Training Performance Horses
Lesson Three
EQUIPMENT:
Knowing how your equipment works to aid in the horse’s training and performance and how it can be disruptive to the horse’s learning process is a prerequisite to the first day of saddle training.
Selection of the bit to be used is based on how bits function and the training results expected.
Saddle style choices are based on the type of work to be done by the horse, but any saddle selected must fit properly if the horse is to be comfortable with a rider.
Bits are actually very simple.
Anything placed in the horse’s mouth for the purpose of communicating with the horse is considered a bit. All bits function on the principle that the horse will avoid pain and seek comfort. So bits are designed to control horses by getting them to react in an acceptable manner by avoiding pain and seeking comfort.
Most bit manufacturers and retailers try to convince horse trainers and horse owners a particular bit will solve training problems and never cause the horse discomfort. Impossible! Bits don’t solve training problems, and the very best they can be is comfortable. Various types of bits and styles can be tried when a horse exhibits discomfort or a dislike for a particular bit. A change of bits may be beneficial, but ultimately it is the trainer’s thoughtfulness, which corrects the problems.
If the horse exhibits discomfort with a variety of bits, the horse should be checked for teeth with rough edges, wolf teeth or abnormalities in the mouth or jaw.
There are only two kinds of bits-a snaffle and a curb.
A snaffle has
the reins attached opposite the mouthpiece, no poll action and no curb action.
A snaffle has the reins attached opposite the mouthpiece and has no curb action and no poll action.
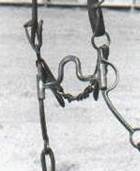
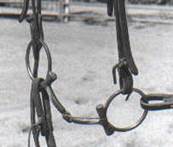
A curb bit exerts pressure on both the chin groove
and the poll because it works as a fulcrum, the shanks and cheek piece turning
around the mouthpiece.
A curb bit has both curb (chin groove) and poll action and has the reins attached below the mouthpiece so the principle of the lever and fulcrum is in effect.
A Pelham is a combination of a curb and snaffle. The Pelham, as most bits, has many variations, but is basically designed to be used with two reins. The upper rein attaches to the bit opposite the mouthpiece and is therefore the snaffle rein. The lower rein attaches below the mouthpiece and is therefore the curb rein. On occasion you will see a Pelham used with a single rein which divides into a "U" shape turned on its side. The upper arm of the "U" attaches to a ring opposite the mouthpiece while the lower arm of the "U" attaches to the shank below the mouthpiece. A single rein attached to a Pelham basically limits the effectiveness of the bit.
Gag bits are in a class by themselves. On the basic gag, the mouthpiece of the bit attaches to a large cheek ring, as does the snaffle. However, with the gag bit, the rein enters the bottom of the cheek ring, passes through the ring and out the top, then lies over the horse’s head at the poll and travels does through the cheek ring on the opposite side. The gag is neither a snaffle nor a curb. Its primary function is to elevate a horse’s head.
Finally, there is the double bridle, which is two separate bits on a single headstall. Just below the brow band, the headstall divides into two cheek pieces. On the double bridle, there is the snaffle, always small and called the Bridoon, and there is the curb. Each bit is independent and has its own set of reins. The curb attaches to what would be the normal cheek piece of the headstall, or the forward cheek piece. The snaffle attaches to the shorter, rearward cheek piece of the headstall.
All bits have many styles, some decorative and some functional.
The mouthpiece in a bit does not define the bit. (You constantly hear that a snaffle is a bit with a jointed mouthpiece. Not true. A snaffle can have any type of mouthpiece you desire). The mouthpiece within the bit, hopefully, functions in a specific manner, and gives the bit a descriptive name, as frequently does the style of the cheek or shank. A snaffle may be a ring snaffle--a description of the cheek piece, or a "D" snaffle with a jointed mouthpiece--a description of both the mouthpiece and the cheek piece. A snaffle with keys attached to the mouthpiece is called a key snaffle.
Curb bits have mullen mouthpieces, or rollers or crickets or ports or, in the case of a spade bit, a spoon and second wire mouthpiece which attaches to the spoon. No matter what the mouthpiece, the curb is always a curb bit.
Pelhams and gags also have numerous variations.
Your first choice in a bit should be based on the communication (training) level of the horse, and nothing else.
Young horses just beginning their training are most often started on a smooth mouth, large D, Eggbutt or Ring snaffle.
As the horse becomes more sophisticated in his ability to interpret the bit cues, he may be put into a Pelham, or a western curb. The first curb bit should have a mild, large mouthpiece. Depending on the horse’s temperament, a roller, cricket or port may be selected.
When the horse reaches the higher levels of training, he will usually carry a double bridle, or a full western curb. In a double bridle or full western curb, the rider may give the subtlest of cues and because of the bit’s weight and action, expect the horse to understand and respond.
During the training process (learning to communicate), you may wish to experiment with many different bits to see which is most comfortable for the horse while getting an understandable message across.
No matter what bit is being used, it must be properly adjusted in the horse’s mouth.
Bits for the average horse are normally 5.5 inches in width. It is incumbent on the trainer to be sure the mouthpiece is wide enough to keep the cheek pieces from squeezing the sides of the horse’s mouth.
The trainer must be sure rings of a snaffle, or the hinging of the shanks to the mouthpiece of a curb, do not pinch the skin of the horse’s lips.
There is little need for a chinstrap on a snaffle, although most horsemen apply one as an aid in keeping the bit from being pulled awkwardly in the horse’s mouth. The curb strap on a curb bit should be loose enough to allow the trainer to put two fingers between the horse’s lower jaw and the strap.
If the bridle has a throatlatch, it should be loose enough to fall forward to the greatest depth of the horse’s jaw. Make sure the throatlatch is not so tight it cuts into the horse’s throat when he flexes at the poll.
When the bit is correctly positioned, the mouthpiece will fit perfectly into the corners of the horse’s mouth, thereby resting on the bars of the mouth, the skin-covered lower jawbone where no teeth appear.
The bit can be lowered in the mouth and still be effective, but should never be placed so low it touches the incisor teeth. By allowing the young horse to carry the bit low, many trainers believe the horse more quickly learns to hold the bit, thus more quickly learning to recognize bit movement.
I do not like to see wrinkles in the corners of the horse’s mouth. Many advise placing the bit high enough to make the horse "smile", but I believe it has to be uncomfortable for the horse to have the skin wrinkled unnaturally, especially if the horse must carry the bit for a period of time. Never have the bit so high in the mouth it touches or bumps the molars.
The snaffle is a direct rein bit, so the rider uses two hands on the reins. Direct pressure is applied to either the left or right rein, which in turn applies direct pressure to the bit on the left or right side. If the rider is asking the horse to turn to the left, for example, the rider gives a gentle tug back and upward at the same time on the left rein. This action pulls the left side of the bit into the corner of the horse’s mouth on the left side. The bit will also apply a slight pressure downward against the bar of the mouth on the left side. The rider’s right hand holds the right rein in position, not allowing the bit to slide sideways in the horse’s mouth. If done correctly, the right side of the bit will stay in position and not be pulled into the right side of the horse’s mouth. Immediately after giving the tug on the left rein, the rider must discontinue the pressure.
With the snaffle, the rein cue is always a tug and an immediate release. If the rider maintains the bit pressure, the horse will push back against the bit, and the effectiveness of the communication is lost. If the horse responds correctly, then no further cue is necessary. If the horse does not respond immediately, then the rider can give a second, third or even a fourth tug on the rein to bring the horse’s nose to the left.
As with all bits, the key to the effectiveness of the snaffle bit is in driving the horse forward into the bit. When the horse is moving forward, he will round his back upward. This, in turn, allows him to flex at the poll and move his head into a more vertical position. If the horse remains behind the bit and rounds his body, he will be balanced and ready to perform.
When using the curb, the rider must be much more careful regarding the amount of rein pressure applied, as movement of the bit immediately tightens the curb strap, putting pressure on the horse’s chin groove and the horse’s poll. With the curb bit, when the reins are moved backward, the cheek piece of the bit above the mouthpiece is moved forward, pulling the headstall down on the horse’s poll. At the same time, the shank, the portion of the bit below the mouthpiece, is pulled backward, which tightens the chinstrap against the horse’s lower jaw.
English riders use both hands on the reins of the curb bit, but western riders use only one hand, left or right. Either is acceptable.
When riding with both hands, using a curb or snaffle, the rider should hold the reins between the thumb and index fingers with the other fingers lightly touching the reins and ready to close around the rein if a shorter rein is needed. The rein runs across the little finger, through the hand from the bottom to the top, then between the index finger and thumb. The hands should be held so the thumbnails are almost straight up, in a natural posture.
Most often, western riders today use split reins. It is permissible to put the index fingers between the reins. To grasp the reins, the rider turns his palm up, places the reins across the hand with the index finger between the reins, then closes the fingers and turns the thumb almost straight up. Rules for most western competition call for the thumb to be 30 to 45 degrees off the vertical.
The length of a bit’s cheek piece above the mouthpiece and the length of the shank to the point of attachment below the mouthpiece determine the severity of the bit and the amount of pressure applied to the chin groove and poll. The greater the length of the cheek piece or the shank, the more pressure applied by the fulcrum/lever action. Most competitive events have established rules regarding the length of the shank below and cheek piece above the mouthpiece. It is your responsibility to know the rules of competition.
The mouthpiece of the bit will also have an influence on the severity of the bit. A jointed mouthpiece in a snaffle, because it bends in the middle and therefore can have a squeezing effect, is more sever than a straight bar. A narrow mouthpiece is more severe than a thick mouthpiece or a rubber mouthpiece.
Crickets or rollers on a straight or slightly curved mouthpiece in a curb bit allow the horse to release some energy or excitement by playing with the moveable parts of the bit. When a horse plays with the bit, he will also lift the bit with his tongue, thereby reducing the amount of weight or pressure being applied to the bars of the mouth.
A port is an upward bend in the middle of the bit’s mouthpiece. Sometimes called a tongue relief, the port allows the horse to move his tongue up without moving the bit off the bars of the mouth. A lot of horse’s seem to like a port.
Bits are made of many different materials, but horses have preferences. Copper as part of the mouthpiece causes the horse to salivate and thereby keep the mouth moist and soft. Horses like copper mouthpiece bits. Horses also like iron bits, but not too many are produced today. Most bits are now made of stainless steel.
Aluminum is used for bits and many trainers like the lightness of the material, but most horses don’t appear to like aluminum.
Silver is used on the shanks of many
western bits. Intricate shank and mouthpiece designs, as well as the names of
bit makers, account for the names of many western-style bits. A
Many bits with short shanks, loose attachments at the mouthpiece and narrow jointed mouthpieces are touted as being mild. In fact, they can be quite severe. Do not be misled by the name of a bit, or the sales pitch given by a tack store clerk.
Bits are helpful in communicating with the horse, but in the final analysis, the horse’s behavior and degree of understanding of cues is the result of the trainer’s care and patience in teaching. Bits do not make horses. Do not expect to find answers to training problems in a new bit.
The most important part of any bit is the person holding the reins. The bit does not make the choice to be abusive or mild. The rider decides.
It is your responsibility to know the bit you are using.
All bits create a degree of pain for the horse.
SADDLES
Knowing the saddle--it’s parts and it’s fit-- is also the responsibility of the trainer. There is no excuse for a saddle causing saddle sores. Once in a while a saddle will be uncomfortable for a horse, but the observant trainer will quickly recognize an equipment change is in order.
Saddle Fitting Reference Links:
http://www.mcmastersaddlesandtack.com/saddlefitting.htm
http://pelham-saddlery.com/fitting.html
Before the horse is tacked, he should be groomed. His back and girth should be completely free of dust and dirt before the saddle pad and saddle are placed.
Western or English, the saddle should be placed on the horse’s back so it is necessary to slide it rearward to be in the correct position. Moving the saddle pad and saddle rearward smoothes the hair on the horse’s back. When in position, the girth (English) or cinch (western) will be about 4 inches behind the horse’s elbow.
When first adjusted, the girth or cinch should be relatively loose. Never tighten the saddle completely without giving the horse a chance to move about. The result of careless girthing is a "cinchy" horse very likely to buck off the careless handler. Adjust the cinch slowly.
A well-adjusted girth or cinch will be snug enough to hold the saddle in place when the rider steps up, but not so tight as to be uncomfortable for the horse. Move the horse a step or two after the girth has been tightened, then mount. After a few minutes of riding, check the girth, as it may need some adjustment.
To determine if the saddle fits the horse correctly, ride the horse long enough to be sure he is warm from exertion. Remove the saddle and pad and examine the dampness on the horse’s back. If the saddle fits correctly, there will be no dry spots. The dampness on the back will be even, and will cover the entire area covered by the saddle.
Horses with extremely high withers, or mutton-withered horses, often require custom-made saddles. In either case, the pommel, or gullet of the saddle should not rest on the withers. Often the use of specialized pads or double padding can prevent excessive pressure on the withers. If pads are being used to protect the withers, be sure to check frequently the positioning of pads and saddle.
Stirrup length on English or western saddles will be approximately correct if the rider places his fingers on the pommel of the saddle, then adjusts the stirrup length so the bottom of the stirrup just reaches the rider’s armpit. A stirrup length arrived at by this method will allow the rider to give strong leg cues while maintaining a comfortable leg position. Minor adjustments can be made to comply with the style in vogue.
Styles and the hottest colors or patterns in saddles come and go, but one rule should not be forgotten: form should follow function.
If you intend to ride jumpers, a saddle designed to facilitate jumping is your best bet. You could ride an all-purpose saddle, but you would be penalizing yourself and your horse. If you want to be a western equitation rider, use an equitation seat saddle. Roping saddles are quite different from western pleasure saddles and dressage saddles have little resemblance to exercise saddles for racehorses.
Your equipment has been designed, tested and redesigned over hundreds of years to provide both horse and rider with the opportunity to reach perfection in the event chosen. Experiment with equipment until you know what benefits your horse and how you can best communicate with your partner.
Then keep bits as simple as possible and use saddles that fit without discomfort.
Assignment:
1. Send me a picture of the bit you will
be using on your horse. Explain why you chose it.
2. Send me a picture of the saddle and pad
you will be using on your horse. cathyhansonqh@gmail.com