TRAIN FOR TRAIL CLASS By Cathy Hanson Lesson Nine Bridges, Serpentines, water, plants and barriers |
ASSIGNMENT It may take a month or more to complete the assignment. Take your time and don’t rush your horse. Email me if you are having problems. You can send a video to demonstrate the problem. When you think you've mastered bridges, send me a video of you working a bridge with plants or barriers on each side of the bridge and just before the bridge. Send a video of you working a serpentine and a water box. Please load your videos to YouTube. Send the links to cathyhansonqh@gmail.com |
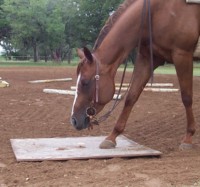
BRIDGES Bridges will be frequently encountered in trail classes. Attempting to introduce the bridge for the first time at a horse show is usually a big mistake. Have a bridge at home so your horse is familiar and comfortable with crossing any bridge, anywhere. Be sure your practice bridge is stable and safe. You do not want your horse to be injured or frightened while learning to step onto a bridge. Your horse must trust you, and a shaky or dangerous bridge violates that trust. The best way to teach your horse to go over a bridge and to be confident with the obstacle is to be patient and go at your horse's pace. A smart trainer knows when to ask the horse to step on the bridge. If a horse is not ready, a smart trainer does not ask. It is possible to force and intimidate a horse, making them step on the bridge, but the unhappy experience will come back to haunt you. If the horse trusts the rider, then in the future when encountering a difficult bridge obstacle the horse will try for the rider. Begin by just riding the horse in the arena with a bridge in the area. Stop and let the horse sniff the bridge. The key is not having the intention of crossing the bridge in the first approach. Let the horse look at the bridge, smell it and even taste it if necessary. As the trainer you should have already made the decision to walk away without asking the horse to step on the bridge. Many horses are very curious and will, bite or even paw the bridge. Do not get excited thinking this curiosity means the horse is ready to cross. Stick with your plan to walk away and let the horse become very familiar with the bridge before asking the horse to step onto the bridge; not pushing too fast, and being sure the horse is ready will assure your success. When approaching the bridge, make sure your horse is moving forward and straight. If the horse stops, that is okay. Stepping backwards is not okay. If the horse steps backward, encourage the horse to move forward. As the rider, your mindset should be in correcting the horse in his response or lack of response in moving forward when requested by your leg pressure. You are not correcting him for backing away from the bridge, but teaching him to move forward in response to your leg pressure. You horse must always respond to a request for forward movement. |
When you're ready, your leg pressure will tell the
horse to step forward and onto the bridge. Do not allow the horse to exit
left or right. Allowing a horse to discover an exit strategy is not helpful.
Use your legs to keep the horse straight. Feeling your legs against his sides
will make the horse feel more secure. If your horse is nervous, simply walk the horse toward the bridge and stop. Do not back up or go sideways. If you think the horse is not ready to step on the bridge, then turn the horse and walk away. If the horse feels ready to advance, walk forward. Your horse will be ready to step on the bridge when he is comfortable approaching it and looks at it with interest or curiosity - not fear. Encourage the horse forward with slack in the reins, so the horse can get a good look. Don't let the horse step to the side. After crossing the bridge, praise the horse, let him stand and rest. Now cross the bridge again, while the horse is confident. A few things to try for a stubborn horse: Stepping over plywood on the ground. The horse doesn't have to step up, so he is more confident. |
Crossing the bridge from the side is another way to introduce a nervous horse to stepping up and over. The horse will probably only have to step one foot on the bridge when crossing over the short or narrow side. Having the length of the bridge to each side of the horse, helps prevent the horse from trying to exit left or right. If the horse has a stall that will allow it, such as an in-and-out type stall, place the bridge in the stall, so the horse can deal with it on his own. Putting the bridge in a small turn out area is a similar approach. Another trick is to place a bit of grain or carrots on the bridge and train the horse through his stomach. When teaching a fearful horse, be satisfied with small steps of success. Placing one foot on the bridge and pawing, may be all you get. The important thing is that you do not ask for more than the horse is willing to give. Once the rider has decided to step up and cross over, if it doesn't happen, you've lost more than just the battle - you have lost the horse and his respect for you. It will be a tougher war, and the bridge will remain a negative experience. Don't go if you don't think your horse is willing and comfortable. |
The correct way to cross the bridge, once
the horse is familiar and comfortable, is to treat it as a walkover. Approach the bridge. Stop and lower the neck and head and step up in two-foot (distance) increments. Walk over, step down, walk four steps and stop. Always stop in practice, so the horse does not rush over or away from the bridge. The two-foot step is important. It is always best for the horse to step onto the bridge with a shorter step and not a lengthened step. A lengthen step has a low foot flight, causing possible ticking by striking the edge of the bridge. The lengthened step will cause trouble if poles are placed on the bridge because the cadence will be off. The horse needs to be able to step up and over poles placed on the bridge. |
Poles are frequently added before and
after the bridge. If the horse develops the habit of a longer step onto the
bridge, he may not get the correct steps when going over poles. An example
is a pole placed four feet in front of the bridge. The horse should
step over the pole and take two steps before stepping onto the bridge. |
There is more difficulty stepping off
the bridge when poles follow the bridge. Horses like to take a longer step
placing the foot farther in front of the body, because it helps with balance.
When negotiating poles after the bridge, many horses will step both front
feet down, before continuing over the poles. It is correct to step one
foot down in a two-foot space, but not two feet. The horse will be penalized
one point for stepping two feet down in a two-foot space. |
When leaving the bridge, help your horse
balance by sitting back and allowing plenty of rein. In tough competition the horse that steps one foot off and continues over the poles correctly will be given plus points. It is important when stepping onto or down from the bridge that the horse stays straight. It is easy for the horse to drift since the reins are loose to allow the horse to easily look down. Keep your legs steady and sit quietly and centered to help prevent the horse from drifting while walking off the bridge. |
Serpentines Most trail courses will have the horse and rider negotiate some sort of serpentine, or an obstacle configured to demonstrate the horse's ability to guide. This type of obstacle will usually require the horse to work at the jog, showing the horse's ability to turn smoothly and in balance while going over poles or in and around objects such as bushes or cones. When guiding, remember to prepare the whole body of the horse for the turn. This is done with the rider's legs. By using the leg to turn the horse, the horse will remain balanced and will maintain a good rhythm while working the obstacle. Let's go over simple turning once more. For a left turn - the hand (one hand when using a curb bit) will move slightly to the left (do not extend the arm forward) to direct the horse. This will cause the right rein to rest lightly against the neck. The left rein will come slightly away from the neck. The horse should always want to stay "between" the reins. The rider's left leg makes light cue contact slightly forward, so that the horse bends his body around the leg. The rider's right leg pushes the ribs through the "open door" created by the hand moving the left rein away from the horse's neck. The right turn is requested by using the same cues, just in the opposite direction. When riding a tight obstacle with several turns, the rider's legs will really be working. The rider will change leg position while in a neutral place between the obstacles. For example: cones set up in a straight line. The rider could use a large piece of ground and make large loops while weaving through the cones. The legs will change and the hand will request the new direction while on a straight line. The horse needs a step to rebalance and prepare for the next turn. The well-schooled horse can do this very efficiently. However, no matter how good the horse, the horse will need at least a step to rebalance the body before bending into the new direction. |
Obstacles that demonstrate the ability
to guide are not always weaving in and out of cones in a straight line.
Markers or poles can be used in many different configurations to test the horse. When poles are used and the horse must turn and cross over in the same obstacle, it is best to do as much turning as possible on the dirt and not while going over the pole. This means use your arena dirt to demonstrate your horse's turning ability and then cross over the pole in as perpendicular position as possible. This gives your horse the best chance at being clean over the pole. When the course becomes tighter, and the rider is attempting to turn while crossing over a pole, the chances become much greater that the horse will hit a pole. Remember to allow all four legs to get over the pole before turning. |
By teaching the horse to turn with leg cues
and very little hand movement, you help the horse be more athletic, especially
when the obstacle becomes tighter and more difficult. If the reins are moved
too much, there will be contact with the mouth and the bit pressure will slow
the horse's forward motion. When forward motion is slowed, there is a
loss of cadence and shortening of the footsteps resulting in more frequent hitting
of poles. If the hand is used too much in directing, the horse becomes unbalanced. As the rein becomes shorter, the horse must shorten his neck by arcing it or worse by elevating the head. In either case the horse is not allowed to see and "search" for the poles. If a rein is dragged across the neck, it will cause the horse's head to tip in the opposite direction of travel and cause the horse to lean or fall in to the turn. When horses are restricted by too much hand and rein movement, they cannot use their necks for balance. The legs aid in keeping the horse's shoulders squared up. This means that while turning the horse will not be leaning into the turn. Leaning causes imbalance, loss of control and results in poor preparation for the next pole or obstacle. In very difficult courses, horses may have to cross over a pole almost sideways or parallel. This can be accomplished by a handy and experienced trail horse, but not by horses which do not guide easily. Good cadence and responsiveness to your leg aids are required, and the horse must be free of restricted contact in order to flow through this type obstacle. |
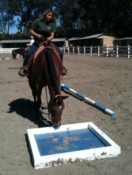
Water Boxes First make sure your water box is safe. The bottom must be solid. The water box should be well sealed, so that it does not leak. Having a larger box is helpful to learning because the horse doesn't "feel" so restricted. A four-by-four box is adequate. A four-by-six box is better! Asking a horse to step into a small space is especially difficult for the young horse just learning to trust. If your horse does not like water, the job gets harder. For horses which don't like water, teach them to trust by first negotiating wet, muddy ground. Later you can work on the water box, Teaching a horse to go through a water box is very similar to teaching a horse to go over a bridge. Horses do not have good depth perception, and they are not able to see the bottom of the water. Trust must be developed. Develop the trust by going slow and showing the horse that he won't get hurt in the water box. Do not let a "battle" develop. Trying to force the horse into the water only confirms the horse's fear that this not something he wants to do. Some horses just do not like to step in water and such horses require a great deal of time and patience before they master the water box. Use the same training procedures as with the bridge. Place a dry water box in the arena and simply ride around it. When time for a rest, stop near the box and do not have the intention of going through; just let the horse inspect it. Many curious horses or those experienced at going over a bridge will often just step right in and walk through the dry box. When your horse is relaxed with the box, add water. When adding water, it is fine to start with a low level and then work your way to deeper water as the horse progresses. A food bribe often works well with water boxes. Add some carrots or apples to the water, and let your horse bob for treats while walking through the water box. Again, let the horse inspect the water box during a training rest period. I have had many horses that like to drink the water and play in it-that's just fine. If your horse is apprehensive, let him look, stand, smell, paw if necessary. Then just walk him away from the box. The same rule about stopping forward motion applies to water boxes as it does to the bridge. Do not allow your horse to begin stepping backward or sideways. The horse is not required to go through the box at this point in his training, but he may not back or exit to the side. Avoid making the decision to go through the box until you are sure the horse is comfortable. Taking more time now will save you days of training later. |
Plants and Barriers Plants, walls and decorative items make a trail course look interesting and pretty and they serve a secret purpose as well. Barriers will direct or push your horse around the course and make it challenging to cross over the poles in the correct spot. When a horse is approaching a barrier, the horse will often lose cadence. The horse's focus is on the barrier and no longer with the rider. When this happens the horse is more likely to hit poles and not get the needed correct steps. When working a circle obstacle with barriers outside the circle, horses often lose focus and fall in or lean away from the barrier. If the barrier causes the horse to lean, the horse will no longer be on the intended path, and that results in penalty points. When training at home, practice working with barriers. Working with barriers teaches the horse to "trust" the rider. When the horse trusts the rider not to run into the barriers, the horse will be able to stay in the moment, following the rider's requests. The best way a rider can teach the horse to focus and stay in the moment, is to set an example by keeping her eyes on the intended path. Frequently the rider actually backs off an obstacle by failing to continue leading the horse with continuous cues. Be aware of your legs while riding up to a barrier. Keep riding! When riding to a barrier, use your legs. One trick when riding a circle in a large box or on an arc with barriers, is to keep your eyes looking ahead and slightly to the outside of the path you want your horse to follow. When on an arc, it is common to look too much to the inside. Because you are turning it seems the barriers add a bit more "push" to the turn. Before you realize it, you are off the path. Don't look at the barrier. Your focus should be on the desired path. Do not let your horse look at the barrier. The horse needs to be concentrating on the path upon which you are directing him; he needs to be looking at the ground for obstacles he may have to cross. Part of gaining your horse's trust is deciding how you think about things. I don't ask a horse to approach anything I think might frighten him. I don't want to teach a horse to be afraid of things. Yes, the horse needs to be comfortable and used to his surroundings, but I teach this by working in the environment and building the horse's trust. Be a thinking rider and a thinking leader for your horse. Keep your horse safe. As the horse learns to trust you, fewer and fewer things will scare him….soon he trusts that you will not get him into trouble, and virtually nothing scares him. |
Plants are often used as barriers and
a way to distract the horse. If your horse nibbles on a plant, he will be
penalized. You must absolutely practice standing next to plants and teach your horse that snacking is not acceptable. Stand your horse next to a plant and tell him "whoa" If your horse attempts to reach for the plant tell him with your voice "no" or "here" use your legs to squeeze and make the horse square back into frame. Keep your hand in the center. Teaching your horse in this way can be used discreetly when showing. First, a verbal command may be enough to remind your horse to pay attention and no snacking. The legs can be used to get your horse's attention without being seen by the judge. If the hand is used to pull the head away from the plant it will be easily seen by the judge. |
Having the horse in a situation that is
tempting and practicing the correction is important. A common place to
have plants on the trail course is on the gate obstacle. A smart rider keeps
the horse in frame and focusing on working the gate. Avoid riding the
horse next to the gate and stopping with the nose buried in a plant. |
Another popular obstacle to place plants
is the back through. |
Keep the horse's head straight. It is up to you to be aware of where your horse is looking. Make sure he doesn't have a snack in mind. Watch the ears and your horse's expression to tell you what he is thinking. If he is thinking about the plant, it's time to intervene and get his focus back on the job. Never allow snacking while riding. While riding on an outside trail or just around for fun, don't allow your horse to eat. He will not know the difference between showing and casual riding. Mastering these obstacles takes patience and practice, but you can do it…so let's get started. |
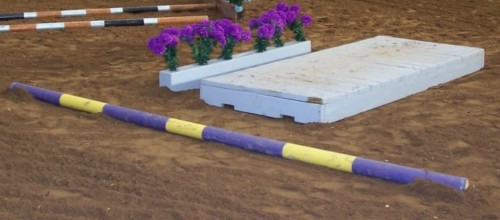
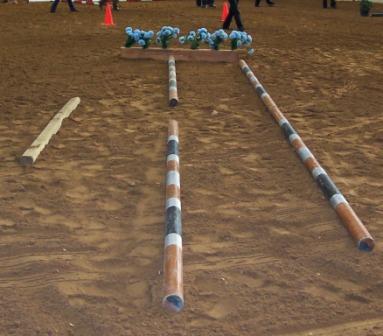
This pole is placed two feet from bridge - one step between obstacles |
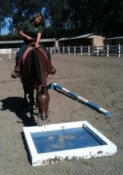
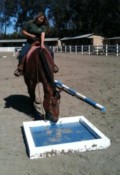
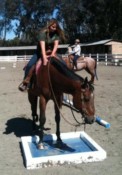
Introducing a young horse to the dry water box...slowly with no fuss. |
Plants Creating a Barrier in a Back-Through |