TRAIN FOR TRAIL CLASS By Cathy Hanson Lesson Four Walk Over, Head Down and Pick-up Sticks By this time you should have acquired or built some trail obstacles. Your horse is maintaining his cadence and you are learning about timing, so let’s start riding over the poles! Have a few obstacles set up in the arena. A 12-foot box is a great starter obstacle. Use four 12-foot poles and set them in a square. (When the horse becomes more advanced, we’ll change the box to a six-foot box.) 12 ft. box Next, set three poles six feet apart in a line. Have a few single poles set out at random. The bridge can be placed anywhere in the arena, as can the water box. When riding over poles, avoid using protective leg equipment on your horse. The wraps or boots will keep your horse from feeling the sting of a pole when he hits it; you don’t want to avoid the sting, you want your horse to know that he doesn’t want to hit a pole. Do a good long “warm up ride” before starting to work obstacles. You want your horse to focus on his lessons and maintain cadence, not be gawking all around the ring full of pep and prune juice. While riding around seemingly without direction, approach a pole and ride over it. Remember the earlier lessons? Your horse should be collected, riding the correct measured step. Remember the correct body position? Even in these first riding sessions, you will be creating a memory for your horse, so ride correctly – the way that allows your horse to be balanced and the way you want to be when showing. This means – look up when crossing poles, stay seated in the center of your horse, make your approach to the pole straight, sit quietly when crossing over the pole, just the same way you will ride when showing your horse. Ride your horse around without any “planned” path, and cross over poles in different sequences; mix it up for your horse. It should start to feel as if you are just riding around and happen to cross over poles that appear in your horse’s path. Practice transitions. Transitions should be smooth and balanced. Trot over a pole, and then pick up the lope. Lope a circle, and then lope over a pole, transition down to a trot and trot over several poles. When your horse makes an error over a pole, such as breaking gait, reaching or chipping, do not let yourself be affected by it, simply keep riding around and ride the pole again. |
Guard against strongly reprimanding the horse
for making a poor crossing. Disciplining the horse for a poor crossing
only serves to make the horse worry about crossing the next pole.
You never want your horse to fear working an obstacle. |
It is the rider’s responsibility to approach
the pole correctly, giving the horse the best opportunity to cross easily.
If the horse increases speed or breaks gait over the pole, put the horse
back together and continue on – quietly. These early training days are
confidence building lessons for the horse. The horse will learn to trust
the rider and feel secure in performing as the rider asks. |
When riding a series
of poles, be sure they are measured correctly. You will have to step off
your horse and correct settings whenever a pole distance is incorrect. The
rule of getting off and correcting distances is your incentive to ride those
poles correctly! |
Please note: when showing, you will not stop after the walk over; this would be a break of gait and penalized. However, by this time your horse has learned to be relaxed and confident in the walkover, so when being shown you can continue to the next obstacle without making the horse anxious. At home and in warm up at the show, still stop your horse. It will be a good reminder there is no need to hurry. |
• When practicing walk overs always remember
to pretend there are two poles before the actual pole. • Remember to ride four to six steps after the last pole; stop, praise and stand quietly. |
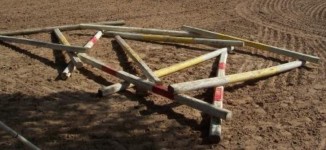
Pick-up sticks - Teach your horse the steps needed for walk overs. Once he has learned you
can allow him to “pick” his way through an obstacle. Pick-up sticks is
a group of poles tossed randomly in an area. Allow the poles to rest on top
of other poles and adjacent to poles. No measuring is involved. |
Pick-Up Sticks |
Taking a Look |
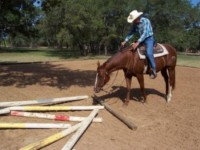
Walk up to the poles and let
your horse pick his way through. Try to find some kind of path and guide
the horse. Let him have his head down and figure out how to get through
the poles on his own. Pick-up sticks can be used with a horse that is not being careful; after bumping his legs around in the pile of poles, he’ll think measured poles are very easy. A horse worked on pick-up sticks usually learns quickly to pay attention! |
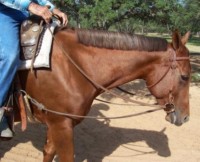
Watch the filly attempt the Pick-up Sticks for the first time. |
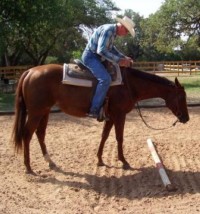
Pick-up sticks are only used for walk over training. Common Errors The horse is not paying attention. The horse must look down and watch where he is going. The horse needs to be looking down and focusing on the poles. He needs to be careful placing his feet. As mentioned, begin to ride for a walk over four to six feet prior to the first pole. Lower the horse’s head, so he is looking at the pole. To lower the head, capture the head by shortening the reins to establish bit contact, and then squeeze with both legs. As you squeeze the horse into the shortened frame, his back will lift and he’ll start to lower the neck. As soon as he starts to lower his neck, release the rein and allow the head to lower. Do not ask the horse to walk forward until he has lowered his head. Watch the filly lower her head on cue. |
The horse should not be lowering
his head and be stepping forward at the same time. The horse is standing,
the head lowers, and then at the rider’s cue, the horse steps forward.
The horse should continue to keep the head down and watch where he is going while
in the obstacle. The rider can roll slightly forward on thigh to encourage the horse to step forward. This weight shift can be used to shift the horse forward in a more subtle way. The rider will stay in this position through the entire obstacle. |
Body Position |
Draw reins can be helpful for a
horse that will not keep the head down. Approach the obstacle the same way.
Use the legs to lower the head. The draw reins will place the head
lower for you and help keep the horse’s head down. Use with snaffle bit
only. |
Draw Reins |
Use positive reinforcement and lots
of repetition to instill the habit of looking down at walk overs. As
the rider, this is one time you get to look down. Look directly at the spot
where you want your horse to place his feet. Looking down helps shorten
the horse’s stride, and keeps the horse in the obstacle. When looking too
far ahead, the horse will lengthen the stride and be looking up ahead instead
of down at the poles. Too Fast – The horse rushes through the obstacles. This often causes the horse to hit the poles and will incur penalties for not being relaxed. Pick-up sticks can help with this problem, because you can make this obstacle never ending. Just keep riding around and through, around and through. An exercise to help slow a horse who wants to rush walkovers is to stop the horse before the first pole, back up, walk forward, stop, backup and then walk over. Do this several times until the horse starts to walk slowly to the first pole. Teach your horse to stop on voice command, and then ask for the stop in the middle of poles. The horse must listen to the rider and wait for the rider to ask the horse to continue stepping. Use your voice to stop the horse, instead of the reins—this way you do not to interrupt the horse’s focus on the pole. (The rider may be forced to use the reins, if the horse is not listening.) Be prepared for the horse to hit poles or step on them. Do not discipline the horse for this. The discipline is only for not stopping. The horse will soon learn to listen to the rider and have a smooth and pain-free walk-over executed quietly and correctly. Remember to always stop four steps after the walk-over. This is the best training technique to prevent the horse from rushing over poles. Hits the poles – Try to determine why. Is he hitting the poles for a reason previously listed, or is he simply lazy? Walking over elevated poles will help. Ride the horse over raised poles. This makes the horse a bit uncomfortable, so he’ll usually try harder. If the horse is not paying attention, the pick-up sticks can help. Riding over the poles on a path not measured almost always causes the horse to bump a pole; bumping a pole will get the horse’s attention. When riding this exercise, be sure to ride slowly and correctly. If you hurry, the horse will hurry. Errors on the part of the horse are only opportunities to teach your horse. Slow down; be correct in your hand and leg aids, and help your horse to understand the obstacle. If the horse is upset, he will not learn the lesson. Stops in the middle of the poles – The horse will stop when he does not have forward impulsion. Maintain your pace. If you feel the horse slowing, use a “cluck” sound and look ahead to create some forward motion. Make sure you are not lifting your hand while working the obstacle. The horse may stop because of a visual barrier. Providing visual barriers, such as walls and plants in practice and gaining your horse’s trust will help prevent a loss of motion when showing. The horse does not lower his head - First teach the horse to lower the head in a standing position. To teach to horse to lower his head, slowly take the slack out of the reins until you feel the horse’s mouth. Apply your boot heel or the spur. Use enough pressure to encourage the horse to lift his back. As soon as the horse starts to lower his head, release your rein. Relax your leg. Avoid pushing your legs away from the horse. Support the horse with your legs and be ready to squeeze again if the head lifts. Do not go forward. Praise and repeat. Refer to video of filly lowering head. |
Even a slight lowering of
the head is fine at this point in his learning. Giving your horse something visual to look at helps, because he will be interested and want to lower the head to get a better look. Practice walking up to different poles or obstacles and lowering the head. Praise and repeat. When ready to walk over poles, lower the head, stay stopped. Ask the horse to walk forward; if the head lifts, lower it again with light contact and leg. It is important the horse does not learn to lower and walk at the same time. This error occurs because the horse is incorrectly responding to the rider’s leg. The sequence will be lower and look, and then walk when directed by the rider. The rider should continue looking down through the entire walk over obstacle. Walk four extra steps with the head low, sit back in saddle and stop. Praise your horse for a job well done. For the extra tough horse that just won’t look down, throw some horse treats out and coax that head down through his stomach! Be sure to repeat and praise so he learns the cue to look down. (You can even space treats throughout the obstacle to keep him looking down.) ASSIGNMENT It may take several weeks or more to complete the assignment. Take your time and don’t rush your horse. Email me if you are having problems. You can send a video before submitting your assignment videos to demonstrate the problem. 1. Make a video of you cueing your horse to lower the head. 2. Make a video of you and your horse walking a six-foot box and three poles set six feet apart. 3. Make a video of you and your horse working the pick-up sticks. Be sure to follow the steps in the lesson…lower head, cue to walk forward, allow the horse to work the obstacle. Make sure to pay attention to your body position. Please load your videos to YouTube . Send the links to cathyhansonqh@gmail.com |
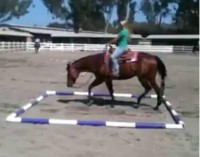
Walk Overs – Use a six-foot box and the three poles set six feet apart to
start your walk overs. The horse will take three steps across the box or
between the three poles. Be sure to keep your horse straight. Maintain
forward motion. The number of steps will tell you if your horse’s cadence
is correct. Two steps means the steps are too big. Four steps
means the steps are too small. Three steps means the steps are just right! Watch this three-year old filly negotiate the six-foot box and three poles set six
feet apart. |
When you are ready to walk over poles
spaced at two feet, use poles at least six feet in length. For some horses
the short length of the pole will make the horse look for a way around the poles.
Short poles make it easier for the horse to escape to the side and not
cross over the pole, so it is your responsibility to correctly guide the horse
to the pole. Poles spaced two feet apart, when ridden correctly, require the horse to place one foot in each space. When riding walk overs, pretend you are crossing over two poles before the first actual pole and two to three poles after the last walk over pole. This will do three things: create the correct two-foot step needed for the walkover; help the horse focus on the poles; keep you from interrupting the step cadence after the last pole. It is a common mistake for a rider to quit riding the walk over as soon as her own body has crossed the last pole—don’t do that; the horse still has two legs to get over. I see riders turning horses or starting to cue for the jog or lope even before the horse has completed the walkover. Make it your own habit, and the horse’s, to continue riding a few invisible walkovers after the last pole. ALWAYS ride four to six steps after the last pole and stop. Praise the horse if he’s earned the praise, and then stand quietly for a few moments. This easy rule will instill the habit of not rushing over walkovers. Horses when confronted with a complex or tough looking walk over may want to rush over the obstacle. Rushing generally results in errors, and the horse will not look relaxed as he negotiates the obstacle. When your horse develops the habit of standing after the last walk over, he will not feel the need to rush – because he knows he is going to stop. Watch the filly walk over three poles set two feet apart. |