TRAIN FOR TRAIL CLASS
By Cathy Hanson
Lesson Three
Cadence
and Timing
▪
Cadence is “measured movement”, and it requires balance.
▪
Timing requires cadence and practice.
CADENCE
Cadence
is created only when the horse is balanced in movement. The horse’s
hindquarters must be engaged and the horse’s back must be lifted with the
shoulders square. The horse must be able to accept and hold the bit. The horse
must have the ability to become collected (maintain the optimum balance in
movement) so he may maintain cadence for a period of time.
A
horse can be collected in different manners.
The collection needed by a reining horse is very different than that of
a trail horse. The trail horse needs to be able to collect its body and create
the cadence needed to work a walk obstacle at two feet, the trot obstacle at
three feet and the lope obstacle at six feet—all measured movements.
The period of time a green horse must
maintain cadence may only be the time it takes on the approach to and the
crossing of an obstacle. As the horse
advances in his training, he will be able to maintain collection and cadence
for longer and longer periods of time.
You
must learn the feel of collection before you can feel cadence. When the horse is properly collected, you
will feel the hindquarters engaged or driving under you. The horse’s back will feel round and lifted
under the rider’s seat. The horse’s shoulders will be square in front of the
rider. The rider should not feel the
front legs extending and reaching, or have the feeling the front of the horse
is traveling downhill.
Once
you learn to feel “collection”, you can begin to work on cadence.
It
will help you to recognize cadence if you count each front foot step. It is
easiest to learn at the jog or trot.
Count
one for one front foot landing and two for the second
front foot landing. One, two, one, two, one, two.
Click
here to watch a horse trotting in cadence…count along with the steps.
When
loping, count the leading foreleg landing as one. When the leading foreleg
lands on the ground the second time, count that as two.
Click
here to watch a horse loping in cadence…count along with the steps.
When
walking, count one front foot grounding as one and the second front foot
grounding as two.
Counting
makes it easier to feel the cadence of your horse.
Now
that you can feel the cadence, you must be aware of the timing when
counting. Your count should be rhythmic
and stay the same.
Does
your counting speed up? This means your horse
is changing his pace (speed) or his cadence (movement). Does it slow down? If yes, your horse’s cadence or pace is
changing once again. So, just by
riding around and counting you can teach yourself to be aware of your horse’s
cadence and pace. This is important,
because as the rider, it will be your job to create the measured movement
(cadence) needed for any obstacle you will encounter. When
the cadence changes, this means the horse’s body is changing. The horse’s degree of collection has changed. Let it be understood, that as the rider, you
will always be working on maintaining collection (optimum balance).
Counting
will also teach the rider to learn the correct steps to be taken between
poles. Counting helps the rider
recognize the steps needed within an obstacle.
The
rider can either continue with a one/two count or count the correct number
required for each particular obstacle.
For example, to jog across a 12-foot box, the rider would count “one –
two – one – two” or “one, two, three, four.”
Please
note: that while only counting the front
legs, the hind leg placement is just as important. If you learn to create the correct cadence
and allow the horse to do his job over the poles then the hind legs will take
care of themselves. This does not mean
you cannot pay attention. For example,
when crossing walk overs spaced two feet apart, each foot must step one step
only between the poles. If cadence is
lost and forward motion slows, the horse could potentially place two hind feet
between the poles. This is incorrect. If cadence changes with a lengthening of
stride, the horse could skip a slot with a hind foot. This is also incorrect.
Some
of the errors that occur when the cadence is not correct follow:
“Chipping”--- Chipping refers to a quick
short step taken directly at the pole.
The horse adds this quick step to maintain gait and be more comfortable
crossing the pole. Other than the
cadence being off in the approach to the pole, the rider looking down can cause
chipping. Where the rider looks is where
the horse will go. Look up!
Adding or deleting steps--- When the
cadence changes, the stride may be too long, therefore deleting steps across an
obstacle. Or the stride may be too
short, and the horse will add steps in the obstacle. Keep in mind that in competition not all
obstacles will incur penalty points for a different number of steps. For example – a fan walk, trot or lope-over
will be measured from a center line.
However if the rider chooses to ride the obstacle wide or narrow, the
distance will change and so will the number of steps the horse will take.
In
most competition, any obstacles that have a “stride rule” are announced to the
exhibitor. These will be the only
obstacles at which the judge can penalize the exhibitor for the incorrect
number of steps taken or skipped.
Stopping or breaking gait--- When the
cadence is not correct most green trail horses will break gait. Some may even
stop. This is most commonly seen in
loping obstacles, the horse breaks to the trot.
To correct this, continue counting, feel your horse’s cadence and look
up. Praise and rest the horse when the obstacle is worked comfortably. Horses lose confidence if they continue to
approach obstacles and their cadence is consistently incorrect.
TIMING
Timing
refers to the horse’s foot placement just before crossing over the pole. If the horse is too close to the pole, this means
the horse is too deep. If the horse is
too far away from the pole this means the horse has a “long” spot.
Of
course the goal is to have the perfect “spot” to cross over the pole so it is
smooth and easy for the horse.
If
the horse crosses the first pole in a poor spot, then he must adjust himself
for the remainder of poles. An
experienced horse can do this, but one that is just learning will probably lose
his gait and hit poles.
Getting
the correct “timing” can be hard. The
rider must let the horse learn this skill.
Try not to interfere with the horse by making adjustments…the horse
needs to focus on the poles, and your interference breaks his concentration.
If
the rider jumps in at the last second and tries to place the horse, the horse
loses his focus on the pole as he tries to respond to the rider. If this
interference continues the horse will not learn to go over the pole on his own,
and he’ll soon lose confidence.
To create a smooth fluid and clean trail
performance the horse and rider must work together.
When
the horse looks at the pole, he is looking at it from a distance away. He uses “monocular vision” to view the pole
and judge where he needs to place his feet to go over it. Due to the placement of the eyes on the
horse’s head, and the fact that he has both monocular vision and binocular
vision, the horse does not see the pole as he goes over it…. the horse picks
his spot further back and remembers where to put his feet.
Yes,
when learning, the horse will pick the wrong spot many times.
The
rider will correct this in two ways.
First
by creating the correct cadence so the horse has the correct length of
stride. And secondly by leaving the
horse alone and allowing the crossing to be ugly and uncomfortable. An ugly uncomfortable crossing will make the
horse pay more attention next time, and therefore pick a better departure spot.
As
a rider that can see the correct spot for departure, it is okay to decide to
alter the course and not go over the pole if the horse is going to have a poor
spot. The theory here is that getting it correct more times than getting it
wrong is better for the horse.
It
is important the rider is skilled enough to see the correct spot from a
distance. Do not change the course
unless you are sure the horse is going to end up at an incorrect departure
point. It is not a good idea to turn
away from the pole, when the horse has already committed to it – this will
teach the horse that there is an exit door just before the pole.
Please
understand – when I suggest you leave the horse alone I do not mean you stop
riding at the pole. When you do nothing
or stop riding it says to the horse “stop”.
Keep riding the horse to maintain cadence and timing.
Other
common mistakes the rider will make when crossing poles:
It
is a mistake to lean forward as the horse trots or lopes over the pole. This unbalances the horse and tips him on his
forehand. The result will be breaking gait and/or lengthening of stride.
To
help correct this error, look up! In trail,
never look down when trotting or loping over poles. Don’t let your pelvis
rotate forward. Hold the stomach in.
An
exercise used to correct this habit is: hold your arm up and out in front of
you at shoulder level. Position your
hand as if you were pushing on a wall.
The tips of your fingers should be pointed up and be at eye level. Do not allow your elbow to bend.
It
is a mistake to lift your hand as the horse crosses over the pole. Usually a rider makes this mistake without
realizing it. When the rider elevates
her hand, the movement interferes with the horse’s focus. The elevated hand will result in the horse
lifting his head and not watching the ground. He will shorten his stride and
have difficulty in making the distance. He may stop or break gait.
To
help correct this error, make an effort to keep your hand in the small box in
front of the pommel of your saddle.
Shortening your reins may help you feel more secure and that alone my
keep you from lifting your hand.
Many
times standing slightly in the stirrup goes along with the lifting of the
hand. The rider is lifting herself over
the pole trying to help the horse. Be
aware of sitting in the saddle, keeping the heels down, lower than your toes.
Applying
additional leg pressure when crossing a pole can be a mistake. (There will be a
time and situation when the horse will need extra leg support in going over a
pole, but that is a special circumstance.)
The mistake I refer to here is the squeezing of the legs because the
rider lacks confidence. The rider
squeezes because the rider is nervous; the squeeze isn’t to help the horse.
Again,
most riders do not realize they are making this error. This incorrect use of the leg by the rider
will result in an increase in speed and lengthen of stride – therefore changing
the cadence. To help correct – remove your spurs if using them. Count out loud. Be aware of your legs
clamping on the horse at the last second.
Riding
crooked over the pole will cause problems as well. Riding crooked is always rider error. (Sometimes a rider will say the horse went
crooked responding to an element of the course created to distract him. That is still rider error; the rider lost
connection with her horse.)
Riding crooked happens for several
reasons. The rider is not sure of the
course and simply makes a mistake. The
rider leans while crossing over the pole, causing the horse to drift. The rider
does not pay attention to the rein in guiding.
The rider does not support the horse with her legs to maintain straightness
(support is different than squeezing at the last second as described above).
When
courses are designed, walls, barriers, plants etc. will be included as a
possible distraction to the horse. When
a wall is on the outside of a wheel of poles, that barrier will make the horse
want to drift in. The rider must be very
confident of the correct line to follow and direct the horse accordingly.
When
riding crooked, it changes the distance between the poles. That changes timing, and it places the horse
poorly for the next obstacle.
When
riding a course, one obstacle rides to the next. In a well-designed course, riding from one
obstacle to the next should be done easily.
However, when you ride a crooked line, it changes the natural flow of
the path. The rider and horse will have
to work hard to get back on track before the next obstacle.
To
correct crooked riding, sit in the center of your horse. Keep your hand quiet and centered. Know your course. Look up and ahead.
Having
a poor approach to a pole hurts the horse’s timing.
When
riding young or green trail horses give them plenty of room for the approach to
a pole, and be straight. Remember the
horse’s vision? Give the green horse a
chance to lock onto a pole and learn to see his spot.
Surprising
your horse by turning abruptly to a pole will not help him learn his timing.
Crossing
over poles at an angle is more difficult as the spot is harder to see. Cross straight over the pole and stay
straight until all four legs have crossed.
All
of these rider errors can interfere with the horse’s timing.
The
best way to improve is lots of practice.
If
your horse is struggling over several poles – then just ride over one pole.
You
must still create the cadence and have the correct timing. Remember that when riding a series of poles,
if you get the correct spot for the first pole – you will be correct for the
remainder, as long as you do not commit one of the mentioned errors.
The
first pole is the hardest to ride in the correct spot.
When
training over several poles, make sure they are measured correctly.
When
first teaching, do not ride over raised poles.
With
enough practiced, your cadence will
be perfect and so will your timing!
ASSIGNMENT:
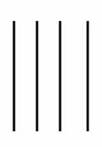
1. What gait would you take when crossing the poles in the
above picture? They are set two feet
apart.
2. How many steps between each pole?
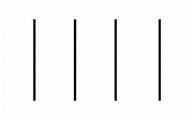
3. What gait would you take when crossing the poles in this picture? They are set three feet apart.
4. How many steps between each pole?
5. Could you use more than one gait to cross these poles? Yes or No? Please explain.
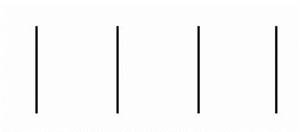
6. List the gaits you could take when going over these poles, which are set six feet apart, and how many steps would be between each pole for each gait.
Please send your report to cathyhansonqh@gmail.com