
TRAIN FOR TRAIL CLASS By Cathy Hanson Lesson Ten Putting It All Together |
ASSIGNMENT Set up a trail course with a minimum of six obstacles. Send me a video of you working the course from beginning to end without stopping. Do not edit the video. Please load your videos to YouTube. Send the links to cathyhansonqh@gmail.com You’ve completed the course. If you and your horse have mastered the skills presented, then you and your horse are going to win many a trail class…so, let me be the first to congratulate you! Best wishes, Cathy Hanson |
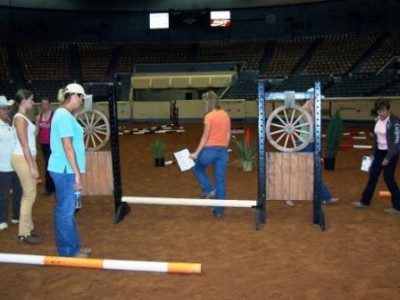
It is time to start to put it all
together. You and your horse have learned how to negotiate any obstacle you may encounter in a trail class. The obstacles you’ve learned to master as “individuals” will now come together in a pattern to test you and your horse’s ability to work together, seemingly without communication. Included in this lesson will be examples of beginning, intermediate and advanced trail courses you can set up at home for practice. Your horse should now be ready to negotiate a complete course. The concentration now will be on moving from one obstacle to the next in a relaxed, focused and balanced manner. (That doesn’t mean you allow the horse to do sloppy work at any obstacles, it just means that you and horse are now learning a new skill…the proper movement through the course.) When setting up your course, be sure all obstacles are measured correctly. Check the distances between obstacles, to assure the steps will be comfortable and balanced for the horse. Have a few barriers in your course, such as plants or walls to test the horse’s concentration and response to you. Once your course is arranged, test yourself by riding the course all the way from beginning to end. You need to experience the pressure of working an obstacle and then placing your horse in a perfect position to work the next obstacle without interruption. Your goal: to ride the correct path, be clean over the obstacles, have a focused, balanced and relaxed horse. Trail courses can begin with any obstacle, so practice different starting points. Start with a back through or a gate, or make the first obstacle a trot serpentine or the loping a series of poles. In the show pen you are going to be challenged at the start, so challenge yourself in the practice pen. If you start with a gate, walkovers or a back through, have your horse positioned to start the obstacle. Wait for the judge to give you the signal to proceed (you can pretend there is a judge). Your horse should stand quietly, waiting for your cue to begin. Now begin your course. (More often than not, at bigger shows, you’ll be asked to start at the obstacle, rather than walking to it. This speeds up the process.) When starting the course with a trotting or loping obstacle, use a cone as the starting point. Allow enough space between the starting cone and the first obstacle to make a smooth transition from the walk to the trot or lope. Once you’ve started the course, keep riding. While schooling your horse, there will be times when errors occur and you will choose to stop and correct your horse. Or you may choose to ride the same obstacle several times so the horse gets comfortable with that obstacle. However, there comes a time when you must learn, as must your horse, how to keep going. When showing there are no “do over’s” You must learn to deal with mistakes and keep going. To ride your practice course from beginning to end is a good way to test yourself and your horse as to how ready you are to complete at a show. Are you able to ride a complete course without stopping and starting over? Combination obstacles – Be creative in designing your obstacles. Here are a few ideas: A walkover and a bridge combination. Walkovers to a box in which you turn 360 degrees and then walk out of the box. A bridge followed by three walkover poles putting you at a gate. Another combo is loping into a chute and then backing out. Or backing an obstacle that leads into a side pass, or working a gate leaving you at a back through. Trotting or loping into chutes with barriers is good to practice. Practice with barriers on the sides or at the end of the chute. A difficult combination is lope over poles in a line followed by a 360 degree wheel. The horse will be in a longer frame when loping the line of poles and then must shorten and arc his body to lope the wheel. Working the opposite way is a good test as well. Lope the wheel first, followed by a straight line. The horse must straighten out after the wheel while maintaining balance and cadence while crossing the straight poles. Pick up trail courses at shows and start your own pattern book. This will give you good ideas and ensure that you don’t keep designing the same course. |
At The Show When at a competition, be sure to get your trail course pattern early. Always read the written instructions as well as follow the diagram. Sometimes there is a conflict between the picture and the words. If you see a conflict, be sure to ask the course designer or ring steward for clarification before the class begins. Make sure the judge is made aware of any instruction conflicts. When it is necessary to provide to or receive information from a judge always work through the ring steward. It is not proper to approach a judge directly. When changes have been made to a course, the announcer should announce it to all competitors. If you are not in the area of the class, always ask upon arrival, if any changes have been made to the course. The class start time and the time of “walking the course”, is when changes or specific “steps” are required will be announced. It is your responsibility to be there for the “course walk through.” |
Preparing your horse to show: 1. Know your course. 2. Give your horse plenty of warm up time. 3. Be prepared to show when called. 4. Warm up doing the basics--transitions, guiding, jogging and loping with “balance.” 5. At the end of your warm up period, visualize yourself working the first obstacle. If you can see yourself working it perfectly, then you are ready to enter the show pen. 6. Don’t be weak in your showing. Competitors have a tendency to deflate a bit when showing - they ride differently than in practice. Be clear in communicating with your horse. 7. Breathe – Breathing deeply will help you relax. Inhale through your nose and exhale through your mouth. 8. Be sure your horse is focused on you and physically ready before starting the course. The horse must be in frame and looking at the ground. Don’t let your horse lift his head and be gawking around the arena. 9. Be consistent in pace throughout the course. Don’t hurry as you get toward the end of the course. 10. Look up and ahead. 11. Count while riding. One two, one two. This will keep you focused and aware of your horse’s cadence. 12. After finishing the pattern, mentally go over the positives of your performance first. Make a mental note on the weak areas to put into practice at home. 13. Do not exit the arena with an agenda to discipline or school your horse, for mistakes made in the class. The horse does not know that he was wrong 10 minutes or 5 minutes ago. It is definitely okay to first walk, think and then practice an obstacle your horse found difficult in the class. Make sure you “practice” is done in a productive manner. 14. Remember to keep riding between the obstacles. This means stay in communication with your horse and keep the horse focused, even when not going over poles. |
Turn negatives into positives 1. Your horse gets nervous – get to the warm up pen early. Help your horse to focus by lots of very slow walking with the horse in frame. Help your horse to focus by walking over and around poles. Stop and stand in the obstacles. Practice your breathing, so your tenseness is not causing the horse to be nervous. 2. If you horse tends to tick the poles, ride over a difficult series of poles to purposely cause your horse to bump the poles and get the horse thinking about being more careful. 3. Serpentine turns – ride the obstacle and figure out the best place to cross over the poles. Practice your horse’s difficult turning direction by riding a small circle to the weak side. Use your legs to bend your horse around. 4. Rushes the back through - spend time standing in the back through. Back one step and stop. Back one step and stop. 5. Plant nibbler – stand next to a plant and remind horse snacking is not allowed. 6. The class is becoming a wreck. There is nothing wrong with choosing to trot through the obstacles and even walk through them if your horse is upset. It is better to try to make the experience as positive as possible. If your horse has a traumatic time in the show pen, he will remember it and you will spend a great deal of time in show classes trying to reestablish your horse’s confidence. |
How to score plus points with the judge 1. Be ready! Judges have many horses to watch; they don’t want to be waiting while your horse is being fly sprayed, or you are fixing your chaps. Be at the start point with a smile and ready to begin as soon as given the nod from the judge. 2. Be efficient while working the obstacle. This is not the time to stop and pause – get the job done. 3. Be clean over the poles. 4. Judges will plus horse’s that show an effort. 5. Judges will plus a horse with a pleasant and curious attitude. Pinned ears and swishy tails will not get pluses. Forced or intimidated horses will not earn plus points--they may score a 0 rather than a minus for doing the obstacle clean, but in tough competition the horse needs to be earning “plus” points to win. 6. Allow your horse to show his skill and pick his way through an obstacle. Judges like a thinking horse. 7. A horse with self-carriage over the obstacles will get pluses. |
Usually the course designer is on
hand, so ask questions, such as, distances between the poles and where the poles
are measured. Step it out so you’ll know the distances and therefore the path you plan to take. Be aware of walls, barriers and plants that will be a distraction to your horse. Plan where you will look with your eyes to keep your horse on the correct path and focused. Plan your transitions between the obstacles and walk the path in the dirt to get to the next obstacle. Some competitors use highlighters to “color code” the course, marking gaits and combinations of poles. For example: blue for the first obstacle of a trot serpentine, followed by a green combo of lope overs and then yellow walk overs. This method helps riders who tend to get lost on the course or have trouble seeing how one obstacle leads to the next. The more you can do to prepare for the class the better. |
When walking the course, have your
printed course with you. Start at the beginning, I think it is best to actually
walk the steps on the exact path you will be taking. For example, avoid
standing outside an obstacle and visually follow the path around. |
COMPETITION There are two levels of competition for trail horses…”green” for inexperienced horses just beginning their trail career, and “trail” for more advanced competition with “seasoned” horses. Green trail should be judged according to the purpose of its intent…allowing a horse to compete on an entry-level with other horses of limited experience. Horses eligible to compete in green trail are in their first year of showing in trail, or horses that have shown before, but have not earned more than 10 breed association points in trail classes. Green trail courses should be designed for entry-level horses. Ample space should be given to work obstacles. Courses for horses other than “green” may be much more difficult with tighter turns and several obstacles relatively close together. HOW YOU ARE SCORED There are two scores given to trail horses for each obstacle--one score is for the “maneuver” (how the obstacle is worked) and the other is a “penalty” score for errors made while working the obstacle. For example, a horse may be working a “walk over” obstacle. The judge will score the horse for the “maneuver” by giving a plus score for a superior performance, but might also give a minus “1” score for a “hit” on one of the poles. Scoring is on the basis of 0-infinity, with 70 denoting an average performance. Each maneuver score is added or subtracted from 70 as is each penalty score. Starting with 70, an exhibitor may have a plus 1 on the first obstacle for the maneuver, and a “0” for the penalty, giving the exhibitor a 71 score after the first obstacle. On the second obstacle, the exhibitor may get a “0” maneuver score and a “-1” penalty score for stepping on a pole. The exhibitor’s score is then back to a 70 at the end of the second obstacle. The judge continues to score both the maneuver and any penalties until the course is completed. By adding and subtracting plus and minus scores, the exhibitor’s final score is decided. The penalty score always reduces your final score, so it is important to avoid penalties. The most important score, however, can be your maneuver score, since that score is the only one which can earn points for you raising your final score. When an exhibitor gets a final score of 74, for example, you know the exhibitor had few penalties and earned extra points for good obstacle maneuvers. MANEUVER SCORE In the green class, the maneuver score is based on the performance of the horse over obstacles with emphasis on movement, smoothness in gaits and transitions and willingness to execute the maneuvers with a willing attitude. Horses should be penalized for artificial appearance over the obstacle. In all other trail classes, the maneuver score will be based on performance over obstacles with emphasis on manners, response to the rider and quality of movement. Credit will be given to horses negotiating the obstacles with style and some degree of speed, providing correctness is not sacrificed. Horses receive credit for showing attentiveness to the obstacles and the capability of picking their own way through the course when obstacles warrant it. The judges will plus horses which willingly respond to rider’s cues on more difficult obstacles. Horse will get a minus maneuver score for any unnecessary delay while approaching or negotiating the obstacle. Horses with an artificial appearance over obstacles are penalized. Horses must demonstrate all three gaits during a course and quality of movement and cadence will be considered as part of the maneuver score. YOUR HORSE’S MOVEMENT While on the line of travel between obstacles, the horse shall be balanced, carrying his head and neck in a relaxed, natural position, with the poll level with or slightly above the withers. The head should not be carried behind the vertical, giving the appearance of intimidation, or be excel lively nosed out, giving a resistant appearance. PLUS OR MINUS POINTS Each obstacle “maneuver score” is given on the following basis ranging from plus 1.5 to minus 1.5. A minus 1.5 is for extremely poor, minus 1 for very poor, minus .5 for poor, 0 for correct, plus .5 for good, plus 1 for very good and plus 1.5 for excellent. Penalty scores are on the following basis: Penalty .5 for each tick or contact with a log, cone, plant or any component of the obstacle. Penalty 1 for each hit, bite, or stepping on a log, cone, plant or any component of the obstacle; incorrect gait or break of gait at walk or jog for two strides or less; both front or hind feet in a single-stride slot or space at a walk or jog’ skipping over or failing to step into a required space; split pole in lope over; incorrect number of strides if specified…required strides should be noted on pattern. There is no 2 point penalty. Penalty 3 for each incorrect or break of gait at the walk or jog for ore than 2 strides; out of lead or break of gait at the lope for more than 2 strides; knocking down an elevated pole, cone, barrel, plant, obstacle or severely disturbing an obstacle; falling or jumping off or out of a bridge or a water box with one foot once the horse has gotten onto or into the obstacle; stepping outside an obstacle with defined boundaries such as a back through or box or side pass with one foot; missing or evading with one foot a pole that is part of a series. Penalty 5 for each dropping of a slicker or object required to be carried on course; first or second cumulative refusal, balk, or evading an obstacle by shying or backing; letting go of a gate or dropping a rope gate; use of either hand to instill fear or praise; falling off or jumping out of a bride or box with more than one foot; stepping outside an obstacle with more than one foot; missing or evading with more than one foot a pole which part of a series; blatant disobedience (includes kicking, bucking, rearing striking); holding the saddle with either hand; faults which occur on the line of travel between obstacles according to severity include, head too high, head too low, nose behind the vertical, nosing out or opening mouth excessively. DISQUALIFICATIONS Horses will be disqualified if the rider touches the reins with two hands or changes hands on the reins (except in junior horse classes or snaffle bit or hackamore classes). Performing an obstacle incorrectly or other than in specified order (going off course). A horse is disqualified is no attempt is made to perform an obstacle; equipment failure that delays completion of the course; excessively touching the horse on the neck to lower the head; entering or exiting an obstacle from the incorrect side or direction; working an obstacle in the incorrect direction, including overturns of more than 90 degrees; riding outside the designated boundary marker; third refusal, balk or evading an obstacle by shying or backing; failure to ever demonstrate the correct lead or gait as specified; failure to follow the correct line of travel between obstacles (going off course); excessive schooling, pulling, turning, stepping or backing anywhere on the course; carrying the head too low or the nose behind the vertical according to severity. |
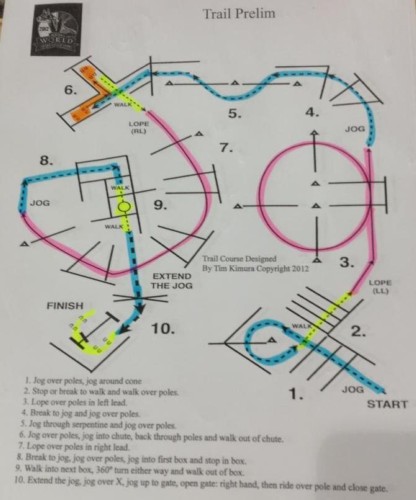
SAMPLE TRAIL PATTERNS Beginner: Click here for pattern example one. Click here for pattern example two. Intermediate: Click here for pattern example one. Click here for pattern example two. Advanced: Click here for pattern example one. Click here for pattern example two. Patterns are PDF documents. Click here to download Adobe Reader - needed to view the documents. |
The Perfect Pattern Taylor Hanson and Sure Bet Chip 2008 American Quarter Horse Association Youth World Champion Trail Horse |