STABLE MANAGEMENT
By
Eleanor Blazer
LESSON
THREE
All
tack and equipment used on a horse restrains and controls the horse to some
extent.
The
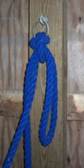
first restraint which comes to mind is tying the horse.
 When tying, use a panic snap or a quick release knot.
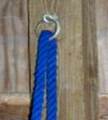
The
quick release knot is tied by running the loose end of the lead rope through a
tie ring or around a tie bar.
Bring the loose end of the lead back
and place it against the end of the lead tied to the horse. Hold with your left hand.
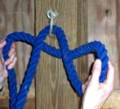
With your right hand pick up a portion of the loose end of the rope and
make a fold in it. Cross the fold over
the two ropes in your left hand and through the loop which has been
created.
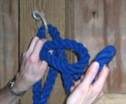
Use the fingers of your left hand to push the fold through the loop and
hold it in position so it can be re-grasped with your right hand. Grasp the fold and pull it through the loop
until it is snug. Move the loose end of
the rope so that it hangs away from the end of the rope attached to the horse.
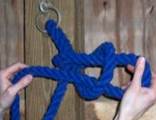
Some advocate “horseproofing”
the quick release knot by taking the loose end and slipping it back through the
loop made by the fold.
Care
must be taken to tie a horse in a safe place in a safe manner.
1. Do not tie the horse too short. Too short means the horse cannot move his
head about freely.
2. Do not tie the horse too low. Tying to anything below the horse’s eye is
too low.
3. Whenever possible tie the quick release knot
above the horse’s head.
4. Do not tie the horse too long. If a horse can get his head to the ground,
the tie rope is too long.
Cross Ties are created by using two ropes, each attached
high on the opposite sides of a grooming area, for example. You should just be able to snap the two ropes
together when they are stretched toward each other. At this length, it is easy to attach a rope
to each side of the horse’s halter.
Cross
ties are very popular and they keep a horse from moving around much. But they are also quite unpopular with many
horses as they make it difficult for the horse to maintain his balance. Horses get used to cross ties, but no matter
how good they get at being cross tied, they will always have difficulty
positioning their feet.
Most
of the time tack is a mild restraint even when it is used to “enhance the
usefulness of the horse.” A bridle is a
good example. The bridle has a small
degree of restraint while doing much to enhance the usefulness of the horse by
allowing us to communicate our desires to him.
There
will be situations, however, when special “restraint methods” are required
exclusively to restrain the horse.
Most
well-educated and trusting horses can be handled without the use of severe
restraints.
But
there is always that unexpected occurrence when restraint is needed, and
without it, disaster results.
The most
common example is the use of a lead line with chain over the nose or under the
chin.
“I don’t want
to hurt the horse….I don’t need it,” is the passionate cry by those with love
for horses, but little experience handling them.
Just because
the chain is there doesn’t mean you must use it in a severe fashion. Unless the chain is jerked hard, or the
horse pulls back, leaps forward or jumps sideways, the chain will simply lie
innocently over the nose or under the chin.
Experienced horsemen and women know the chain is passive if they want it
to be. And because they are experienced
handlers, they always lead a horse with the “restraint” in place, ready when
needed. Because the restraint is in
place, the handler is always prepared for that once in a million moment of
disobedience or fear reaction.
“Be prepared”
is the Boy Scout motto; it will be adopted by the wise horse handler.
When you need the restraint and it is not
available, you have placed the horse and others in danger. In addition, if the horse gets away, you
have reinforced his “flight” reflex. The
“reinforcement” convinces the horse that jumping, rearing, or pulling back are
good ways to avoid unpleasant situations.
Once the
resistance, refusal or escape has occurred, you can’t go back and correct
it. It is over. You have failed in your responsibility to
care for the horse, and the horse has had a dangerous act validated.
PLANNED RESTRAINTS
There are a
number of situations when the use of “restraints” is the first choice. Such situations include an emergency where a
horse must be restrained quickly to avoid further injury to itself or handlers.
Restraints may
be the first choice when a veterinarian is attempting to treat a wound, or when
a horse becomes dangerous while being trimmed or shod. (It is never the vet or the horse shoer’s job to teach a horse to stand.) Restraints may also be called for as a first
choice when handling broodmares who have been at pasture with foals, or when
you have limited manpower and must accomplish “health care” procedures such as
deworming. (The use of chemical
restraints, such as tranquillizers administered by a veterinarian may be the
best choice. Never, under any
circumstances, administer a tranquillizer yourself—the liability factor is much
too high.)
If properly
applied, physical restraints allow a procedure to be finished quickly and
without danger for horse or handlers.
(Gentle persuasion over a period of time is preferable, except when the
“persuasion” becomes coddling and the horse becomes spoiled as too frequently
happens.)
Horses which
have been allowed to “please their handlers when the feel like it, and refuse
their handlers when they feel like it,” are very dangerous horses. Unfortunately there are many such horses;
unfortunately such horses usually suffer great abuse at the hands of some macho
yahoo who takes it upon himself to “teach this outlaw who’s
boss.”
It is better
for the horse when his handlers are prudent, using the best restraint for the
circumstances whenever it appears a restraint may be needed.
APPLY RESTRAINTS WITH CONVICTION
1. Choose a safe place to work. Restrained horses can act unpredictably, so
avoid enclosed places. Be sure there are
no obstacles around which could cause injury.
2. Always apply restraints properly and with
conviction…..a poorly applied restraint is dangerous. The idea is to keep the horse still—little or
no moving and definitely no flight.
Attempting to be “kind” to the horse by applying only a little pain is
of no value of any kind.
3. Apply restraints slowly, but with
purpose. Do not make a big deal of it
and do not apply roughly or with “vengeance.”
Appling restraints must be done aggressively, but without anger.
4. Be sure all
preparations for the procedure to be accomplished with the horse are in place
prior to applying the restraint. You do
not want the restraint left in place longer than necessary.
5. The person doing the restraining must keep
his or her attention on the horse at all times.
If you are restraining the horse, you’ll just have to miss out on the
gossip of the moment, or the “stitching of a wound;” keep your mind and you eye
on the horse.
6. The person doing the restraining should stand
on the same side of the horse as the person working on the horse.
7. If the procedure is going to be painful for
the horse, be sure a veterinarian has administered an analgesic and a
tranquillizer.
The most common
restraint bit seen today is the “yearling bit,” which is basically just a thick
round ring which goes into the mouth by inserting it over the lower jaw. The horse wears a halter as well as carrying
the yearling bit.
The true
standard in-hand restraint bit has a thin mouthpiece with a downward-facing
port. The horse wears a halter as well
as this bit, which should be clipped to the halter to limit its severity.
Any bit will
help restrain a horse move effectively than a halter alone.
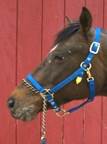
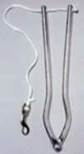
CHAIN LEAD SHANKS
The chain lead
shank over the nose or under the chin is the most commonly used restraint. It can be more severe than a bit restraint.
When using the
chain lead shank, the method of holding the horse’s attention may be a steady
pressure on the lead, or it may be several quick jerks on the lead followed by
an immediate release and then the resumption of a steady pressure.
Most show
horse handlers prefer the chain under the chin as that is the approved method
for showmanship in hand classes. There
is also no chance of leaving any kind of permanent lump on the horse’s nose as
can be done with the chain over the nose.
Cuts and scrapes to the lower jaw bone heal quickly and are seldom of a
serious nature.
The chain over the nose, if used
judiciously, will not leave a lump on the nose, but can cut or scrape the
skin. A cut or scrape on the top of the
nose is very obvious, but seldom serious.
If the horse
has become dangerous to himself or others, or if it is imperative the horse
hold completely still, then putting the chain under the upper lip and across
the upper gum—a lip chain—is usually very effective. A lip chain should be held with
pressure. However, horses will often
initially object strenuously to the lip chain, and it may be necessary to give
the chain several strong jerks to get the horse’s attention on you. The horse’s gum can be cut and often
bleeds. This is not usually a serious
matter, as mouth injuries heal rapidly.
If it is necessary to use the lip chain harshly, do so and get it
over. Once the horse submits to the
restraint it is seldom necessary to “reschool” him.
A horse which
has experienced restraint with a lip chain will usually stand quietly
immediately upon its placement. A lip
chain can be a very effective restraint.
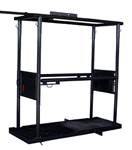
CHUTES
Chutes and
wash racks are generally very dangerous as forms of restraint when working with
horses. Horses, unlike cattle, panic in
confined places and can be severely injured by “fighting” a chute or rack. If a horse goes down in a chute or rack, and
then panics, the resulting injuries can result in the need for euthanasia.
If a horse is
going to be placed in a chute for a particular procedure it is recommended the
horse be tranquillized.
Most wash
racks for horses are an excellent place to get a horse injured.
Since most
wash racks are simply a pipe bar with no solid sides, the horse can easily get
his legs outside the bar, can try to jump over the bar, or duck under the
bar. Too often the wash rack has a
cement floor. Cement is dangerous for
horses at any time, and much more so when wet.
Refuse to use dangerous wash racks, and avoid wash racks and chutes as a
form of restraint.
Tying a horse
in a wash rack, even one with a tail gate, is a fooling mistake. If a horse panics, is tied hard, the wreck is
going to be serious.
The best chute
for horses is one that is solid-sided and as unrestrictive as possible—a chest
high bar in front and a stifle high gate behind--with no overhead structure.
TWITCHES
A skin twitch
is nothing more than grabbing a fold of skin, usually on the side of the neck,
and squeezing it tightly while pressing the tips of the fingers hard into the
horse’s skin. A skin twitch, if done by
a very strong person, can be fairly effective.
A more
effective “skin twitch” is created by taking the soft tissue just above the
horse eyelid and pinching it between the thumb and index finger. Use your fingernails to achieve maximum
effect.
Sometimes you
can grab the horse’s upper lip and twist or squeeze it with some
effectiveness. For the person of
average strength this is seldom very effective.
If only a
“calming effect” is desired, then you can feel around the center of the horse’s
upper lip until you find the “soft spot”, generally right in the center of the
lip. This is an acupuncture point and
if you press your finger with sufficient force into the soft spot, the horse
will usually stand quiet and relax. This
is not considered an effective restraint, but is mentioned because mechanical
twitches work on this same acupuncture point.
A mechanical
twitch is a device which screws up the skin of the top lip. There is a lot of question as to just how the
twitch actually works. Some say it is
simply a distraction, some credit the acupuncture point and some say the
release of endorphins calms the horse.
Why they work
may not be exactly know, but the fact that they work is well documented. When applied correctly, they are extremely
effective.
The most
common mechanical twitch is a loop of cord or chain attached to 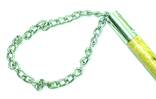 a heavy wooded handle, usually
an axe handle or very long hammer handle.
The loop is eased over the horse’s upper lip and the handle is twisted
quickly to get a good grip on the lip.
a heavy wooded handle, usually
an axe handle or very long hammer handle.
The loop is eased over the horse’s upper lip and the handle is twisted
quickly to get a good grip on the lip.
There is
somewhat of an art to applying this twitch.
If applied too roughly the horse will hate the procedure and want to
fight the handler. Too loose and twitch
is ineffective and actually becomes a dangerous weapon which if flung about by
the horse can injure the horse or the handler.
Practice applying
the mechanical twitch correctly. If
misapplied several times a horse will quickly resent the twitch and can become
extremely defensive, striking or rearing to avoid it. Never stand directly in front of the horse
when applying the twitch as horses will often strike.
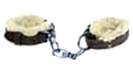
There is also
the “humane” twitch which isn’t any more humane than the loop of cord. The “humane” is a hinged “V” which clamps
over the upper lip and is then either held in place or tied in place.
“Humane” Twitch
Another form
of the “twitch” is the “ear twitch.”
The handler
grasps the horse’s ear and twists just a bit while squeezing finger tips into
the ear in a pulsating manner.
The handler
should never pull at the ear, but instead should actually press downward on the
ear.
If done
properly, the horse will not be ear shy.
HOBBLES
Hobbles are
the simplest of limb restraints.
 Hobbles
are generally two loops of leather which buckle around the pastern of each
front leg. The loops of leather are
connected by a short chain (which supposedly keeps the horse from moving), or a
longer chain which allows a horse to move about. Hobbled horses will move about regardless on
the length of connecting chain.
Hobbles
are generally two loops of leather which buckle around the pastern of each
front leg. The loops of leather are
connected by a short chain (which supposedly keeps the horse from moving), or a
longer chain which allows a horse to move about. Hobbled horses will move about regardless on
the length of connecting chain.
Knee hobbles
are applied above the knee and are more restrictive than the standard pastern
hobbles. Horse will still get about,
and can even strike with both front legs at the same time.
Spider
hobbles, in my opinion, are quite dangerous and I do not recommend them. A spider hobble consists of straps around
all four legs. The straps are connected
by chains while allow the horse to stand in a normal position, but keeps him
from moving. If a horse decides to fight
spider hobbles the scene can quickly become a disaster.
Kicking or
“breeding” hobbles are mild and quite safe to be used in any situation where
prevention of kicking is desired.
Kicking
hobbles consist of a strap around each hock.
The strap is 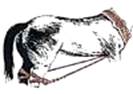 connected
by a cord which runs through a pulley on a neck collar. The horse can move forward in a normal manner,
but can’t kick.
connected
by a cord which runs through a pulley on a neck collar. The horse can move forward in a normal manner,
but can’t kick.
SIDELINE OR SCOTCH HOBBLE
A sideline or
Scotch hobble is constructed with a 25-foot cotton rope and is a very useful
hind leg restraint.
The simplest
form is to loop the rope around the neck and tie with a knot which will not tighten. Then take the long end of the rope and loop
it one time around the hind pastern. I
recommend you pass the rope from the medial side of the pastern, come around
the pastern and out on the lateral side.
Once the loop is in place, take the long end of the rope back to the
neck collar. You can then raise the
hind leg to the height desired by pulling the long end through the neck collar
and securing it.
Some sidelines
have leather straps which go around the fetlocks and nylon webbing neck
collars.
The key to
successful use is being sure the horse is standing square and can balance on
three legs.
KNEE STRAPS
Leg lifts and
knee straps are very handy, although knee straps can cause a horse to fight
pretty hard.
To keep most
mature horses still, you can simply lift a front leg. Grasp the leg around the pastern and hold
tightly. A horse which is not
particularly fearful of the procedure taking place will usually stand very
quietly as long as one front leg is held up.
Young horses,
or horses which are going to give you trouble about the work to be performed
may benefit from a knee strap.
A stirrup
leather will work for the strap. Buckle
the strap in a figure eight fashion between the fetlock of the raised leg and
the forearm. The strap should go around
the pastern and pulled relatively snug.
I
do not recommend the use of knee
straps. It is easy for a horse to fight
and fall with a knee strap. If you
intend to use one, work on a grassy area or very soft ground. Horses going down on hard ground can chip a knee, hit their heads or injury themselves in other ways.
Another
form of knee straps can be created with a cotton rope. Tie the rope to the pastern, and then wrap
around the forearm, holding the loose end of the rope. By holding the rope, you can release the
restraint easily if it becomes necessary.
When
a restraint is necessary, it is necessary.
Use it and use it properly so the horse receives the benefit of
treatment or other health care or grooming procedure.
ASSIGNMENT:
1.
Make a video of you tying a quick
release knot.
Please load
the video to a video hosting site such as YouTube
or Photobucket. Send the links to: elblazer@horsecoursesonline.com