STABLE MANAGEMENT
By
Eleanor Blazer
LESSON TEN
MISCELLANEOUS DUTIES
This
is a real ad taken from an online help wanted service. It is an example of what may be expected of a
stable manager. We’ve covered most of
the “hands-on” aspects of caring for horses, now we’ll look at some of the
“extras”.
This
lesson covers the care of the coat.
Horses
naturally grow a thick winter coat. Many
stables will allow the horses to stay natural, but others may not want the
horses to “hair-up”.
In the past,
the way to get rid of the thick coat was to clip the hair from the horse. Today, most show horses are never body
clipped. Instead, they go “under the
lights” to keep them from growing a thick coat in the first place.
Horses start
to grow their winter coat toward the end of summer when it is still hot. Nature takes her cue for the amount of light
during the day, not the temperature. The
shorter the time of daylight, the more the coat grows. Most horses start growing their winter coat
at the end of August or early in September when it is still quite warm in many
areas.
Conversely,
horses start to shed their winter coat as the days lengthen, toward the end of
February and early in March when it is generally still cool. (The seasons and dates are just the opposite
for horses in the Southern Hemisphere.)
The
thickness of the coat depends to some degree on genetics—the horse’s
breed. The coat condition is also
influenced by whether the horse is stabled or turned out in pasture during
colder weather.
The
primary reason to clip a horse’s coat is to prevent overheating and sweating
during exercise.
Excessive
sweating can cause a horse to lose condition, even becoming mildly
dehydrated. In cold weather is hard to
“cool out” a horse with a heavy coat and the horse is in danger of becoming
chilled while waiting to dry.
Horses
are, of course, clipped to make their care easier and more convenient for their
owners or grooms, and to make them “look good.”
There
are many types of clips in which varying amounts of the horse’s coat are
removed. Some clips are best for horses
in light work and colder climates. Some
clips are more suitable to horses being worked harder in warmer areas. Some clips are simply tradition for the
competition discipline.
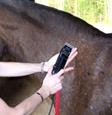
Before
starting to clip any horse—old or young—it is imperative the horse goes through
a “familiarization process.”
Start
by showing the horse the clippers which are turned off. Let the horse see, smell, taste
and feel the clippers sliding back and forth across his skin, around his nose,
by his eye and on his ears. Only when
the horse is completely relaxed and uninterested in the silent clippers can the
next step be taken. Turn the clippers on
and let the horse hear the noise. Make
no attempt to clip the horse. Simply let
the horse hear the noise. Turn the
clippers on and off several times. Move
into a different position and turn the clippers on again and off again. Turn the clippers on above the horse’s back and under his stomach. When the horse seemingly doesn’t care about
the clipper noise, you are ready to approach actual clipping. If the horse is ignoring the sound of the
clippers you may give him a carrot or apple so he associates something pleasant
with the noise.
 Put your hand on the horse’s neck, turn the clippers on and
then rest the vibrating clippers against your arm, then against your hand. Let the horse get used to the vibrating
sensation gradually and with you as his protector. Horses often do not like the sound or the
feel of the vibrating clippers, particularly when sensitive areas are being
touched. Pretend to clip nearby the ears, muzzle, eye and poll. Rub your hand on all those areas while
keeping the clippers close.
Put your hand on the horse’s neck, turn the clippers on and
then rest the vibrating clippers against your arm, then against your hand. Let the horse get used to the vibrating
sensation gradually and with you as his protector. Horses often do not like the sound or the
feel of the vibrating clippers, particularly when sensitive areas are being
touched. Pretend to clip nearby the ears, muzzle, eye and poll. Rub your hand on all those areas while
keeping the clippers close.
Keep
in mind that the blades of clippers may be cold when clipping first
begins. The horse may not enjoy cold
clipper blades along his nose and lips.
Clipper blades get hot during clipping, so be careful not to put a hot
blade against sensitive areas.
Being
a prey animal, if the horse becomes frightened or feels threatened, he may try
to escape the danger he perceives. If he
can’t escape, he may begin to fight, kicking or striking at the clippers. Ignore that behavior…do not discipline the horse;
instead start the training process from the beginning once more.
While
difficulties may occur, the training of the horse to accept the clippers should
have begun early enough that there is no need to get the job done today, or
this week. Do not just quit the process,
but regress to simply letting the horse hear the clippers and see them. Then turn them off and allow the horse to
smell, touch and even taste the clippers.
End the training session on a good note.
Teaching a horse to accept clipping will take as long as it takes. There is no reason to use restraint on the
young horse just learning about clipping.
Keep
in mind, however, that clipping is not an everyday occurrence and re-schooling
with the young horse may be necessary the first six to 10 times it is done.
On
the other hand, some older horses have had bad experiences with clipping, and
they will not tolerate being clipped without restraint. Approach such horses slowly, cautiously and
try to get them to understand you are not going to hurt them. Then apply the appropriate restraint and try
to make the process as pleasant as possible.
GOOD CLIPPERS
It
is important to have your clippers in good working order. Some clippers make more noise than
others. It is a good idea to purchase a
quality pair of clippers which are as quiet as possible.
For
full body clipping and clips which require major portions of the body hair to
be removed, use a large set of clippers with a “general purpose blade.”
Most small
clippers—which are usually fairly quiet—have interchangeable blades. Blades are numbered, with the lower numbers
having a larger cutting surface. For
example, a No. 10 blade works well to blend in hair adjacent to hair which has
been clipped with the large clippers.
For fine
clipping around the eyes, white markings on the face or legs, muzzle, ears, and
poll a No. 40 blade is suggested.
Clipper
blades must be sharp. A dull pair of
blades will pull the hair which can be painful for the horse.
Be
sure the clipper motor is well lubricated so the clippers do not overheat. Use a “coolant” spray to cool and reduce
blade friction. Clipper blades should
also be oiled periodically with blade oil.
Before
the clipping begins, be sure the horse is clean – if weather permits a bath is
best. Clean hair is much easier to clip,
clips closer and more evenly, and doesn’t leave dirt in the clipper blades
which dulls them and creates friction heat.
Be sure the horse is completely dry before clipping.
CLIPPING WITH THE HAIR
Clip in the direction of hair growth when clipping small delicate
areas of the horse such as the muzzle and throatlatch, or when trying to “blend
in” hair around joints or large bones.
For example, when clipping the fetlock joint and pastern, clip with
the hair. To clip the back of the
pastern, hold the cannon bone just above the fetlock joint so the foot hangs
down, exposing the back of the pastern.
Then clip downward, with the hair growth, toward the hoof.
CLIPPING AGAINST THE HAIR
Clip against the direction of hair
growth when clipping large smooth areas of the body.
Clip against the hair growth at the
coronet band and when clipping white markings.
CHOOSE A “SAFE” AREA
While
it seems to be a popular idea for magazines to show horses being clipped
without a halter in an open field, it is an extremely foolish and irresponsible
idea. You must assume the herd “alpha
role” each time you work with a horse; the horse is dependent on your for his
safety and well being. Do not place
your horse in dangerous or unsafe situations.
When
you are ready to clip, take the horse to a “familiar area.” An area where the horse is usually groomed is
ideal. You want the horse to be relaxed
and confident, and you want the horse to be comfortable with the equipment
being used. Use the horse’s everyday
halter, and have other familiar horses within sight.
Horses
are very sensitive to changes in human behavior and are good at detecting
nervousness, to which they respond. By
not making the clipping job a big deal, you’ll be relaxed and so with the
horse. If you make tiny progress each
day for several weeks, the job will be of no consequence to you or the horse.
DO’S AND DON’T’S
1.
Never clip a wet horse.
2.
Never clip a horse standing in water or on wet ground.
3.
Don’t you stand in water or on wet ground.
4.
Check the clipper cord to be sure it isn’t frayed or damaged. Mend any suspicious spots with electrical
tape.
5.
Do not allow the horse to get the electrical cord in his mouth while you
are busy clipping. With young,
inexperienced horses it is a good idea to have an assistant to watch the horse
at all times.
6.
Tie the electrical cord to something solid a foot or two from the
electrical outlet so that as you move about, there is never tension on the cord
at the plug.
7.
Inspect all equipment before and after every use. Service the equipment prior to storing it for
the next use.
8.
Do not body-clip a horse after he starts to shed the winter hair. Clipping at this time will remove the
incoming summer hair and leave a dull looking coat that will remain all year.
TYPES OF HORSE CLIPS
When
choosing a clip for a horse, the determining factor should always be: the work
the horse is expected to do in the expected weather conditions. (If you are clipping to make the horse look
in “show condition”, then you are probably going to do a full body clip. Keep in mind full body clipped horses will
need to be blanketed to keep them warm when not working.)
Give
careful consideration to the clip chosen prior to beginning the project.
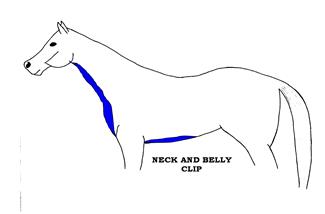 Neck and belly clip: This is a good clip for horses which will
“live out” during the winter months, yet may be used occasionally for trail and
recreational riding. It is also a good
clip for the stabled horse which is used for light riding.
Neck and belly clip: This is a good clip for horses which will
“live out” during the winter months, yet may be used occasionally for trail and
recreational riding. It is also a good
clip for the stabled horse which is used for light riding.
*Colored area is clipped
A. Bib clip:
Generally for stabled horses getting light work. The clip makes it easy to sponge off sweat
along the next and between the front legs.
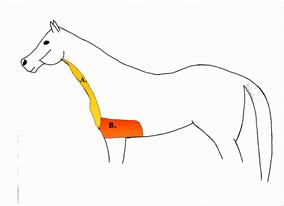 A. and B. Apron clip: This clip begins with the bib
clip, and then has additional coat taken off to the girth line, between the
front legs and the top of the forelegs.
This is a good clip for horses which wear martingales and for western
horses with wide cinches and breast collars.
*Colored areas are clipped
A. and B. Apron clip: This clip begins with the bib
clip, and then has additional coat taken off to the girth line, between the
front legs and the top of the forelegs.
This is a good clip for horses which wear martingales and for western
horses with wide cinches and breast collars.
*Colored areas are clipped
A. Low trace clip: This
clip originates with the harness horse, getting its name because the clip 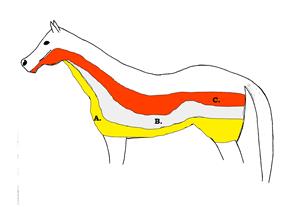 parallels
the path of the “traces.” It is a good
clip for field kept and stabled horses which sweat a lot while being
exercised. Once bathed, excess water is
easily removed and the horse will dry much more quickly.
parallels
the path of the “traces.” It is a good
clip for field kept and stabled horses which sweat a lot while being
exercised. Once bathed, excess water is
easily removed and the horse will dry much more quickly.
The
coat is removed the underside of the neck and belly, between the forelegs and
the upper part of the hind legs. A good
guide is to saddle the horse, then begin the clip about 12 inches below the
saddle skirt.
B. and C. Medium and high trace clips: As the name suggests, these clips are the
same as the trace clip, only they move farther up the side of the horse and in
most cases have the lower portion of the head clipped. These clips are not suggested for horses
which will be left out during the winter.
When clipping the lower half of the head, keep in mind this is an area
of very thin skin which allows considerable loss of body heat.
*Colored
areas are clipped
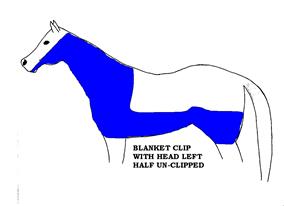 Blanket clip: This clip is for stabled horses
which are engaged in relatively hard work on a consistent basis. All the hair is removed except for the
“blanket over the hindquarters and saddle area.
The horse’s head is normally “clipped out,” but you can choose to clip
only half the head as shown. *Colored area is clipped
Blanket clip: This clip is for stabled horses
which are engaged in relatively hard work on a consistent basis. All the hair is removed except for the
“blanket over the hindquarters and saddle area.
The horse’s head is normally “clipped out,” but you can choose to clip
only half the head as shown. *Colored area is clipped
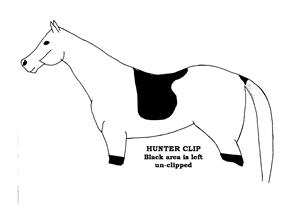 Hunter clip: This is a clip only for horses
which are stabled, working hard on a daily basis, and being shown on a regular
basis. With this clip all the hair
comes off except for the saddle area, the legs and a small “V” shape left above
the tail.
Hunter clip: This is a clip only for horses
which are stabled, working hard on a daily basis, and being shown on a regular
basis. With this clip all the hair
comes off except for the saddle area, the legs and a small “V” shape left above
the tail.
Horses
with a hunter clip and horses with full body clips must be given special
attention to their needs for warmth.
They should be stabled, well fed and turned out without blankets
sparingly during cold weather. *Black area is left un-clipped
OTHER CONSIDERATIONS DUE TO CLIPPING
In
addition to keeping a horse warm, his hair plays other important roles, so when
it is clipped; it creates other considerations for the stable manager.
The
long hairs of the muzzle and above and below the eye act as feelers, telling
the horse he is getting close to an object.
When those hairs are gone, horses tend to get a few extra bumps, lumps
and scratches. Check the horse daily
for any tiny wounds which need attention.
The
hair within the ears protects the horse from insects, so when it is gone, it
becomes the handler’s responsibility to be sure the inner ear gets caressed
with insect repellant.
A
horse’s skin feels the softest of pats, the pressure of the lower leg, the
sting of a crop and the discomfort of an itch, sunburn and a variety of rashes
as well at the irritation of a fly, a tick or the bite of an ant. And when the hair has been clipped from the
skin, the skin is much more susceptible to all of those things.
It
is always a good idea to view skin problems as a signal there may be other
health concerns. Internal disorders can
cause skin eruptions and skin disease can cause internal problems. In addition, a visible disorder of the skin
can point to a particular fault in diet, to an injudicious use of cold water on
an overheated horse, to a fault in the stable’s drainage, ventilation or
lighting.
Give
consideration to all those possibilities before jumping to the conclusion the
horse with strange lumps and bumps has “mosquito bites.” Of course, that could be the case.
Parasitic
skin diseases can be caused by flies, leeches, lice, ticks, poultry mites,
mange or ringworm. Or it could be simple
eczema. Or it could be an allergic
reaction to fly sprays, the use of certain drugs or a fungus.
Because
the horse has been clipped, all of the above have a better chance of occurring;
be prepared.
Click
Here to Take Quiz (There is no assignment for this
lesson.)
If
your duties as a stable manager require you to prepare a horse for competition
please take the online course “Preparation
for Competition”.