Showmanship in Hand
By
Cathy Hanson
Copyright © 2014
LESSON
TWO
Now that your horse is leading and stopping easily, it is time to begin to teach the horse how to square up his feet.
To begin, lead the horse off in the walk
as you have taught him and then stop. Turn and face the horse. Your body should be to the side of the
horse’s head never directly in front of the horse. Your feet should be together, with your toes
facing the horse’s left front toe. Your
body will be angled toward the horse’s shoulder.
The first part is to
teach the horse to move only the right hind leg. In order to minimize cues and make for a faster set up, we
will not teach the horse to move the left hind leg. The left hind leg
will stay stationary and the right hind will then be moved to match the left
leg position. The handler will move the right hind
leg forward and backward on request until telling the horse to stop.
When asking the horse
to move the leg, use the lead at the same level of the side halter ring. Move the chain straight back or straight
forward. Avoid using the chain in a downward
motion as this will be the cue to place the front legs.
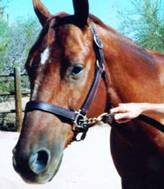
The
chain should be moved directly backward rather than being pulled down
The goal at this point
is to gain control over the right hind leg, and to teach the horse a
communication system. It is important
that the hind leg is swinging straight as it moves forward and backward.
Pull the chain straight forward, not downward, to move the right hind
foot.
At some point, just by accident, the foot
will land in the correct spot, opposite the left hind leg. Tell the horse “whoa” and allow the horse to
stand quiet. Praise the horse.
As you continue to move the hind leg, a “feel” will begin to develop and you will
know how much pressure must be used on the lead to place the foot in the
correct spot. Do not worry about placing the front leg until the right hind leg is
being placed consistently on the first try. This is important because when asking the
horse to step back, the legs will move in diagonal pairs. This means the left front leg will want to
move when the right hind leg steps backward.
By working just on the hind leg, you will eventually separate the legs
so that they are no longer moving together as if connected.
This learning process may take several days
or longer. Do not move on to the front
leg until the hind leg placement is “perfection.”
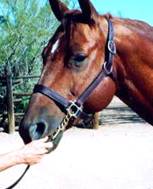
When ready to square
the front leg, first look directly at the front leg you wish to move. If the left leg needs to move guide the lead
down and toward the right front leg. This
shifts the weight to the right front leg, making it possible for the left front
leg to move. To move the left front leg
push slightly to the right side to shift the weight onto the right front leg,
releasing the left leg. Start developing
your eye to see quickly which front leg needs to move. This will depend on the horse’s balance. If the left front leg is too far under the
horse, then that would be the correct leg to move forward.
The horse in the
finished position needs to be standing square and balanced.
The communication for
squaring will be as follows: stop and
face the horse for squaring. Move the
right hind leg either forward or back one step.
Move one front leg one step and present the horse. A lot of work must be done to perfect this
communication, but once it is done, the horse will remember it and make your
performance smooth and polished. It is ideal to use no more than 2 steps when
setting up your horse in actual competition.
During this training process, you must learn
to recognize instantly a balanced square position. When you feel the horse is square, lengthen
your lead so as not to accidentally pull the horse. Then step to the side of the horse to see that
the horse is standing square. Practice
recognizing the squared balanced position until you can see it without moving
from your squaring position.
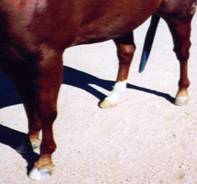
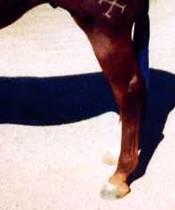
This
picture shows how the hind feet are separated and need to be brought even.

This
picture shows how the right hind foot is moved back and forth - getting closer
to squared.
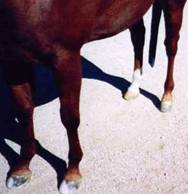
The
hind feet are now squared simply by moving the chain forward or backward, but
not downward.
The
hind feet squared – viewed from the side.
To test yourself and your communication
skills, think and say to yourself which foot you are
going to ask to move and then see if it happens. If it does, you are communicating well. If it does not happen, the horse did not
understand your request.
Once the horse is squared, tell the horse
“whoa” and take one step backward. This
will be your presentation position. When
in this position the horse should not move.
If the horse does move, step back into the squaring position, correct
the horse, and then return to your presentation position.
At this point in your training the
following should be expected.
1. Be able
to walk a straight line, stop and square.
2. Be able
to trot a straight line, stop and square.
3. Be able
to walk and then transition to a trot on a straight line, and then stop and
square.
4. Be able
to trot and transition to a walk on a straight line, stop and square.
5. Recognize
a balanced squared horse from the front of the horse.
6. Your
horse should lead off easily and briskly.
7. The
horse should stop straight.
8. The
horse should be able to square up in two steps at least 50 per cent of the
time.
Problem Solving
1. The horse rests one hind foot.
Lift the head up with the chain to shift the weight back. When the horse stands correct – tell him
“Whoa”.
2. The horse is crooked in his square up.
The
horse is probably stopping crooked. Make
sure the head and neck are straight when stopping. The horse’s head needs to be
directly in front of his chest. Lift the
head up when stopping to prevent the horse slumping on the forehand and the hindquarters
swinging left or right.
3. The horse tries to grab or bite the chain.
Do
not let the chain hang down near the lips.
Keep the chain up across from the ring of the halter. Tell the horse “No” and reprimand with a small
jerk if necessary. Follow the suggested corrections in lesson one.
4. The horse moves the left hind foot.
Always move just the right hind foot. Determine the horse’s
balance. If the right hind foot is
behind him, pull it forward. If it is
too far under the horse, move it backward.
5. The horse moves the incorrect front foot.
Again, notice how the horse is balanced.
Ask the horse to move the foot that is out of balance.
6. The horse takes to many steps to square up.
Keep practicing. Something is
missing in the communication. The horse
does not understand what you are asking.
Try
this drill. Ask for the two-step square
up. First the right
hind foot, and then one front foot.
If it does not happen in two steps, immediately walk forward and try
again. If it does not happen in two
steps immediately walk forward and ask again. Continue until a two-step square
is accomplished. Praise and allow the
horse to stand quietly. Many times a
horse will figure out that when he stands square he will be able to stand and
rest.
Assignments:
1.
Read two articles on Showmanship from any horse magazine of your choice. Give the magazine name and article title.
Give the author of the article and the expert used for the article. Write a summery of the two articles.
Send your report to: cathyhansonqh@gmail.com
2. A video of you performing the "showing/cue" techniques described in this lesson is required. You may post the video to a video hosting web site; for example - PhotoBucket or YouTube. Please send the link to cathyhansonqh@gmail.com