SCULPT YOUR HORSE
Deanna Cummins
Copyright©2011
Lesson Three
Drawing
In this lesson you will learn the basics
of drawing, how to use your drawing tools, and the techniques necessary for
sculpting.
Drawing is an important first step in creating
your sculpture. Drawing improves your
hand coordination and gives you a visual understanding of the horse’s body
structure. Learning to draw will help
you learn to sculpt. Drawing practice
will help you when it comes time to shape the clay for your sculpture.
Why
you must draw your subject before sculpting
Drawing is a very helpful tool for
creating the composition. It helps to
plan the structure and organize the artist’s ideas. It is also very important
for understanding the shapes in different positions. Drawing exercises the
two-dimensional thought process of the brain and helps with comprehension.
Drawing techniques and exercises
There are a number of drawing
techniques available to the artist. The
basic techniques for this course:
A.
Relaxation exercises for the hand.
It is necessary to draw freely and softly.
A relaxed hand will allow you to do so!
Practice quick motions with your pencil making soft shapes, such as up
and down motions with more pressure at the start, gradually getting softer. You can also do this exercise in a circular
motion.
B.
Shapes.
This helps to break down your subject
into parts and to focus on the uniqueness of the individual parts of the body.
Practice drawing circles, ovals and squares.
At first it will be difficult to draw a round circle and a straight
square. But practice visualizing one line at a time before you draw it. It will
be necessary to practice this exercise for a few days before you will be able
to master the shapes. During this exercise, focus on keeping your hands relaxed
and drawing soft lines.
C.
Handling your tools.
The position of your hand on your
paper and the way you hold your pencil will influence how you draw your
subject. It is necessary to practice
often in the beginning. (Later in this
text there are pictures of different hand positions.)
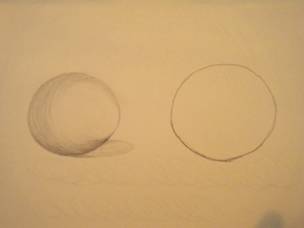
D.
Shading
Making two dimensions become three
dimensional is the start of comprehending the art of sculpting. To make an
object look three dimensional you will need to understand its full
content. How do you show that an object
has many sides when it is on paper?
Basic shading consists of applying more shading in the weighted areas of
an object. Shading on a horse will be in the areas with more tension as well as
the weighted areas of the body. For
example: you will want to shade the shoulder and hip because these are a couple
of areas that will have more action ¨tension¨ and the hooves and legs should be shaded because they carry
the horse’s weight. Shadows also help to
create depth in a drawing.
E.
Drawing from your head versus drawing from life.
Drawing from your head and contrasting
it with drawing from life will reveal your true comprehension of your subject.
Drawing from life will be one of your most valuable exercises. Choose one part
of your horse; his neck for example, and practice drawing just that part of the
horse and see if you can match the shape on paper. Practice each part of the
horse this way.
Drawing from your head: start by
visualizing the image you want to draw. Visualize one line at a time! For example: start with the profile of your
horse. The first line to draw would extend from in front of the ears down to
the top lip. Ask yourself, how is this line shaped? Is the line straight,
curved and does it” indent”? Some horses
have very flat foreheads which blend into a dramatic ¨Roman nose¨ while others
may be straight with small lumps and indentations. You will never draw a
ruler-straight line on a horse! This is because horses are naturaly
imperfect. The ¨imperfections¨ are what
an artist should be looking for when creating a portrait! These are the attributes which set
individuals apart.
Next
work your way up the chin, lower jaw to the jowl and so on.
Drawing tools and how to use them
The tools used for drawing are simple
and few. All that is necessary are two
different grade pencils, paper and a pencil sharpener. All your needed tools are provided in the
tool kit offered with this course.
Holding
your pencil properly is important! You will want to hold it at a 45-degree
angle from your paper. This is the position for most drawing exercises.
Refer
to the photos below for examples of holding your pencil.
Holding
your pencil properly will give you the most control when you apply
pressure. One point to remember: always
avoid pressing hard with your pencil. This will cause indentations in your
paper and it will be difficult to control your lines if your hand is tense. You
want to carefully glide your pencil over your paper leaving a soft pencil line.
It is important to rest your hand to keep it relaxed.
Holding the
Pencil
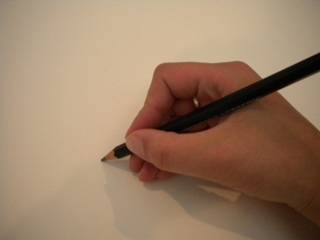
This is the way you
will hold your pencil most of the time.
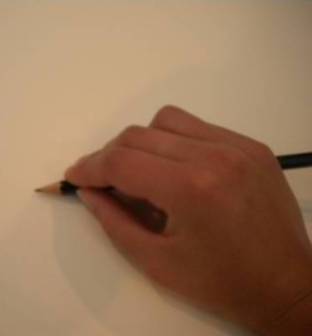
This position is often used for shading.
The negative space
Identifying the negative space will give
you the ability to more easily understand the shapes and how they connect.
Seeing the negative space helps for smoothing and reshaping your clay after it
is added to your armature. Practicing and understanding the negative space is
very important. Practice by looking at the outline of your subject as the
example below shows. A good place to start is the belly line and inside of the
legs.
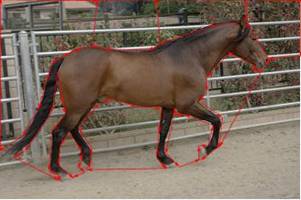
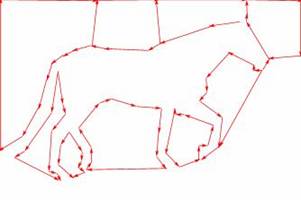
Your horse on paper
On a
photograph of your horse, outline the negative areas.
As you
draw, focus on the small details of each line. This exercise will help you to
define one line from another. Notice that the connections of the muscles are
defined. For example: the throat begins after the jowl which is round and the
neck has a slow curve ending at the chest muscles which protrude slightly out
in front of the neck. Make sure you distinguish the muscle connections of the
horse!
The horse as shapes
On
a number of photos of your horse in different movements find and draw all the
basic shapes of the body. (Refresh your
memory by rereading Lesson 2)
Break
the horse down into as many basic shapes as you can! These shapes should
consist mostly of circles and ovals. Remember that these are the basic shapes
of the body. They condense and extend
when the horse is in motion.
Inside
these shapes find the muscular shapes of your horse. These can distort due to
their density. These will vary from circles to squares to rectangles and so on.
To
find these shapes start by drawing the obvious indentations of the horse’s
muscles. (This was explained in lesson 2)
Hair versus muscle
Hair (mane, forelock, tail) against
muscle is an important contrast! You want to have hair that looks full, soft
and flowing and in contrast the muscles should look strong and natural.
When you are drawing, you can define
the hair against the muscle by drawing two lines for one strand of hair. This
will help make it look thicker and softer. You want to make sure it is flowing
in a natural direction. If your horse is moving, notice how his movement causes
the mane to flow away from his body.
A horse’s mane helps define the discipline as
well as the breed of horse. If your horse is a hunter, depict him in hunter
braids or if your horse is western pleasure horse, put bands in the mane. This
is a fun way to help define the horse’s breed and discipline.
When you are sculpting your horse’s
mane, forelock or tail, make sure you add enough clay to make it thick, soft
and flowing.
The focus is the same as when you are
drawing.
Assignment
Part
1: Practice the drawing exercises A-E in this lesson. Email your drawing exercises to
me at: dncummins06@yahoo.com
Part
2: Draw the negative space of your horse, practice drawing your horse’s
shapes as well as defining the hair against the muscles. Email three of your best drawings.