SCULPT YOUR HORSE
Deanna Cummins
Copyright©2011
Lesson Six
Detail and Technique
In
this lesson you will learn the application of detail to your existing
sculpture. Sculpting the head and adding to the shoulders, neck and legs. Detail
focuses on the animal’s muscles, hair and skin.
Each
area of the body has its own veins, muscle tone, hair type and skin tone. The
only areas of the body to which you may add hair would be the horse’s muzzle or
fetlocks.
The
triceps, deltoid and brachialis are muscles which are most often
well defined in the forehand. The latissimus dorsi is a muscle which is flat and stretched over the back;
similar to its close neighbor the trapezius which is also flat and extends over
the withers and up the neck. Consider these differences of muscle tone as you
sculpt. Below are muscles to keep in mind as you sculpt. The recreation of
these muscles in your sculpture will give the sculpture a feeling of life.
Muscles
to keep in mind: refer to Horse Conformation
Structure, Soundness and Performance. Pages are indicated next to each
heading.
Shoulder (see page 28 and 104)
Infraspinatus
Deltoid
(see page 94)
Triceps
Descending
pectoral
Trapezius
Chest
(see page 32 and 99)
Cutaneus coli
Descending
pectoral
Transverse
pectoral
Haunches
(see pages 29 and 33)
Semitendinosus
Semimbranosus
Gracilis
Quadriceps
The
Torso (see page 28)
Latissimus dorsi
Ascending
pectoral
Internal
abdominal oblique
External
abdominal oblique
Forelegs
(see page 28)
Refer
to lesson 5 (the forelegs)
Hind
legs (see page 28)
Lateral
head of the gastronemius
Long
digital extensor
Neck
(see page 28)
Brachicephalic
Sternomandibular
Splenius
Detailing Your Sculpture
Start
by identifying the visible muscles on your live model. Now indicate on the photograph
which best matches your sculpture composition which muscles are well developed
and trace their shape. The previous section “Muscles to keep in mind” shows the
most common visible muscles of any breed. All the detailing you will be doing
in this section will be refined and minimal.
The shoulders
At
this point, the shoulder of your sculpture should be in its basic shape and
proper form. On the surface of the clay begin by lightly tracing the most
developed muscles one at a time. Do this with your fingers or a blunt rounded
tool. Once you have the desired shape, re-trace the muscle. As you re-trace
push the clay to the inside of the muscle. This should create a convex shape.
Be sure to make this convexity slight when viewed from the front of the
sculpture and the top. The same technique is used for the haunch muscles.
The Chest and Upper Arm
The
muscles of the chest and upper arm, such as the transverse pectoral, descending
pectoral, biceps brachii (of the shoulder) are over
lapping developed muscles which need to be sculpted at the same time. The most
critical muscles are the transverse pectoral and descending pectoral. It is
common to over sculpt these muscles. Notice that the transverse pectoral is
most developed between the forelegs and on its connection to the radial carpal
extensor. Keep in mind that this muscle is small in comparison with its neighboring
muscle the descending pectoral.
See video clip Detailing the chest: http://www.youtube.com/watch?v=ynU2UFb44nQ
Haunches
The
Gracilis should properly be placed at this point, but
be sure that this muscle dose not extend to far down the inside of the hind
legs.
To
define the semitendinosus use a rounded tool to create a slight concave tracing
of the muscle on both sides of the haunches. The same can be done for the
biceps femoris muscles.
See video clip: Detailing the hip: http://www.youtube.com/watch?v=Pp_cTDsV870
The Torso
This
area of the horse does not require much detail. Areas to notice will be the
Trapezius where the withers begin to ascend up the neck. In this area there is
more development in the withers then in the back. It is easily shaped with the
tips of your fingers and the side of your thumb. The ascending pectoral is
often a well- developed muscle, but hard to view. It looks like a thick rope
that extends down both sides of the belly.
The
external and internal abdominal oblique defines the horse’s flank. To delineate
the external abdominal oblique lightly outline the visible line (if any) of
this area using the same technique described earlier with your fingers and the
tool.
Neck
The
jugular groove is the most defined area of the neck. This is visible on every
horse to some degree. To delineate this part of the neck begin at the
throatlatch by creating a long descending line with a wooden tool that has a
wide rounded end. Push the clay carefully up towards the crest of the neck. Add
clay to define the splenius behind the ears.
Detailing the Head
The
head possesses much to detail, however, the artist will not want to add all that
is seen in a living horse. In a sculpture 8 inches tall you will want to choose
the amount of detail carefully; you’ll want to choose the most desirable
features of the face.
To
sculpt the basic shape of the head apply the clay in large shapes.
Starting
with the cheeks, roll out large circles and place them on both sides of the
head. Add clay down the muzzle to create proper thickness. While viewing the
sculpture from the front; place clay on both sides of the head. This should
make the head look like a diamond when viewed from the front. The points on the
sides of the head are your reference for where you will be placing the eyes.
See
video clip: Sculpting
the head http://www.youtube.com/watch?v=3Cpzr1-zw50
When sculpting a horse’s eye always
begin from the inside out. This will give you the ability to sculpt intricate
eyelids.
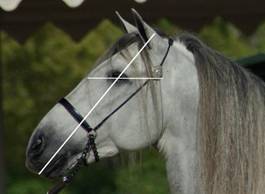
Begin by locating the proper position
of the eyes (as shown in the picture). This is done by drawing two imaginary
lines on the front and sides of the face. Notice that the eyes are placed on a
slant. The corner closest to the forehead points in and the other
points toward the splenius. The descending muscles of the forehead point
directly to the inside corner of the eyelid making it a very good guide for
placing the eyes.
To begin sculpting the eye, carefully
scoop an eye shaped hole on both sides of the head where the lines meet over
the eyes. Be sure to view the sculpture from the front and confirm that the
eyes are placed across from each other. Now roll a small clay marble for the
eyeball and place it carefully into the eye shaped hole. Take care not to
flatten the clay marble too much. Now view the sculpture from the front again.
Are the clay marbles set away from the head or are they flush? If they are not
flush you may have to deepen the hole or make smaller marbles. Remember that
when the eyelids are added the eyes become larger. Now press the lower part of
the eye in. This will slant the lower part toward the horse and the upper lid
away from the horse.
See
video clip: Sculpting
the eyes http://www.youtube.com/watch?v=Ln2vKCXxLOM
When
creating the eyelids, always begin from the top down and inside out. So the lid
that is over lapped by another will need to be sculpted first. This will
maintain the detail and clarity of all the layers of skin.
Start
with a small triangular piece of clay. Be sure that this piece is particularly
thin, and place it in the inside corner of each eye. This is the inner eyelid,
which sweeps horizontally across the eyeball. Next roll a small, thin rope-like
piece of clay. This will be the first part of the upper and lower eyelids.
Press the outer edge of the long piece of clay flat so there is no visible
crevice. The part which lies against the eyeball may remain untouched to give
the allusion of the possibility to blink. Notice that the area around the eye
is fleshy. To create this affect start with the lower part of the eye and shape
a small piece of clay to match the outline of the larger part of the lid. Place
this clay under the eye and smooth all the edges. The same will be done for the
upper lid only this will require more clay.
Refer to Sculpting the
Eyes video clip.
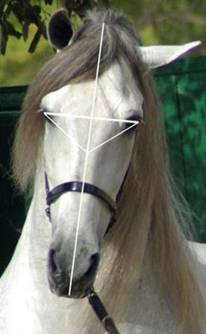
When
sculpting the nostrils, notice that the head tapers into a thin triangular
shape. The same shape, though smaller, is found in the muzzle as shown in the
picture. To create this tapered look, press the sides of the face above the
muzzle with your index fingers.
To create nostrils, use a flat tool and scoop
out a crescent shape on both sides of the muzzle. Imagine that these crescents
would create a circle in the middle of the muzzle if pushed together. Using the
tool, carefully carve out the nostril to create a tunnel up the nose.
See video clip: Sculpting the nostrils http://www.youtube.com/watch?v=mCC7uF1wdsg
For
the ears, start by sculpting a refined triangle for both ears and place them on
the head in the desired position. Smooth the connecting edges to attach them to
the head. With a sharp edged tool carve out the inner part of the ears.
As
you begin to carve the lower portion notice that the edges of the ears come
together creating a sort of lip. Maintain this as you sculpt. Notice that the
outsides of the ears are not flat but have an obvious convex shape between the
point and connection to the head.
See video clip: Sculpting the ears http://www.youtube.com/watch?v=IkOfCOOQcLY
Start
the facial detail by first locating the facial crest. This is the obvious bone
that runs along the top of the jowls under the eyes. To sculpt this, add a long
piece of clay and smooth the edges. Define the jowls with the side of your
thumb by pushing it carefully up toward the ears.
To
sculpt the mouth, push the clay in to create a small crevice in the shape of
the horse’s mouth on the muzzle. Then round
and smooth the edges on both sides.
The temporal fossa is located above
both eyes. This is the part of the forehead that moves as the horse chews. To
sculpt this divot, carefully carve out a small crevice.
See video clip: Detailing the head http://www.youtube.com/watch?v=aqsbTSUg-zE
Here
is where you will have the opportunity to decide which facial detail you would
like to add to your sculpture and which is most noticeable in your own
horse.
a. Veins
Some
horses possess obvious veins and others show very little. Veins are often seen in a horse that is fit
or in the moment of work. The veins that are most often seen are between the
jowl and muzzle as well as around the eyes.
Veins are simple to sculpt; start by rolling a
very small piece of clay and lay it in the pattern of the vein being sculpted,
and then smooth out the edges. Be sure these veins are soft and not overly
defined.
b. The forehead
If
your horse possesses well defined muscles on his forehead you will most likely
want to include these in your sculpture. Notice that the muscles in this area
are crescent shaped. They curve toward the eyes and ears and are soft rounded
muscles. Place crescent shaped pieces of clay and smooth the edges.
Detailing the Legs
1)
Knee,
Tendons and ligaments
To sculpt the knee, begin by adding two
small crescent shaped pieces of clay on both sides of the leg in the proper
location of the knee. Fill the center with two small horizontal pieces to
create the joint.
See the photo in lesson
To sculpt these tendons and ligaments
begin by tracing them into the cannon with a flat tool. Use the tool in a
rolling motion over the top of the ligament or tendon to give it a round
affect. Smooth the edges with your fingers.
See
video clips: Detailing
the hind legs http://www.youtube.com/watch?v=IlvULp7FE1Y
2) Hooves
Read
pages 253-267 in Horse Conformation
Structure, Soundness and Performance. The hoof has two areas of detail, the
coronet band and the underside of the hoof. To sculpt the coronet band, use a
flat headed tool and indent the area just below the coronet. As you indent roll
the tool up to create a rounded edge on the clay.
To
sculpt the hoof, begin by defining the frog. Do this with a sharp tool and
carve out the indentations on both sides of the frog. In the center of the frog
there is a concave shape identical to the shape of the frog. Carve this area
out as well. To create a proper looking wall, sole and bars use the flat of a
tool and press in along the wall leaving about an 1/8” or less around the edge
of the hoof. The sole is an area that slopes inward. To do this press it deeper
as you come closer to the frog. Leave a small amount of raised clay for the
bars.
See video clip: Detailing the hoof http://www.youtube.com/watch?v=xAiOiP0rusk
Hair
on the fetlock of a horse is simple to create. Start by adding many small
strands on the sides and back of the fetlock. Smooth the crevasses together
with a tool and carefully rub the hair with a finger to make it soft. Etch
small hairs in a downward motion around the coronet with a pointed tool.
Sculpting the Mane and Tail
1)
Mane
There
are many stiles, breed types and lengths of mane. In this lesson you will learn
to sculpt a full natural mane. It is important to master a thick mane; if you
are able to sculpt a soft full mane you will have the ability to sculpt any
other type.
Begin by adding thick long strands of
clay in the center of the neck. As you come closer to the head and withers
gradually make the strands thinner and shorter. Layer these strands three or
four times to make it look full. Fill the crevasses in between the strands with
clay and smooth them with a rounded wooden tool. With the same tool separate
the clay strands by drawing semi-deep lines. Turning each strand into multiple
strands of hair and smooth them with your fingers.
See video clip: Sculpting the mane http://www.youtube.com/watch?v=ZOf-g8WyssU
For a thinner and shorter mane the same
process will be done only make your strands more refined. To sculpt a roached
mane, roll out a strand of clay making it thinner on the ends and place it
along the top of the horse’s crest. Attach it by smoothing the crevasses on
both sides. Etch hair with a small wooden tool with upward strokes.
2)
Tail
Cover the wire for the tail with long
flat pieces of clay. You should be able to make the tail with two or three pieces
of clay. This will give the tail thickness. Over these strands add small round
strands of clay; just like you did with the mane. Continue with the same
techniques explained in the previous section about the mane.
Color Options for Your Sculpture
First follow the baking instructions
provided in your sculpting kit.
There
are many ways available for adding color to your sculpture. Here are some
desirable materials in order of use.
a)
Primer: a primer for metal or wood will work well. Choose a shade that is
similar to the color of the paint.
Spray
a light even cote of primer over the entire sculpture. As you apply the primer
keep a consistent distance of about 8 inches from your sculpture. Allow it to
dry for 30 minutes.
b)
Out door paints are a good choice because they are durable and long
lasting. Acrylic paint is forgiving and
easy to work with.
To
create a bronzing affect for your sculpture use a spray-on bronze metallic base
coat and dab a dark brown or black paint with a rag all over the sculpture;
creating a large stippling affect. Quickly wipe away areas that have fine
detail to create highlights; such as the mane, tail, face and muscular areas. Be sure to do any painting in a well
ventilated area away from children and animals. When using spray paint, always
follow the instructions. Wear a mask and gloves while spray painting. See
photo below.
Hand Painting:
To
hand paint your sculpture you will need at least three brush sizes.
1.
Three-quarter inch wash brush
This
brush is used to apply the base coat and paint the large areas of the body.
2.
A one-inch wide soft brush.
This
brush is used for detail areas such as the legs, muzzle, mane and tail.
3.
One rounded brush with a fine tip.
This
brush is used for eyes, hooves, nostrils and black tipping the ears and legs if
your horse has dark points
You
will also need:
1)
A large flat work surface
2)
A jar of water for cleaning the brushes and thinning the paint. Keep this water
fresh and clean.
3)
A towel for cleaning your brushes.
Begin with the ¾ inch brush moistened
in water. In even strokes apply the paint in thin layers. Allow each layer to
fully dry before adding the next. Do this until the sculpture is fully covered
with a solid color of paint. To apply dark points use the “shader”
brush and apply the paint in its normal consistency. Gradually thin it more and
more with water as you approach the area where it begins to blend or fade into
the body color.
For markings, outline each marking on
the horse’s body and fill them in with shades of the markings color and blend
them together as you paint. (See photo below for shading)
Paint the entire eye black and add a
circle of brown or blue in the center of the eye using the rounded brush. Dot
the eye with a small white spec to give it life. Paint a layer of clear nail
polish over the eyeball to make it look moist.
c)
Fixatives: choose a mat spray-on sealer for a natural look. Krylon
is a good brand to use. Be sure to get a non-yellowing and moisture resistant
finish.
Once your sculpture is fully painted
and has been allowed to dry for several hours spray the fixative on the entire
sculpture in thin layers one at a time. Allow each layer to dry before applying
the next. Apply at least four to five layers.
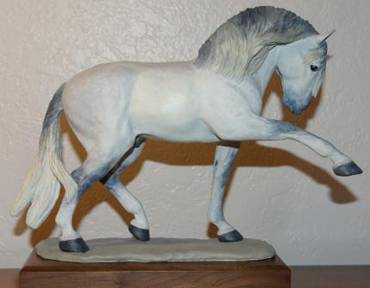
Base and Mounting Options
If
your sculpture is free standing, a base is not necessary. But a base does
create a nice finished look for a sculpture.
You
can be creative with the base. Keep it
simple and complementary to the sculpture. Wood and marble are complementary
materials for sculpture bases.
You
also have the option to sculpt your own base and paint it. This is useful if
your sculpture is not free standing and needs a prop to hold it up. If this is
the case you can get creative with props, making jumps, walls, plants and so
on.
The
base should bring the focus to the sculpture. Be sure you do not choose
something that is finely detailed. A lot
of detail on the base draws the focus away from the sculpture.
Assignment:
1) Write an essay explaining the
techniques that you learned in this lesson and how you applied them to your own
sculpture.
2) Send a video showing your techniques
of detailing a leg, shoulder or hip, face and mane or tail. Send photos showing
your finished sculpture.
Send your assignment text, pictures and
video link to: Deanna Cummins dncummins06@yahoo.com
Please
be sure to put your full name on all work.