SCULPT YOUR HORSE
Deanna Cummins
Copyright©2011
Lesson One
First Steps in Creating Your Sculpture
Part 1 Lesson 1: Materials and Tools
Order Intermediate Art Kit or Clay/Tool
Kit from: http://sculptingtools.weebly.com/


You will also need a sculpture mount
kit (available at http://sculptingtools.weebly.com/)
and a camera.
Tools and how to use them
In this part of the lesson you will
learn about different tools and how sculptors use them. (You can use a variety of tools to get the
effect you wish to create; I encourage you to experiment with different tools to
see the textures you can create with them.)
Tools merely assist you. The tools I think
you’ll discover are your favorites, once you have learned to use them, will be
your hands. Using your hands and the other tools will take practice, but with
time you will master them.
Your
Hands
Your
hands are your primary tool when it comes to sculpting. They are always
accessible, and due to their natural shape and flexibility they give an artist the
opportunity to use them in many different ways. You will find your fingers are
the best tools for smoothing clay and adding natural looking muscles to the
large parts of the body. When a sculptor uses her hands more than artificial
tools, the sculpture will have a soft and flowing look to it.
Fingers
and hands are used mainly on the largest parts of the sculpture.
The
techniques you can use with your hands are many, and you can get creative in
finding what works best for you.
When
using your hands and fingers, the first thing to keep in mind is pressure. The
amount of pressure you apply with your hands and fingers will determine the
amount of detail or smoothing that will be achieved. Always start with minimal
pressure and gradually add more and more. As you add more pressure, stop and
evaluate what you have done before going too far.
You
MUST stop frequently and look at your sculpture from a distance. Doing so allows you to see the entire picture
and the kind of effect you are having on the entire sculpture.
By
using light finger pressure you will be able to carefully smooth the surface of
the sculpture. Surface smoothing with your fingers can be done to the large
parts as well as the refined parts of your piece.
By
using medium finger pressure you can indent parts of the body. For example, in
the shoulder or hip you can use the side of your thumb to create grooves which
will look like muscles.
The
only time you will be using intense pressure in this course will be for
softening your clay.
Wooden Tools
Using
wood tools will give you a soft affect similar to your fingers. The wood is
smooth and when used with water or your saliva (this is done by licking the end
of the tool) you will be able to blend areas that are too small for your
fingers. By using water or saliva you will be able to smooth sharp looking
edges and detail.
The
wooden tools are used for fine shaping and finishing your work.
Wood
tools come in various shapes, allow you choices to meet your needs at any given
moment.
The small round tipped tools works well for
fine detailing such as hair, nostrils, eyes, eyelids as well as leg detailing
such as hooves, ligaments, chestnuts and so on. The larger tools will also work
well for hair, large muscles and reaching up inside hard to get to places such
as the insides of legs and underside of the head such as the lower jaw, chin,
and throat. The flat tools will have a sharper and more defined affect then
rounded tools which will give you a smooth affect.
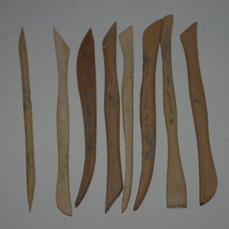
This is an example of a
basic wooden tool set. Many artists like to carve their own tools to fit their
specific needs. As you sculpt, you’ll find certain shapes are more useful to
you then others. There aren’t specific names for tools because they are usually
just a collection of different wooden shapes.
Metal Tools
Metal
tools are often used for cutting small parts of the clay or adding sharp,
defined detail like the frog on a horse’s hoof, or the very small detail for
the inside eyelid as well as veins. The sharpness would later be carefully
smoothed by your finger or a wooden tool.
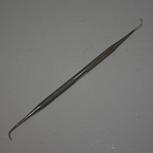
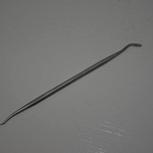
These are examples of
different shaped metal tools. These happen to be dental tools which have great
shapes and sizes for sculpting. Today
art suppliers are making metal sculpting tools which can be found at your local
craft store.
Available
Materials
An
artist that fully intends to cast her work after the sculpting stage is complete
will be able to use virtually any material to achieve the desired affect. But
the artist that intends to have a finished product without casting, as we will
be doing here, will need to choose materials that will last and can be hardened
for painting.
Though
you can use any material to create your art, you will want to keep these key
points in mind about undercuts.
Undercuts
What
is an undercut? This is an area of your
sculpture that is deep and has at least two sides. Areas between the legs are
considered undercuts, as well as areas around the mane. Nostrils and ears are
some areas that may have undercuts. You want to sculpt these smaller areas so
that they are not extremely deep. Avoiding deep undercuts will give you a
cleaner and smoother sculpture.
Materials
Clay
is the number one material used by artists today.
Clay
is pliable, allowing you to shape and reshape throughout the entire sculpting
process. Clay allows an artist to fill unwanted holes and crevasses easily. It
is also very forgiving and can be sculpted and re-sculpted numerous times. Clay
gives you the ability to add detail such as hair and muscle more easily then a
hard material such as wood.
Clay requires the least amount of physical
labor when working on small pieces as we will be doing in this course, and clay
does not require the use of any large tools.
There
are a large variety of clays available to use today. Each clay type has its purpose and proper
use. Some clays
are formulated to be reusable; these are called plasticine
clays. These clays can never be hardened and are often oil based for endurance.
There are also clays which are
formulated to harden. Some are air drying clays and others require the use of a
kiln for firing and hardening. These clays are used for ceramics, pottery and
ceramic sculpture.
There
are clays formulated for baking in your own oven. There is a large variety of oven-bake clays
available in your local craft store.
Sculpture Mount
A
sculpture mount is a simple, but very useful tool for the sculptor! You can
build this yourself with the tools mentioned here. A sculpture mount kit is
available online at http://sculptingtools.weebly.com/.
It is not required for sculpting, but will assist you in maintaining the detail
of your sculpture.
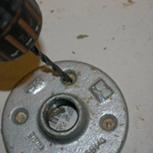
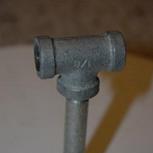
To
build this useful tool you will need one floor flange with screws, one piece of
plywood (measuring 7”x7” and at least ¼” thick) one galvanized tee ¾” (make sure
your tee is threaded) and one brass nipple ¾” in diameter and about 6” in
height (this is a metal pipe with threading on both ends). All of these
materials should be available at your local hardware store.
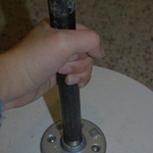
To
assemble: screw the floor flange to your plywood and screw the brass nipple
into the top of the floor flange. The tee will screw to the top of the brass
nipple. And that’s how you build a sculpture mount. If you have a lazy “Susan”,
place your plywood on top of it so you can easily rotate your figure while you
sculpt. (More details about building and
using a sculpture mount in lesson four.)
Part
2 Lesson 1: Photographing your Horse
It
is important to have a variety of photos of your horse.
Photos
should include your horse turned out and playing, under saddle, being longed
and groomed. Observing your horse in these settings will allow you to fully
define his character and what part of the character you want to accentuate. But
you also want to make sure you are taking valuable and useful photos. For example, a lot of artistic head shots
will not help you much with sculpting the body of the horse.
Think
in terms of what you want your sculpture to be when finished and take photos
that will help you create that image.
Do
you want your horse to be trotting, or squared for a halter pose? Or do you want your horse playfully kicking
up his heels, or grazing on green grass?
Keep the image of your sculpture in mind each time you take a photo of
your horse. Be sure to photograph your horse
from all angles and sides.
Using the surroundings
properly
The
surroundings in your photo are very important. This is what will make up the
background of your photo and give you contrast. You want to choose places with little
clutter. Wide open areas such as arenas and pastures are great places to
photograph your horse. Enclosed areas,
such as a stall, are not places that allow you to see your horse and his
proportions properly.
You
want a lot of light. This will reflect the muscle tones of the horse’s body and
help you define them in your sculpture. It is easiest to photograph outside
with natural lighting.
Lighting and how to
use it
Using
light can be your best friend or your worst enemy in photography. Proper lighting
will reflect the highlighted tones of the body parts of the horse. You want a
lot of natural light behind you or coming in at no more then a 90 degree angle
toward your subject. This will highlight areas like the shoulder, face, and
legs, and will give you the ability to see the varying dips and crevices that
are naturally a part of the horse’s body.
You never want to be facing into the
sun! This will fade your subject making it very hard to define important areas
of the body.
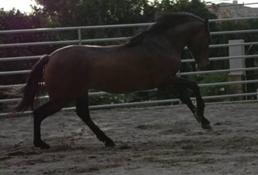
These
are two examples of proper lighting.
In
the first photo you can see the shoulder, neck and foreleg being emphasized by
the light. The photos can be useful in sculpting these areas of the horse. In
the photo below the entire subject is clearly visible and defined.

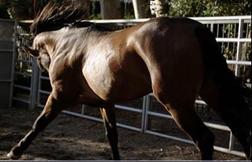
The following picture is an
example of improper lighting.
As
you can see the horse is blending into the background.
The
body parts are not highlighted or defined. You want to make sure you have a lot
of natural light.
Take
photos in the morning, outside and facing away from the sun to avoid these
kinds of useless photos.
Proportions in a photo
The
angle that you take your photo will affect the visual proportions of your
horse. It is easy to distort the image by improper positioning of the camera.
You want to stand directly across from the horse’s barrel as if you where
longing him. This position will give you
a view from the side that does not distort the image and you will be able to
view the horse’s natural proportions and conformation.
Keep
proportions in mind when you are photographing your horse standing as well as
in motion.
When
you are photographing your horse from the front or the back you want to stand
directly in front of the horse so your shoulders are lining up with his. The
same with the rear view. Stand directly behind your horse at a safe distance
with your shoulders in line with his hips.
Photographing the parts of the horse
You
want to photograph close ups of your horse’s legs, face, shoulder, hip and
back. These photos will be used for
reference while you are sculpting. You can make an album of all your photos for
easy reference.
Choosing your composition
This
means in what position you would like to portray your horse.
What
is your focus?
Here
are a few points you can consider; your horse’s personality, historical origin,
breed conformation and so on.
Composition
is important! It is what creates the interest and feel of your sculpture.
Composition
of a sculpture derives from a number of the artist’s thoughts and ideas. The composition is what tells the story and
reveals what you were thinking.
A
one-horse composition will focus on the specific movement of that individual.
In
this course we will be focusing on a one-horse composition. Below you can see
some examples.
One horse compositions:
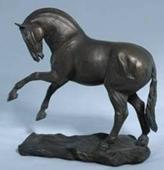
This sculpture shows the historical origin of the Andalusian breed and its majestic personality.
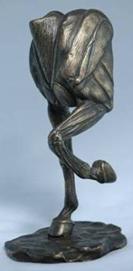
This is a one horse
composition with a modern twist emphasizing the muscular attributes of the
horse’s forehand.
Assignment:
Part 1:
Practice using the tools and clay that
are provided in your sculpting kit. Use the techniques described in this lesson
along with your own creativity. Try creating different kinds of textures such
as hair and muscles with each tool. Be creative!
Part 2:
Photograph your horse in different
kinds of lighting and try to emphasis the muscles of your horse. Practice photographing
your horse from the angles described in the proportions section of this lesson.
Also shoot detail photos of the parts of your horse and choose 5 to send for
this lesson. These parts should be head and neck, back, forelegs, hind legs,
and detail areas, such as chestnuts, nostrils, tail, hoof, etc.
Photograph your horse in the
composition that you will be sculpting him/her. Your composition can be the
full body or a part of the horse, such as his/her head.
Part 3: Send your composition photo with a
short written description of your plan for your finished sculpture.
Send your assignment to: Deanna Cummins dncummins06@yahoo.com
Please
be sure to put your full name on all work.
If you prefer to mail it send to:
Deanna
Cummins
9738 Flying Mane Lane
Alta Loma, CA 91737