SCULPT
YOUR HORSE
Deanna Cummins
Copyright©2011
Lesson Four
The
First Stages of Sculpting
In
this lesson you will learn the differences between three dimensional (3d) and
two dimensional (2d) sculpting, the applications of technique and the first
stages of sculpting in clay.
Medallion
Versus 3D Sculpture
Medallions
can be 2d or 3d art depending on the preference of the artist.
Many
medallions are a combination of the two where the depth of the image is 2d and
the foreground is 3d. Much of Greek art is sculpted in this way because it adds
a very dramatic effect to a medallion sculpture.
Three-D
sculpture will depict part of the subject or the entire body, but you can
always rotate the piece 360 degrees so you can see all sides.
In
3d art an artist has the opportunity to structure many compositions inside one
piece of work. For example, if an artist
is sculpting a herd of horses the composition can be from all angles depicting
different events that are happening in that moment. By placing each horse in a
specific manner the artist can draw attention to specific events happening in
the sculpture.
Techniques used for a
medallion
Creating the 3D medallion
a. To make a medallion you first need to
create your shape. It can be any shape you like from square, rectangle, oval, round
or you can get creative and make it a hexagon and so on. The shape you choose
should compliment your composition. For example, if you choose to sculpt more
then one horse you might want your medallion to be a rectangle shape so that
you will be able to fit horses standing side by side. Or if you are sculpting a
horse’s head you might want to choose the circle because the head will not
require a lot of room and the shape will draw attention to the horse’s eye.
b. The shape should be symmetrical on all
sides. To do this it is best to use a pre-cut peace of plywood. Plywood comes
in all shapes and sizes. If you are not
able to find the shape you are looking for you can get plywood cut to shapes at
many hardware/lumber stores.
Start by smoothing your clay over your
plywood about ¼ to ½-inch thick. You want sufficient thickness for adding
detail later. Cover the entire shape of your project. Smooth the edges of the clay. You can get as creative as you would like
with the edge of your sculpture. You might
want to add embellishments or texture depending on your focus.
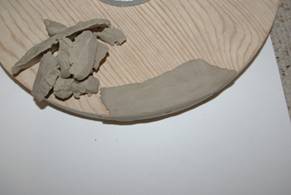
Smooth
clay over plywood
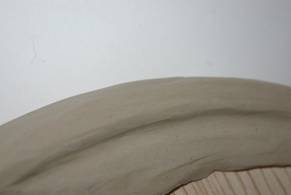
Clay
covering edge of plywood
Make
the entire clay surface as smooth as you can. A little water on your fingers
helps smooth the clay, but be careful, too much water will keep the clay from
sticking to itself. Once the clay
doesn’t blend into itself, it is difficult to fix. If this happens, often you simply have to
replace your clay.
c. Once you have smoothed your surface
and created the edge, your medallion is ready for the application of the first
detail.
In a 3d medallion you will want to
start from your background and work to your foreground. This will give you the
ability to add detail in areas which will later be more difficult to
reach. (Do not add any desirable 3d
detail at this point. The reason for this is that the detail must be added in a
specific order so that you will not destroy your detail while you are in the
process of sculpting other parts of the medallion.)
Let’s start. Is your horse in front of trees, mountains or
the ocean? Choose your background carefully. You will not want to add too much
detail to the background. The reason for this is that it will create
distraction from your focal point which is the horse.
Begin by tracing the outline of the
background with one of your smaller tools. Remember to use light pressure as if
you where drawing with a pencil.
Along your tracing, start adding small
amounts of clay so that your image is slightly raised. Assuming that your medallion
is fairly small you will want to keep it between 1/8 to
¼-inch thick. A smaller relief in the background will give you more
contrast with your foreground. See video
clip http://www.youtube.com/watch?v=RjN5SKhoww0
d. When you have finished adding your
background relief you are ready to start adding your first foreground detail.
This detail will be partly 3d. For
example, if you are sculpting a cantering horse this would be the hindquarters
of the horse. This part of the horse would have more intricate detail and would
be raised on top of your background another 1/8 to 1/4-inch thick. The detail that you will be adding in this
part will be muscles, tail, hooves, chestnuts and so
on. The detail of this part is still 2d similar to your background.
See
video clip
http://www.youtube.com/watch?v=xJGjolQUTIk
e. Now we can begin adding the 3d portion
of the medallion. A 3d image is when you are able to see all sides (360 degrees
around). Again, if you are sculpting a
cantering horse part of the back and torso will be protruding from the 2d
background. The forelegs, chest, neck and head will all be 3d; meaning that
they will in no way be touching the background of the medallion. (Techniques
for sculpting detail will be discussed later in this course.)
The 2D medallion
A 2d medallion has the same process as
the 3d. However, rather than following
step “e.” you will continue with step “d.” for your entire image. In this part
of adding the relief you can add as much or as little detail as you feel is
necessary in creating your sculpture.
Techniques used for a
3D sculpture
A
3d sculpture like the medallion requires proper measurements, angles, and
proportions. It is necessary to understand your image from all its angles. The
sculpture should look in proportion, when you view it from the front, side,
top, back and underneath. When sculpting, it is very important to always rotate
and look at your sculpture and be ready to make small or major adjustments if
it does not look proper. It can take a number of times sculpting and
re-sculpting a part of a figure to get the desired look and proportion. It is
important to always refer to your original image (your horse). Study the
photographs of your horse while you are sculpting. It is always helpful to
review the exercises you have learned to help in understanding the proportions
of your image.
The armature
The
armature is what will give you the proportions and size of your figure. The
most critical part of the armature is the torso. This will directly determine
the size of your figure. All the other areas of the body such as the four legs,
neck, head and tail should all be measured longer then needed so that they can
later be trimmed to the proper proportion according to the torso.
Size, measurements and angles
A sculpture is measured from its
highest point.
Your armature will be made of three pieces
of wire. This wire should be measured 3 times the desired height of the
sculpture. For example, if you want your
sculpture to be 8 inches tall you would measure your wire between 24 to 26
inches long.
The torso for a wire armature of a
horse is measured from mid shoulder (which is in front of the withers) to mid
hip (behind the loins) this would measure about 4 inches long; half the height
of the sculpture. These measurements can fluctuate anywhere within a half an
inch.
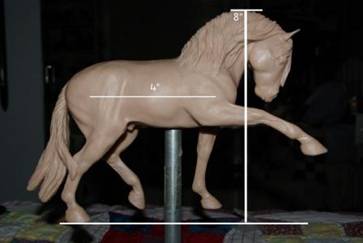
Height
– 8 inches; length – 4 inches
When considering proportions and
measurements, remember that it will need to compliment the size of the
sculpture as well as the other body parts. Each body part will relate to
another. Take the foreleg of the horse as an example. The leg is made up of
four basic parts. The upper arm, cannon, pastern and hoof; if we measure from
the elbow to the back of the knee this measurement will be very close in length
to the cannon measured from mid knee to pastern. These similarities will be
repeated in other parts of the body.
(More will be explained about proportions in lesson 5.)
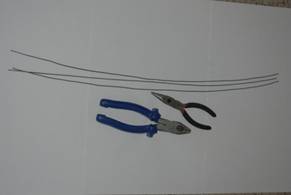
Tools for building an armature and how
to use them
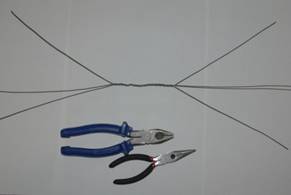
There are only a few tools needed to
build your armature. You will need two needle nose wire cutters, galvanized
wire and some tinfoil. The circumference of the wire will depend on the size of
your sculpture. You will need a larger circumference for a larger figure. Be
sure that the wire is firm. This is necessary because the wire must be able to
withstand the weight of the applied clay.
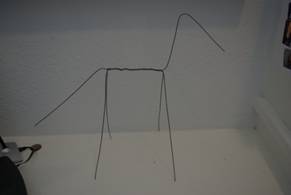
Building the armature
a. You will need three pieces of wire cut
and measured to be the same length (3 times your desired height.)
b.
Place your pliers next to each other in the center of your three pieces of wire
and twist them together until you have your desired length of the torso.
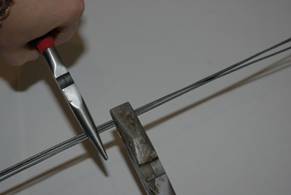
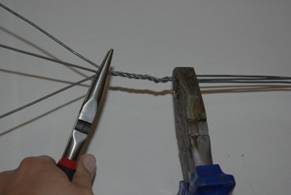
Make sure your wire is the same length
on both sides of the torso. A finished torso should measure close to half the
height of your future sculpture. For example if your sculpture is 8 inches tall
you will want the torso to be about 4 ¼ to 4 ½ inches long.
c. If you plan to use a sculpture mount
(recommended) before bending the
wire, thread it through the top portion of a metal Tee pipe. You can build a mount
yourself as described here.
Building a Sculpture
Mount
A sculpture mount will help you keep
the detail in-tacked while you are sculpting. This offers a "hands
free" method of holding your sculpture while you work. For purchasing a
sculpture mount kit please visit http://sculptingtools.weebly.com/ for additional
details
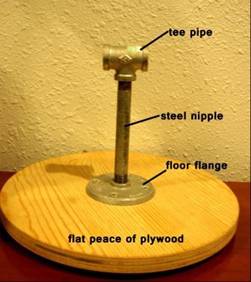
You will need:
One flat peace of
plywood (shaped to your preference)
One ¾” floor
flange, threaded (four matching screws)
One ¾” x 12”
steel nipple, threaded
One ¾” Tee pipe,
threaded
All the above materials are available
at most local hardware and home supply stores.
Attach the floor flange to the center
of the plywood (you will need to drill the holes for the screws) with the four
screws. Attach the steel nipple to the floor flange. Thread your wire frame
through the top of the Tee pipe and fill the tee with some clay to keep the
wire frame from sliding from side to side. Screw the Tee pipe to the steel
nipple.
To attach the floor flange without
screws you will need some epoxy (found at most hardware stores) place a
generous amount of epoxy under each screw hole and press the floor flange down
hard. Be sure you allow the epoxy to dry for 24 hours before using. WARNING:
Epoxy is a toxic material! Read all safety instructions on the packaging before
using! Always keep out of the reach of children and animals. Wear gloves, a
face mask and work in a well ventilated area.
d. Bend
the neck, head, legs and tail. Trim some of your excess wire. Be sure not to
trim it too short.
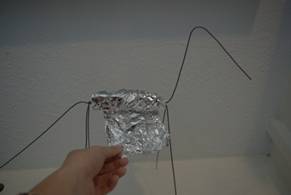
e. Wrap
the torso with tinfoil a number of times. This will make your clay figure
lighter in weight and speed up the first step of applying the clay.
Keeping your finished
sculpture in mind
It
is always important to keep your finished image in mind! This is because you
want to create something that is practical from a sculptor’s point of view. Practical
meaning that it will have the ability to stand without extra mounts.
Your
sculpture will need an attractive means of standing. This is most often done by
creating a small clay base for your horse to stand on. (Base options will be
discussed later.)
It
is always good to look ahead and plan your finished sculpture. You can do this by getting ideas from other
sculptures.
Get
creative! Your composition is very important and without a good concept of your
finished image it will be very difficult during the process to sculpt your
ideas.
Assignment
1. Choose one technique of sculpting from
the three we discussed in this lesson. Build your frame if you will be
sculpting a medallion, or build an armature if you choose to sculpt 3d.
2. Write a paragraph about your chosen
sizes and measurements and send it to me with photos of your frame or armature
prepared for clay application.
Send your assignment to: Deanna Cummins dncummins06@yahoo.com
Please
be sure to put your full name on all work.