SCULPT
YOUR HORSE
Deanna Cummins
Copyright©2011
Lesson Five
Medium
and Application
In this lesson you will learn the
differences between working with clay and other traditional mediums such as
stone and wood. (Medium: a commonly used word in the art world which means
material and work of production.) We will briefly examine the process of using
material other than clay. Finally,
you’ll learn to properly apply your clay to the armature.
Different clay and
medium options
There are several mediums to work with
when sculpting. The two traditional
mediums are wood and stone.
Different mediums require different
techniques such as carving away or adding material. Throughout this course you will learn the
technique of adding, but will have the opportunity to briefly learn about
carving, as well as some other artistic practices.
There is a wide variety of clays
available to the artist. Clays can be chosen by texture or consistency.
Depending on an artist’s style and subject she may choose more or less firm
clay. Firm and soft clays range from ceramic, which is soft when it is
hydrated, to Plasticine clay which has three types of
consistencies, but is still very firm when compared to ceramic. Just like clay,
wood and stone have many consistencies as well. Depending on the location of
the wood it will be more or less firm. For example, redwood is soft do to the
climate of its location. Walnut is a firm wood because it grows in dryer
climates. This is also true with stone material. One very commonly used stone
is marble. It is often chosen for its more forgiving nature; it’s easy to sand
and make smooth.
Clay Versus Other Mediums
Clay
Clay
allows an artist to shape, add and carve away from the artwork. With its
flexibility, an artist can easily make adjustments throughout the sculpting process.
When clay is finished it will always need a curing process to make it last.
This is done in a number of ways depending on the desired finish.
Ceramic
First and most commonly known is the firing
of ceramic. To make this clay durable it will need to be brushed with a glaze
and fired in a kiln at an approximate temperature of 1700 and 2000
degrees.
Air drying clay
Air drying clay is not long lasting,
but is often used by the enthusiast because of its low maintenance and easy
hardening. Air drying clay can be
painted and made to look very attractive.
Non-drying clays
Non-drying clays will always need to be
taken through a mold process. There are
a number of processes for hardening, and each process leads to a different
finish.
Lost wax
The process of lost wax begins with a
rubber mold around the clay figure. This mold captures the detail, creating a
negative inside the mold. Once the mold cures, the clay figure is pulled out of
the rubber mold and wax is poured in. This creates the second positive of the
sculpture in wax.
The wax is then dipped into ceramic. This
creates another mold around the figure capturing the detail. This mold is fired
as the wax is melted out. This is the second negative. When the hot mold is
taken out of the firing oven the metal is poured in to create the finale
sculpture in “positive” form. The metals often used for casting sculptures are
bronze, pewter, aluminum, copper and brass. To finish a metal, the artist will
always need to cover it with a protecting agency. This is the color you see on
many sculptures, called patina.
Resin
In this process a rubber mold is
created around the sculpture. This is the same process as the lost wax rubber
mold. After the clay is pulled from the mold, two agencies are mixed together
to create a curing process. Before this process is able to reach its final
hardening state, it is poured into the mold creating a resin cast of the
original.
Wood
When
sculpting with wood, an artist is essentially carving away to create the image.
Stone
Stone
is a material that an artist will have to carve to create a shape. Like wood,
it is, of course, possible to add pieces to a sculpture. (Many large sculptures
are made up of many smaller parts and bolted together, or in the case of wood,
put together with dowels.) Even the
pieces need to be carved to create the desired shape to complete the work.
Metal
This
will require an artist to weld the pieces together and grind (carve) away. By
bending and shaping the pieces an artist is able to sculpt directly in the
metal unlike the other processes involving metal.
Measuring Armature for
Body and Leg Proportions
Body proportions
This is where you determine whether your armature is properly
proportioned or if it will be necessary to make adjustments.
1. Start by checking the torso as
explained in lesson 4. The wire torso
should measure close to half the height of your future sculpture. For example,
if your sculpture is
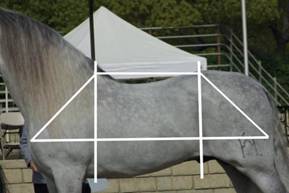
Find similarities in the measurements
of the different parts of the horse’s body. Measure the angle of the shoulder
and compare that with the angle of the hip. Measure the length of the bottom
line and compare that with the back. When
you are doing these measurements be sure you have a
set point to measure from. For example, if you are measuring the bottom line,
always start at the base of the triceps and end at the patellar bone of the
gaskin or the middle of the flank. Having these points of reference will help
you measure more accurately on your horse and sculpture. Choose defined areas
as your measurement points.
2. The armature should have extra
length for the legs. You will trim the excess wire after the clay has been
added.
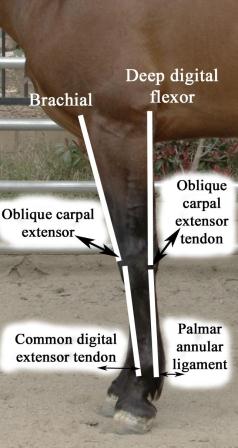
To determine the proportions, measure
the upper forearm from the top of the brachial muscle to the oblique carpal
extensor muscle. Compare this measurement with the lower leg measured from the
oblique carpal extensor muscle to the common digital extensor tendon. Measure
the length of the back of the upper arm from the deep digital flexor to the
oblique carpal extensor tendon. Also measure the lower leg from the oblique
carpal extensor tendon to the palmar annular
ligament. Notice how these lengths are the same on the front of the leg and the
back. Your lower leg measurements should be the same length as should your
upper leg measurements.
Mark your wire with a permanent marker
on these points. Then mark from the fetlock to the toe of the hoof. These marks
are merely a guide to help you place your clay generally in the correct
area.
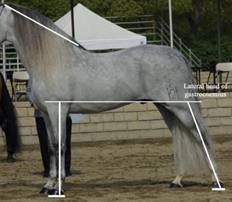
Note: The leg and neck
measurements are all the same length. Though the hind leg looks longer due to the
gaskin joint it is a trick of the eye. Notice the line running from elbow to
gaskin; these two joints are at the same height.
3. You will also want extra length for
the head and neck. This is because you will be manipulating the wire to the
desired position later which changes the wire’s position inside the clay. For
this reason it is necessary to have extra length to avoid difficulty later.
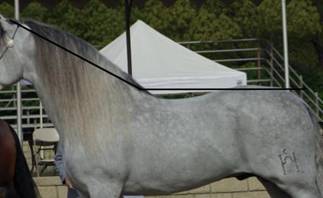
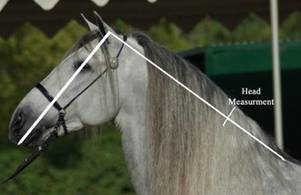
Proportions of the neck are measured in
relation to the length of the horse’s back. The horse’s topline
extends from his poll to the top (dock) of his tail (see picture below).
Measure the “original” horse between the withers and the dock of the tail, then
using this length, measure the neck starting from the withers ending at or near
the poll.
The length of the neck and the back
should be very similar. Measure them on the wire frame and mark each point with
a permanent marker. On your sculpture, always keep these measurements matching
the “original” as this will keep your sculpture in the proper proportions.
4. The head should be one-half to
three-quarters the length of the neck. Measure the head from the poll to the
top lip. Then compare this measurement with the neck. Keep
extra length in your armature. You will trim this after your clay has been
fully added.
Applying the Clay to
the Armature
In
lesson 4 you learned to build your armature, so now your wire armature properly
prepared with tinfoil and bent into the desired position. In lesson 1 you where
asked to send a photograph of your expected composition. That expected
composition should be your reference now for your sculpture’s position.
The
first steps of clay application do not require any detail. We will discuss the
process according to the ideal conformation broken down into parts of the
horse. In order to create a portrait of your horse you will have to assess what
is different in your horse’s conformation and make the necessary adjustments.
Before beginning you will want to
soften your clay.
For very firm clay you can soften it by
merely needing it in your hands and between your fingers. If you find it
particularly hard or cold increase the temperature in your work room to help
heat the clay. You may also add a small
amount of vegetable oil to your clay if it is cracking. I prefer to save this
as a last resort only for the reason that it can cause sculpting to be more
difficult and the clay will sometimes have a hard time holding the detail.
Though it is an option and some sculptors find it useful.
Important Tips Before Beginning!
You will want to be sure that your
layers are always smooth and flat before adding the next layer. The reason for
this is to prevent air inside your figure. If you have large air pockets they
may burst as the clay shrinks and hardens in the oven.
Rotate your sculpture as you add the
clay to make sure that your horse’s body is even when viewed from the front,
back, above, underneath and on the right and left.
A.
Barrel
Begin by applying clay in layers on top
of the tinfoil to the torso of the armature. The barrel of the horse should be even
on both sides. But not too round. Though this part of the horse may look like a
large ball it still has some areas that are ever so slightly flat or less
curved.
Once the clay is at least 2-4 inches
thick on the barrel, begin to work on the haunches. Each time you add a layer to your sculpture,
refer to your horse’s photo and ask yourself, “Does it look like my horse or do
I need to make changes?”
See
video link http://www.youtube.com/watch?v=CyUpLp76Vak&feature=related
B. Haunches and shoulders
You
may begin with the shoulders or haunches. It will not make a difference in your
sculpture’s finished look or overall structure.
You will be applying the clay in
layered shapes. These shapes should compliment the basic shapes of the horse’s
body part upon which you are working.
As you apply the clay for the haunches,
remember the basic shapes in lesson 2. Ask yourself, “How many basic shapes are
in the haunches?” Look at the anatomy of
the horse from different angles. When you view the horse from the front, the
barrel should be wide enough to prohibit any view of the haunches. When you
view it from behind you may see a slight shape of the barrel halfway down the
hip between the point of hip and the stifle. This is where the horse has a
slight concave curve. Be sure to make the haunches wide enough to cover any
other views of the barrel. Even weak haunches of a horse will be fairly large
when compared to the rest of the body.
Again ask yourself how many basic shapes make
up the shoulders? As you sculpt the two shoulders you will find that you have a
hollow cavity for the chest. We will discuss filling this cavity later. The
shoulders of a horse slope back to the withers. Therefore you are unable to see
clearly where the scapula lays on the horse when you view him from the front.
As you sight down the shoulder you will notice that it comes to a “fatty”
muscular part of the body. This is the humerus below
the point of the shoulder and above the radius of the forearm. In areas like
these add more clay to create the muscle.
Some horses will be in shape and
muscular, while others may be too fat or very slim. Be sure to keep looking at your horse’s body
type and make adjustments accordingly as you add clay.
See
video Links: http://www.youtube.com/watch?v=BBEIaId91ts
Sculpting
the shoulder:
http://www.youtube.com/watch?v=8snKff6no18
C. Neck and head
After
you have defined the shoulder, start adding to the neck. A horse’s neck has a
lot of definition when viewed from angles such as the top and the front. Viewing
it from the side will make it look flat with little muscle, but this is
deceiving, so keep looking around your sculpture and viewing the neck from all
sides.
Note:
Each
horse will have a neck which reveals his breed and discipline. Some horses have
thick arching necks with large crests others may be straight with little or no
arch with a thin crest. Some horse’s throatlatches are very thick and others
very refined. Study these differences and compare your horse with other horses.
It is also helpful to compare the breed conformation standards to your horse’s
conformation. This helps define your horse’s individuality.
As
you apply clay to the neck, add it in sections. Make sure you apply enough
thickness to the neck. You will always
be able to carve away too much clay during later steps. Try to sculpt the neck
with the definitions that you see in your horse. Make the base of the neck
thick and the throat thin. As you apply the clay, be sure to view it from the
top and front as well as the side. Be sure that your horse’s neck and crest are
thick enough from above. This is the
last point where you can easily change the position of the horse. So make all
the necessary adjustments now.
It
is simple to apply clay to the head area.
The most important part about the first steps in adding clay to the head
is to make sure the head is the proper length in relationship to your horse’s
neck. You are using proportions now…so 1
inch in real life may only be 1/8 on your sculpture.
Measure
the length of your horse’s head. Now
take that measurement and starting at the horse’s poll, measure down the neck
the distance of the head. Note the location on the neck where the head distance
stops and match those proportions on your sculpture.
When adding clay to the head, check the
size of the forehead in relation to the muzzle. Does the head taper to a small
refined muzzle or is the muzzle large?
Is the forehead wide between the eyes or not?
See
video link:
http://www.youtube.com/watch?v=09wFQ3F7_Qo
D. Forelegs
This is the time when you will
determine the proper proportion of your horse’s legs to his body (Review
proportion measurements). Anything after this will be small detail. The
legs have only two stages of sculpting: shaping and detail. Unlike the other
parts of the body which will require shaping, muscle toning and detail. The
lower legs are mainly bone and ligaments.
We will discuss the leg in three parts:
upper, lower and hoof.
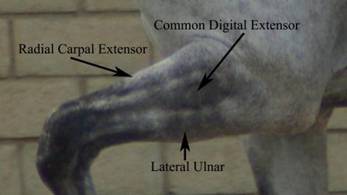
The upper leg has three visible muscles. These are Radial Carpal
Extensor located in the front between the triceps and the knee. The Common
Digital Extensor located against the Radial Carpal Extensor. And the Lateral Ulnar on the back of the leg located between the elbow and
the back of the knee. All three of these muscles are often visible on most
horses.
Sport horses will have well developed
muscles causing them to be more visible. The Radial Carpal Extensor is a muscle
which is most visible. Breeds such as stock Quarter horses will have a
naturally large Radial Carpal Extensor. All individuals vary in muscle tone and
visible structure.
Add these muscles in three parts. Shape
your clay to mimic the muscles and add them to the leg.
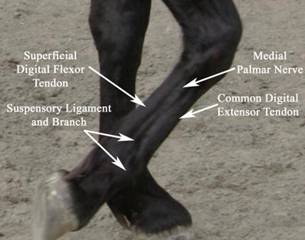
The lower leg is made up of bone,
tendons and ligaments. The lower leg has a vast number of tendons and ligaments
holding the bones in place. But the visible ones are the Common Digital
Extensor Tendon which runs down the front of the cannon and meets the Suspensory Ligament and Branch. The Suspensory
Ligament raps around the fetlock and runs up the center of the cannon, behind
the Medial Palmar Nerve.
The Superficial Digital Flexor Tendon runs up
the back of the cannon.
Add clay to the cannon without detail,
including the area for the knee. The knee will be discussed separately due to
its complexity.
Now you should have clay in the area of
the cannon. Here is where you will need to add or carve away to make the cannon
the proper proportion and thickness. Be sure to view your sculpture’s leg from
all angles particularly from the front. You want to be sure that it is even on
both sides and not too thin or thick. Refer to your “original” photographs and
compare the shapes of your sculpture to the shapes of the horse. After the clay
is smoothed and has its proper thickness you can etch these tendons, ligaments
and nerves into the leg with your tools. Detailing of the legs will be
discussed in a later lesson.
See video link:
Sculpting the foreleg
http://www.youtube.com/watch?v=UpjdoTYmFKA
Sculpting the Hoof
http://www.youtube.com/watch?v=sXISEeaIpco&feature=youtube_gdata
The hoof and
pastern can be shaped and then added to the leg. Do this with a small amount of
clay and roll it into a ball. Then carefully roll the top into a cylinder this
will be the pastern. Now shape the hoof. Start by flattening the walls and
pointing the toe. The hoof is wide and round at the toe. The heel is more
square and straight. The hoof should be wider then the leg when viewed from
underneath. Once you have the proper shape you can attach it to the wire which
is sticking out of the center of the cannon bone.
C. Hind legs
Before adding clay to the hind legs be sure your wire is bent in the proper joints. These joints
will be the gaskin, hock and pastern. Also check your hind leg length. This is
an area that many people believe is longer then it really is. On a properly
proportioned horse (as shown previously in this lesson) you will have the same
length in the forearm, neck and hind leg.
Note: Some horses will very in the hind leg length. This is often due to the
gaskin being to long or short (most commonly too long in many breeds). Another
possibility in the hind leg is the cannon being too long. This will cause
balancing difficulties in the rest of the body. When you find a horse that does
not conform to the ideal proportions (which many of our horses don’t) you will
want to keep these proportions the same and not alter them so that you are able
to capture the horse’s true unique beauty. Dealing with this difference in a
sculpture is quite easy. All you must do is find one part of the horse that
matches that length and match these measurements on your sculpture. Before
you proceed be sure that this is a true conformation difference your horse has
and not your own intellect distorting the real image.
To add the clay, start at the head of
the gastrocnemius; bring the clay to a mild point for
the hock. Then proceed to adding the hock joint and cannon. Add the pastern and
hoof as mentioned in the previous section about sculpting the forelegs.
See
video link:
http://www.youtube.com/watch?v=6WhQwkX6hqc
Assignment:
1.
a. Measure the areas mentioned in this
lesson on a photo of your horse standing square. Mark the photo with the proper
measurements detailed with the point names.
b. For the parts of the horse not
measured in this lesson find your own ways of measuring and in a short essay
explain the reasons why you chose the measurement points you have. Mark them on
another photo of your horse detailed with the point names.
2.
Add the clay to your armature as described in this lesson. Send photos of all four
angles of your sculpture. Send a short video demonstrating your sculpting
techniques.
Send your assignment text, pictures and
video link to: Deanna Cummins dncummins06@yahoo.com
Please
be sure to put your full name on all work.