Role and
Responsibility of Riding Instructor
Lesson Two
Understanding
and selecting equipment is one of the most important factors in having students
experience success during a lesson.
In this
lesson we’ll discuss saddles, the components that make up a saddle, safety and
maintenance of saddles, and correct saddle fit for both horse and rider. We’ll examine saddle pads and their intended
use, as well as how they can cause poor saddle fit. We’ll review the bridle, different types and
uses of bits and types and uses of reins.
We’ll talk about all of the extras:
martingales, draw reins, spurs, crops, helmets, and riding boots.
There are
many different types of saddles. Let’s
review two of the most common: the western saddle and the flat saddle. (In the
USA the flat saddle is commonly referred to as an English saddle.) Both types have unique descriptive terms and
are designed with a different rider position in mind.
The Western Saddle
There is
only one type of western saddle, right?
Wrong! As horsemen and events
have become more specialized, saddles have followed suit. This specialization allows the horse and
rider to perform in different ways and at their absolute best. As we discuss the different types of saddles,
we’ll also investigate variations and styles.
The core
of the saddle is the tree.
The tree
is the solid portion that the saddle is built around. The tree is most commonly made of fiberglass, aluminum or wood covered
in rawhide. The type and shape of the tree determines how it will fit a horse.
The
underneath part of the tree has two main parts: the bars, which are the lateral
or side portions of the tree and the gullet that is the arched portion of the
tree. The degree of “arch” and the width
of the bars determine the fit.
The most
common western tree is a “semi quarter” tree.
This will fit most horses.
For a
horse that is very broad across the withers or mutton withered (flat and wide),
a “full quarter” tree is usually needed.
Small
narrow horses, such as the Arabian, need a narrow tree, commonly known as an
Arab tree.
The top
portion of the tree has four basic parts, these are: the horn, which is what I
recommend holding on to if your horse begins frolicking, the fork or the swell,
which is the top portion of the gullet, the seat, obviously the area where the
rider sits, and the Cantle which is the raised area behind the rider’s seat.
The tree
is only the framework to the saddle. It
is not unbreakable. If a horse rolls
with a saddle on or the saddle receives blunt force trauma it is possible for
the tree to break or crack, rendering the saddle useless. A saddle with a broken tree must never be
used on a horse, as it no longer works as designed and the creation of a very
sore-backed horse is inevitable.
To check
a saddle for a broken tree, place one hand around the horn and the other on the
cantle--try to “fold” the saddle upward.
If there is a lot of movement, there is a good chance the tree has been
broken. If the saddle merely gives
slightly, then the tree is not broken.
The
“skeleton” of the saddle is covered with leather.
The
underneath portion of the saddle is typically covered with sheepskin which is
basically protection and comfort for the horse.
Added to
the saddle is “hardware” such as the “D” fixtures or “rigging”, to which the
latigo and billet attach to secure the cinch.
The stirrup is attached with the fender, and the leather behind and
below the cantle is referred to as the skirt.
Some
saddles have a second cinch that is positioned below the cantle. The second cinch keeps the back portion of
the saddle from tipping upward when a rider dallys a
rope to the saddle horse to stop a steer, jerk a calf or pull a log.
The
construction of the fork, saddle horn and seat of the saddle will vary
depending upon the type of saddle.
For
riding cutting horses, the fork of the saddle is high
and the horn is more narrow and taller. This allows the rider to hold the horn
and brace himself against the fork when the horse is working a cow. The cutting rider sits closer to the front of
the saddle and the seat usually allows free movement of the rider.
The reining
saddle has a wider lower set horn, the forks are not as tall as that on the
cutter and seat is deeper to allow more stability for the rider. The fenders of the reining saddle swing
forward and back freely, allowing the rider to balance himself during a sliding
stop by moving his feet forward.
The
roping saddle has a wide and slightly taller horn and is very strong. The fenders of the saddle are set slightly forward
and have little forward or backward swing making the stirrups steady when the
roper stands to throw his loop. The seat
is deep, and, of course, the saddle has a second cinch. The stirrups of the roping saddle are wider
and longer than other saddles. This is
helpful to the calf roper when they need to dismount quickly without getting a
foot caught. The roping saddle is the
most sturdy and heaviest western saddle.
There
are two types of western pleasure saddles.
The first is a general, multi-purpose saddle; a saddle a weekend rider
or a trail rider would find most useful.
This type of saddle is built primarily to be cost effective. The seat is usually average in depth and the
fenders are usually set slightly forward.
The quality of leather used on this type of saddle is usually not as
high as that used on a specialty saddle.
The
second type of pleasure saddle is that used in the show pen. These saddles are
often custom built, use the highest quality leather and are most often hand
tooled. They are accented with sterling
silver plates and conchos.
There are
two types of seat for the show saddle; the pleasure
seat, which is not as deep as the roper, and the horsemanship seat, which
pushes the rider’s pelvis forward slightly.
The
fenders of the show saddle are hung almost directly beneath the seat to allow
the rider’s leg to hang directly below the hip.
The
barrel or game saddle is the western saddle’s version of a race saddle. It is built with weight in mind. The skirt is shorter, the seat is very deep and the saddle is very lightweight.
The
fenders of the game saddle are very loose, swinging forward and back very
easily. The horn of this saddle is a
little narrower to allow the rider to hold on easily when making a sharp turn.
The last
type of western saddle you need to be aware of is the training saddle. The training saddle is most like the show
saddle, except it is made in plain leather and has D hardware attached to the
front and behind the cantle. These D fixtures are used for bitting-up
horses. These saddles are generally a
bit lighter; the fenders are very loose and often made with “rough-out”
leather. Rough-out leather is not
smooth; it resembles suede. This rougher
surface will give more “grip” to the rider’s seat and leg, and that can be of
benefit when riding a young or spooky horse.
The training saddle is made to be very durable and comfortable.
Regardless
of the type, there are a few key areas that need to be checked frequently to
help ensure safety.
Both the off side billet or latigo and the cinching latigo should
checked for cracking or excessive wear.
Both areas will become damp with sweat almost every time they are
used. Overtime the leather may become
dry and begin to crack. A well-used
saddle may show worn areas where the latigo leather has become thin; whether
worn or damaged, the latigo should be exchanged.
The cinch
should receive a visual inspection every single time the saddle is used. Check to see the cinch is in good condition; no broken pieces, and no questionable wear
patterns.
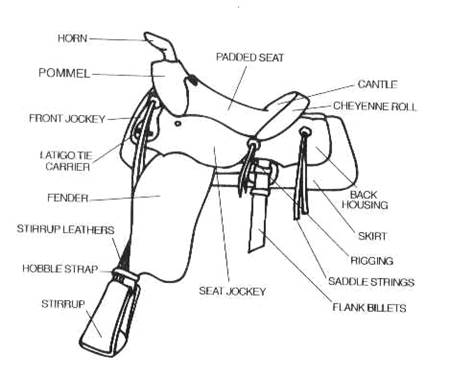
PARTS
OF THE WESTERN SADDLE
Proper
care of the saddle is the best way to ensure it will continue to serve safely.
All
saddles to should be conditioned at least a couple of
times a year. This practice will allow
you to thoroughly inspect the saddle for potential problems, not to mention the
fact that clean equipment will portray a positive image for your business.
All
western saddle seats are measured in inches.
To
measure the size of the seat place one end of the tape measure at the end of
the seat by the pommel, measure to the start of the cantle, the total of inches
is the seat size of the saddle. Western
saddles will range from 13 to 18 inches.
To
determine if the saddle properly fits the rider, observe the rider from the
side. If the rider has never ridden
before or not very often, then it may be necessary to adjust the rider’s
position before making a determination. With the rider sitting in the proper
position, she should be able to place her fist between the back of their seat
and the cantle. If she cannot do this, the saddle is too small. If she can fit more than a fist between the
seat and the cantle, the saddle is too big.
If a
saddle is too small several things may occur:
The rider
may not be able to able to maintain a balanced position. The rider’s constant unbalanced movement
often results in the horse having a sore back.
The cantle is not designed for the rider to brace against for balance;
it is designed to close the seat of the saddle.
When a
saddle is too large, there is too much “play” in the rider’s seat. The rider will be unable to stay in the
balanced position, instead sliding forward and back as the motion of the horse
changes.
Generally saddle purchases are made
without much understanding and purpose.
As the riding instructor, it is your responsibility to see to it the
saddle fits both the rider and the horse.
Neglecting this responsibility will prevent you from providing quality
education.
Price is
most often the primary factor in choosing a saddle. This is a very unfortunate
mistake. Cheap saddles lack both
craftsmanship and quality materials.
Do not
let your students or their horses suffer the complex problems caused by poor
saddle quality and fit; in the long run it reflects directly on your reputation
as a riding instructor.
Not
all saddles are created equal; each saddle has definite purpose. Choose a
saddle for your client, or be sure she purchases one, that allows you to give a
great riding lesson. Do not let the
quality of your work be tarnished by poor equipment.
Flat Saddles
As with
the western saddle, there are different types of flat saddles, each with its
own purpose.
As you
can easily see, any flat saddle has less leather and is a lot lighter than the
western saddle; that doesn’t mean the craftsmanship involved in building the
saddle is any less.
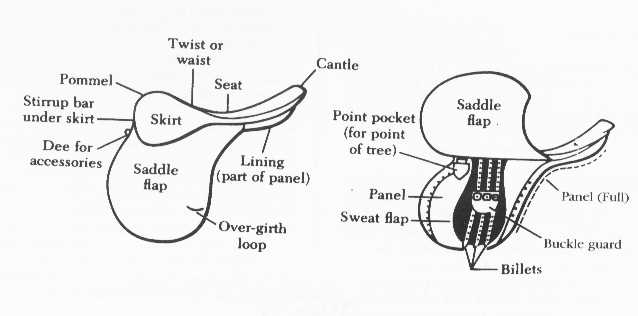
PARTS
OF THE FLAT SADDLE
Just like
its counterpart, the flat saddle also has a tree. The flat saddle also has a gullet, bars and a cantle.
The front
portion of the flat saddle is the pommel, the back the cantle. Underneath the seat and cantle are two pad
like structures, one on the right and one on the left of center; these are
designed to sit on either side of the horse’s spine. These “pads” are referred to as the panels.
The area
between the seat and the pommel is known as the twist. Behind the seat area is
the cantle. To the side of the pommel
and the twist is a small flap of leather known as the skirt, underneath the
skirt is the stirrup bar; the larger piece of leather below the skirt is the
known as the saddle flap. The saddle flap’s placement, as well as its length
will be designed to aid the specific riding discipline selected.
The
“leathers” hang from the stirrup bar and the stirrups hang on the
leathers. The leathers come in various
lengths and widths and are easily adjustable to fit the rider’s needs.
It is
important to note the width of the leather determines how easily the iron is
stabilized. The widths vary from ½ inch to 1 inch. The leather of the ½ inch
width requires more skill from the rider to stabilize his or her leg. The ¾ inch leather requires an effort from
the rider in learning how to stabilize the leg, yet
does not give the feeling of being too thick or in the way as often does the 1
inch leather.
On the
end of the leathers are the irons or stirrups.
Most Hunt
Seat riders refer to the stirrup as the iron.
It is simply a tradition, and Hunt Seat riding is definitely
a discipline that has deep roots in tradition. As part of the Hunt Seat tradition it is important to note that the leathers, irons,
and girth are commonly referred to as “fittings”. Fittings are typically sold separately when
purchasing a saddle.
Under the
saddle flap are three pieces of leather, the billets. The girth buckles to these billets. (A girth generally has two buckles and may be
buckled to the two billets of choice—most commonly the first and third…the
second being kept in reserve.)
Threaded
through the billets is a flap of leather called is the “buckle guard.” The buckle guard is designed to do exactly
what its name implies; it lies over the buckles and keeps the buckles from
becoming accidentally opened and interfering with the rider’s leg. To the front of the skirt and to the top
portion of the saddle flap are the D attachments. These Ds are smaller than
those found on the western saddle. Their purpose is to allow the attachment of
accessories such as a breastplate or standing martingale.
The girth
of the flat saddle has elastic on at least one side and attaches to the saddle
with buckles.
The side
of the girth without elastic buckles attaches to the right side of the saddle,
the elastic side to the left. The
elastic provides a means to stretch the girth and allows the girth to be
tightened easily. Some girths have elastic on both sides
and some have three buckles verses the standard two. The girths are typically
made of leather; however it is not uncommon to see
girths with fleece.
The
saddle seat saddle is the most unique type of flat saddle. Click
here for picture. The seat is very flat and its design places
the rider substantially behind the withers. It is not uncommon for the saddle
seat saddle to have a cut out for high withered horses. This type of saddle is
referred to as a cutback.
The
placement of the leathers places the rider’s leg more forward than the other
types of flat saddles. Ultimately the
saddle is designed for flat work use, not for jumping. Saddlebreds, Morgans,
Tennessee Walking Horses, and Arabians are common breeds you will see being
ridden saddle seat.
The
close contact saddle is another common flat saddle. Click
here for picture. This saddle offers the rider just what its
name implies, close contact. This saddle
may be used for riding on the flat or for jumping.
Riders
competing in classes such as hunter under saddle or hunt seat equitation will
choose a close contact saddle with the flaps placed under the seat of the
saddle. This placement enables the rider
to ride with a slightly longer iron and keep her heel underneath her seat.
Jumpers
will choose a close contact saddle with the flap placed farther in front of the
seat. This type of saddle is also
commonly referred to as a jumping saddle. The placement of the saddle flap in
this manner allows the rider to ride with a more flexed knee and a shorter
leather. The shorter leather causes an
increased angle at the knee; the forward flap absorbs this increased angle.
The seat
of the “jumping” saddle will also be deeper than that used for flat work. The deeper seat provides more stability.
The
all-purpose saddle is the one that does it all. Click
here for picture.
It has longer flaps than the close contact, a deep
seat and knee rolls. Riders new to the
sport will often choose this saddle for its versatility.
The
all-purpose saddle can be used for flat work, jumping, pleasure and trail
riding. These saddles are usually very cost efficient.
If you
plan on providing horses and tack, this saddle is an excellent choice for
economy and options.
The
dressage saddle has the longest saddle flaps. Click
here for picture. The dressage rider will use a very long iron,
which allows maximum contact with the horse’s side. The body position of the
dressage rider mimics that of the western rider. The hip angle is very open
and the rider uses a “deep” seat. The
deeper seat and the maximum leg contact allow the rider to communicate the most
intricate cues to the horse.
All flat
saddle seats are measured in inches. Starting at the pommel, run the tape
measure to the cantle to determine seat size. Flat saddle seat sizes range from
14 to 18 inches.
Saddle Fit
To
determine if the flat saddle fits the rider, follow the same guidelines as
discussed for the western saddle. In addition you will have to evaluate the length of the
flap. The flap should extend about mid way between the riders knee
and ankle. If the flap is too long, the rider will be unable to properly use
her leg.
The
safety check for the flat saddle should include a visual inspection of the
girth. Check each end of the girth to insure the
stitching near the buckles looks solid and has not become worn or compromised.
Check the elastic to make sure it has not become worn or started to tear.
The
leathers should also be inspected for cracks and thinning of leather,
especially where the irons rest. As a general rule it is a good idea to clean a flat saddle
more frequently than a western saddle.
Flat saddles accumulate more sweat from the horse and thus require more
attention.
Western Saddle Pads
There are
so many variations of saddle pads, it’s impossible to discuss them all. In choosing a saddle pad you first need to
consider the purpose. Primarily the
saddle pad is to protect the horse’s back, while it absorbs sweat. The saddle
pad also protects the saddle, and in some cases it may
aid in fitting the saddle.
Felt pads
are simply a piece of one inch felt 32 inches wide and 34 inches long. These pads were very popular during the
seventies and the eighties and are still used quite a bit today. The advantage to the felt pad is that it is
very durable and difficult to destroy.
The drawback is it is difficult to clean, and some horses get the hair
rubbed off in the loin area.
Neoprene
pads are among the newer “hot” items.
They are usually one-inch thick rubber type
substance. The pad is very sturdy and
absorbs concussion well. The major
advantage to neoprene is it can be hosed off and kept clean. The disadvantage is no absorption of sweat,
and some horses may experience an increase in heat production.
Wool-back
pads are nice basic saddle pads. They
are made from synthetic wool and look a lot like a fleece pad. These pads absorb sweat readily and do not
irritate the horse’s back in anyway. The
wool-back pad is usually used with a Navajo to add a little more thickness. The wool-back can be washed fairly easily; the draw back is
hair will become embedded in the pad and in time will not be able to be
removed. The build up of hair may rub on the horse’s
back and create bald spots.
Air ride
pads are popular for western saddles.
The air ride pad has a fleece type bottom that is in contact with the
horse’s back, while the center of the pad is made up of air bubbles, much like
bubble wrap used for shipping breakable items.
The top of the pad is a simple woven cloth.
The air
ride is great for absorbing concussion, while the fleece absorbs sweat. To make it more attractive, it is easily
washed and very durable.
Therapeutic
pads are also available for western saddles. There are many different types and each has its own claim to fame. Some therapeutic pads utilize gel, which
absorbs concussion and distributes weight more evenly across the horse’s
back. Some therapeutic pads have extra
padding in specific areas, such as at the withers.
Be very
careful in choosing a therapeutic pad; be sure you understand how it functions
and what will occur when a horse wears it.
Saddle
pads may help saddles achieve a perfect fit by compensating for a horses conformational imperfection. For example, a horse with a very high wither
may benefit from a pad that has a cut out in the wither area. A horse that has a sway back may benefit from
a wedge pad. The wedge pad will level
the saddle and alleviate excess pressure on the loin.
A word of
caution about “padding up”: think about saddle fitting like you would about
fitting a shoe to your foot. You have to have the right kind of socks on or your feet get sore.
If you were to wear to thin a sock, you might get blisters. If you wear socks that are too thick, they
take up too much room and the shoe feels too tight and
uncomfortable. Wear the right socks and everything is great. Your horse feels the same about his saddle
pad. Don’t make an uneducated decision
about what pad to use. Know how it will
affect your saddle fit.
Flat Saddle Pads
The flat
saddle pad is unique in that not one pad fits.
The type
of saddle will determine the type of pad used.
Each type
of flat saddle pad is cut to fit the shape of the saddle.
The close
contact saddle or jumping saddle is the smallest of the flat saddles. A pad made for the close contact saddle will
not properly fit an all-purpose saddle or a dressage saddle. The all-purpose flat saddle pad is also “cut
to fit”. The dressage saddle pad is
usually a square pad and not cut to fit the outline of the saddle.
Fleece or
wool-back pads: same pluses and minuses as with a western pad. These pads are available to fit all saddles.
Currently on some of the open horse show circuits as well as breed circuits
these pads are not cut to fit the shape of the saddle seat. Instead
they are square under the seat to provide room for the attachment of the
exhibitor’s number. The reasoning behind this is to provide the judge with the
opportunity to easily view the number of the exhibitor without having to walk
toward the rail to view the rider’s number her back.
In the
hunter jumper circuit numbers are still worn on the rider’s hunt coat.
Air ride
pads are available for flat saddles.
Felt pads
are available for flat saddles, however they are seldom seen. It has been my experience that a felt pad is
too stiff and rigid for use under a flat saddle, and often inhibits the rider’s
“feel”.
Therapeutic
pads are available for all types of flat saddles. These pads can be useful for
horses that compete in extremely demanding events such as jumping or
cross-country. Therapeutic pads offer
extra absorption of concussive forces and help soften and distribute the weight
of the rider. When selecting a therapeutic
pad read the manufacturer’s claims about what the pad does and what it doesn’t
do, look at the price of the pad and make your own decision as to it value.
Riser
pads or inserts are typically made of rubber or foam. A riser pad does just
what it says: it raises or lifts the back of the saddle. While the riser pad may level the saddle
appearance, additional pressure is put on the front of the saddle and can
quickly cause a sore back. Before using
a riser pad, reevaluate the fit of the saddle being used.
Fitting the Saddle
Doesn’t
one size fit all? What would it matter
if didn’t quite fit perfectly?
One size
does not fit all, and it is a big deal if the saddle doesn’t fit properly.
A poor
fitting saddle can and will cause a horse to not only become sore in his back,
but in is body as well. The horse’s body
wasn’t truly designed to carry us. His
spine is being pulled down by everything underneath it. Then we put weight on top of it.
As
if that isn’t enough of a problem, how do you think he’ll feel if the saddle
doesn’t fit his back?
With the
horse standing on level ground place the saddle pad over the withers and
slightly forward. Next place the saddle
on the pad. Slide the saddle and pad
backward until they seem to settle into a natural position behind the
withers. Ideally
we want the cantle of the saddle to be level with the pommel, it should not
appear as if the saddle is going down hill.
The
gullet of the saddle will still be slightly over the withers. The girth will be
a few inches behind the elbow of the horse. Now lift the pad up into the gullet
of the saddle, I like to refer to this action as making room for the horse’s
neck.
Lift
the saddle pad into the gullet of the saddle.
You
should be able to fit two to three fingers easily between the saddle pad and
the withers. If this is not possible
then the tree is probably too wide for the horse. A tree that is too wide will apply direct
pressure to the horse’s withers, and can create
sores. It will definitely
inhibit the horse’s movement and the horse attitude, making teaching
with that horse very difficult.
If you are able to fit your entire hand between the withers and the
gullet, then the saddle is too narrow.
A tree that is too narrow will have a pinching effect on the horse’s
back; inevitably causing pain and the horse’s willingness to perform.
If
the horse is not comfortable, you’ll have lots of difficult teaching a good
lesson. If the horse isn’t happy, no one
is going to be happy.
Now
cinch the saddle, but not tightly.
Slide
your hand under the pad on the horse’s shoulder just under the pommel. Repeat
this process on the other side. (Hint: make sure the horse is standing somewhat
square.) The pressure you feel should be
the same.
Slide
your hand under the rear portion of the skirt just shy of seat of the
saddle. You should be able to feel the
saddle in contact with the horse’s back.
If the saddle is not in contact with the back, there will be excessive
pressure on the horse’s shoulders and possibly on the loin. The saddle should contact the back all along
the horse’s side.
Now ride
the horse for at least fifteen minutes.
Be very aware of his behavior. If
he is pinning his ears or swishing his tail excessively, the saddle may be
uncomfortable.
When you
remove the saddle note the sweat pattern on the horse’s back. If there are dry spots, there are saddle fit
issues.
As a
horse develops and ages it becomes necessary to re-fit the horse. As the horse’s body changes there will be
changes to the fit of the saddle. Just
because the saddle fit when he was five doesn’t mean it will fit the horse when
he is nine.
The Western Bridle
There are
three major pieces that comprise a bridle: the headstall, the bit and the reins.
For bridles that carry a curb bit there is also a chin strap.
It may
seem redundant to discuss the pieces of the bridle; however
I am continually amazed how many people do not know the parts of the
bridle. You should teach it in one of
your very first lessons, then test the student’s knowledge several times.
The
headstall itself has several different pieces and there are many variations of
types of western headstalls. For simplicity sake we will discuss three, the brow band
headstall, the single/double ear headstall and the split ear headstall.
The brow
band headstall is so named because the piece of leather that lies in front of
the ears is termed the brow band. The
piece of leather that lies behind the ears is referred to as the crown piece.
The crown
piece offers attachment and adjustability for the cheek pieces. At the bottom of check pieces, there is an
attachment device for the bit. There are
several ways the bit may be attached.
There may be water ties, or pieces of leather that run thru the double
backed cheek piece. Sometimes there are
buckles used. There may be concho screws
used. (A word of caution about concho
screws: they do become loose in time, and it is necessary to check them
frequently to avoid the bit falling from the headstall.
Brow band
headstalls are commonly used for bridles with snaffle bits or hackamores. We
will discuss different bits later in this lesson.
The
single ear headstall also has a crown piece and cheek pieces. There is not band
across the brow. A single leather piece
attached to the crown piece encircles one ear.
The ear-piece is moveable and can be adjusted
for a comfortable fit. The ear-piece traditionally encircles the right ear.
When
there is an ear-piece around each ear, it is a
double-ear headstall. The ear-pieces do slide on the crown piece and can be adjusted
for a comfortable fit. This design
allows for more detailed placement of silver barrels and braiding.
Single
ear or double ear headstalls are commonly used for bridles that carry a curb
bit.
The split
ear headstall resembles the single ear headstall. The difference is the hole for the ear is not
adjustable, but is instead a sewn piece of leather or
literally a split in the crown piece allowing for insertion of the ear. The
problem that occurs with this headstall arises with the need for adjustment;
there virtually is no adjustment.

SPLIT
The chin
strap or curb strap is a piece of leather or chain which attaches to the bit
and lies underneath the horse’s chin. If
a chin strap is made of leather the intensity or pressure is less than if the
chin strap was made of chain. When we
discuss curb bits we will talk more specifically about the role of the curb
strap.
There are
four basic types of reins used for the western bridle.
1. The romal reins are comprised of one single rein attaching to each side of
the bit. At the center of the reins is a
long single braided leather piece with a “popper” on the end—this is the romal.
Romal reins that are made of leather
and are hand braided. The type of braiding is referenced by the number of
plaits. A basic braid romal rein will be 12 or 14
plait. A 16-plait romal
rein is a little thicker and heavier.
Regardless of the number plaits
involved in the making of the reins, they may be made solely of leather or may
have rawhide woven around them or silver barrels placed around the
leather. The length of the romal rein varies depending upon what event they are used
for. Working cow horse riders use a
54-inch rein. Riders competing in trail classes use a 58 or 60-inch rein.
Another factor that determines
the length of rein is the length of the horse’s neck—long neck, long rein.
The proper way to hold a romal rein is to have one hand closed around the rein
portion with the rider’s thumb on top.
The hand should be held in the same manner as if you were eating an ice
cream cone. The other hand holds the
tail of the rein, and usually rests on the rider’s leg. The hands should be no closer than 16 inches
on the reins. This position allows the
rein hand to move freely with out “hanging up” on
tension created by having a shorter distance between the hands.
Romal reins are
also available in round harness leather, braided rope and regular rope. These reins are substantially lighter than
the braided reins, but are sufficient for the weekend or trail rider.
2.
The single rein is another common
rein used with the western bridle. It is
very similar to that used on standard hunt seat bridles, but is usually shorter
in length. The single rein is just what
it implies, one end of the rein attaches to one side of the bit and the other
end of the rein attaches to the other side of the bit. These reins are available in rope, leather,
braided leather, or nylon.
The events that use the single
rein include roping and “games”. Trail
riders also like to use the single rein since it eliminates the possibility of
accidentally dropping one rein when out on trail.
3. Split reins are the most popular type of rein used with a western
bridle. Two reins make up split
reins. One rein attaches to one side of
the bit and the other rein attaches to the other.
Split reins are used with snaffles
and curb bits. They may be held with two hands or one. If split reins were held with one hand, the
rider’s palm would be facing downward toward the neck of the horse, one rein
would be held between the thumb and the index finger with the other rein being
held between the index finger and the third finger.
In the show ring it is only
permissible to have one finger between the reins, and the reins are carried on
the side of the horse corresponding to the hand being used by the rider……right
hand, right side, left hand, left side.
When the reins are held with two
hands the tail of the reins should cross over the horse’s neck and both reins
are held in each hand.
The highest quality split reins
are made from harness leather. Latigo leather split reins are also available.
The widths available are ½ inch, 5/8 inch and ¾ inch.
The ends of the reins that attach
to the bit may utilize water ties, concho screws or buckles. A word of caution about reins that use
buckles: if you use a running martingale, the buckles may catch on the rings of
the martingale, thus trapping the horse. This will not happen with reins that
use water ties or concho screws. Water
ties are by far the best way to secure reins to the bit.
4. The final type of reins to
consider are draw reins. Draw reins do exactly what they imply, they
draw the horse’s head toward the chest.
The draw rein may be a single
rein or two reins. Attachment is to the
side rings or the cinch or to the Ds at the middle of the cinch under the
horse’s chest. The rein then goes from
attachment through the snaffle bit cheek piece (or the curb rein attachment
point) and back to the rider’s hands.
When the rider sets her hands,
there is no direct contact with the bit…instead the indirect contact of the
rein forces flexion of the horse’s neck and poll.
Only a very experienced rider
should use draw reins. Do not try to
teach a beginning rider while draw reins are in place. Used improperly, the draw rein can cause a
horse to feel trapped and behave in ways that can cause serious injury. When choosing to use draw reins always take
into account the temperament of the horse, experience of the rider and the
choice of the bit. These reins are not
intended for the beginning rider!
The Hunt Seat Bridle
Hunt Seat
riding is deeply rooted in tradition, so it is no surprise that all Hunt Seat
bridles components are essentially the same. The Hunt Seat bridle has a crown
piece, check piece, throatlatch and brow band just as the western counter part. But it
also has a noseband which is attached to the bridle.
The area
where the bit is attached to the bridle is significantly different than that of
the western bridle. It has a small cut
in the leather that fits over a bent piece of metal sewn into the leather. The Hunt Seat bridle has another unique
trait, “keepers.” “Keepers” are loops
of leather designed to hold the “tails” of the bridle. The tails are the pieces that allow bridle
length adjustments.
The reins
of the Hunt Seat bridle may be all leather with a braiding interwoven, or
leather with rubber in the area of the hands.
Hunt Seat reins may have a small buckle where they join at the rider’s
hands. They are available in many
different lengths; the size of the horse and the event determine the choice of
length.
Jumping
horses typically require less rein length than a hunter under saddle
horse. A pony would also need a shorter
rein.
Bits
It seems
from the beginning of time man has been determined to reinvent the wheel so
speak. The variations and promises of
bits are so numerous one would assume horsemanship is not needed.
There are
only two basic types of bits: the snaffle, and the curb. One is not superior to
the other, neither work miracles. Both can be effective in communicating with
the horse with the proper training of the rider.
The
purpose of the bit is simple, it gives added control to the rider, and it also
gives an opportunity to create a refined line of communication.
Snaffle
bits are those bits that have a direct action on the horse’s mouth. The reins
attach opposite the mouthpiece, there is no poll action and no curb
action. The bit pressure is applied to
the corners and bars of the mouth.
Whatever pressure is applied to the rein is applied equally through the
snaffle to the horse’s mouth.
There are
several different styles of snaffles available, all determined by the discipline
of riding, education level of the horse and education level of the rider.
The cheek
pieces of the snaffle are available with four different types. The reins attach to the cheek piece that can
be “O”, “D”, eggbutt or full check.
The “O”
slides through the mouthpiece. All the
others are fixed cheek pieces and will not rotate. The “O” may pinch the corner of the horse’s
mouth as it slides through the mouthpiece.
If this occurs the use of bit guards may be of benefit. Bit guards are
round pieces of rubber that lay between the side of the horse’s mouth and the
“O”.
It is
important to note that horses of any discipline may use any of the snaffles
listed.
Mouthpieces
of the snaffle may be one, two or three pieces. Some of the types of mouthpieces
available are: smooth--the bar stock, which is the actual piece in the horse’s
mouth, is smooth, it is slightly wider toward the corners. Smooth snaffles are used for breaking colts,
for horses with very sensitive mouths or for hunter and jumper horses.
Twisted
snaffle: the bar stock of the twisted snaffle is comprised of one large piece
twisted to two smaller pieces of bar stock. The degree of severity of the
twisted wire depends upon the size of the bar stock used and the shape of it. Round bar stock is less severe than square
bar stock.
Covered
or wrapped snaffles: these are smooth mouthpieces that are wrapped in plastic
or leather, increasing the diameter of the bit. Usually, the larger the
diameter of the mouthpiece, the less severe the bit; the smaller the diameter
the more severe the bit. This is true,
only if the bit fits the horse’s mouth.
Before
selecting any bit, you should measure the width of the horse’s mouth, determine
the amount of tongue the horse has and determine the depth of palate for each
horse.
Kimberwick bits: Kimberwicks
are used in flat saddle riding.
The Kimberwick mouthpieces include smooth as well as ones with
a port. A port is an elevated “U” shaped
piece of bar stock in the center of the bit.
The Kimberwick has two rein attachment
points…one opposite the mouthpiece and one below, allowing the bit to be used
as a snaffle, or a curb. If it is used
as curb, it then needs a curb strap.
Because
the Kimberwick can be used as a snaffle or a curb, it
is a nice choice for riders who are just learning to ride.
A curb
bit has the reins attach below the mouthpiece.
It is a lever action bit. When
the rein is moved backward, the shank of the bit moves backward, rotating
around the mouthpiece, which is the fulcrum of the lever. In doing this there is pressure applied to
the horse’s mouth by the mouthpiece of the bit, pressure to the chin groove by
the chin strap and pressure to the poll by the crown piece of the bridle.
The
amount of pressure applied by the mouthpiece is a ratio…the length of the shank
to the length of the cheek piece of the bit.
If the shank is 3 inches, for example, and the cheek piece is 1 inch,
then the applied pressure is 3 to one.
One ounce of pressure on the reins and 3 ounces of pressure is applied
to the mouth.
Shank
lengths of curb bits are typically 6” or 8”.
There are several junk bits that have shorter shanks, these bits in my
opinion are the most ineffective and offensive to the art of horsemanship.
There are
two common shapes of shanks, the curved shank, such as that found on a grazer
bit, and the straight shank. The straight shank bit will ask for more flexion
at the horse’s poll in comparison to the curved shank.
The
second piece of the curb bit is the mouthpiece.
Mouthpieces of the curb bit are numerous, but they all have only one
purpose---to be uncomfortable. The
mouthpieces may be of straight bar stock, and may or may not be broken or
jointed. They may include a port; ports
are available in many different heights, and widths. The higher the port the more pressure applied
to the roof of the horse’s mouth. The
wider the port, the less the tongue carries the bit, making the bars carry more
of the weight.
Quality
curb bits are generally inlaid with copper.
Very seldom will you find a curb bit with a solid copper mouthpiece;
cooper is very soft and easily chewed.
Curb bits
offer a beginner rider more stop than a snaffle. Knowing you can stop will
prove to be a mental asset to these riders.
A word of
advice on curb bits; choose a bit that suits the job. Do not select a high port bit for a rider’s
first lesson. Choose one that will not
punish the horse when the rider makes the inevitable mistake of pulling or
hanging on the reins.
A good
quality curb bit will cost $125 and up, but will last a life time. Bits are an investment every riding
instructor needs to make. Having the
right bit for the right horse to match the rider’s skills is extremely
important and brands you as professional or unprofessional.
To learn
more about bits take the online course Bits, Saddle Fitting and Hoof Balance at
HorseCoursesOnline.com Click
here to see a course description and outline.
Curb
straps may be leather or chain. Leather
is, of course, softer than chain.
Western bridles use curb chains with a leather attachment while riding
bridles use “J” hooks to attach the curb chain.
When a curb strap is properly adjusted, two fingers will easily fit
between the curb chain and the horse’s jaw.
You change the length of the curb strap to meet the need…how quickly do
you want curb strap pressure?
Accessory equipment
Martingales: for western horses there is one type of
martingale, commonly referred to as a running martingale, or a training
fork. It is comprised of a piece of
leather connected to the center ring of the cinch, running between the horse’s
front legs and toward his head. The leather piece is split and it has two rings
attached. The reins are run through the rings of the martingale and then to the
rider’s hands.
Although
it is not uncommon to use a martingale with either a snaffle or a bit, I recommended
that martingales be used only with a snaffle.
Split reins with water ties are the best reins to use with a martingale.
Reins with snaps may become entangled in the rings of the martingale and cause
a horse to panic.
Flat
saddle horses may use two different types of martingales. The running
martingale is similar to that of the western horse, except it has a neck piece,
this piece of leather which lies around the horse’s neck simply holds the
martingale on the horse. When flat saddle
horses use a running martingale they also use rein stops. Rein stops lie between the martingale and the
bit, they stop the martingale rings before they reach the bit, reducing the
potential for the rings becoming hooked on the buckle attachment of the rein.
The
standing martingale has one piece of leather extending toward the horse’s head
with a loop at the end. The noseband of
the bridle runs thru this loop. It is similar to a western tie-down. Standing
martingales are most often seen on Hunter and Jumper horses. The standing
martingale allows the horse to lean against the noseband for balance.
It is
essential you know if the horse accepts the use of any type of martingale.
Never add
a martingale to a horse’s routine for the first time with an inexperienced
rider. Horses can be very unpredictable;
do not assume a horse with a quite disposition will accept any
thing.
Always
use an educated judgment based upon knowledge of the horse, equipment and past
experience. Safety first is the
responsibility of the riding instructor.
No matter
the discipline you teach, it is your responsible to teach the proper rider
attire.
Tennis
shoes, hiking boots and any other type of foot wear other than a traditional
riding boot is not acceptable.
These
days people seem to be in to convenience; they like boots with rubber soles
that have grips on the bottom, they like the shoe that has a heel like a boot,
and they like open toe shoes. when stopping by the barn. You have the responsibility to set the rules
and to maintain safety. Only riding and
work boots are acceptable in the barn area.
Rubber
grips within the stirrup are also not acceptable. The keep the rider from making a subtle
adjustment as the sole of the boot will not slide. If a rider gets into trouble, rubber does not
allow them to slip their foot out of the stirrup; it may actually cause further
injury to rider.
The
riding shoe is simply an embarrassment to the tradition of riding. As instructors we are responsible for
preserving the tradition of riding.
Riding
boots are designed to protect the rider’s foot and leg. Riding boots are designed to interact with
the art of riding, allowing the rider to be able to make subtle
adjustments. Riding boots allow for an
easy dismount in an emergency.
Riding is
not a sport of convenience; it is a sport of tradition and dedication.
Always
honor, preserve and teach the tradition of riding.
Chaps can
be a very useful addition to a student’s riding gear. Many flat saddle students
utilize what are known as schooling chaps. Theses chaps are simple, usually
smooth leather, keeping the rider’s leg from being pinched by the stirrup
leathers. Chaps also save wear and tear
on the rider’s expensive show boots.
Half
chaps are small chaps that only cover the rider’s lower leg. They either zip on
or Velcro on. These are less expensive than a pair of full chaps and serve the
same purpose.
Western
show horse riders typically only wear chaps in the show ring. These chaps are custom made to fit the rider,
come in an array of colors and may be either rough-out or smooth leather. Show chaps are often accented with a silver
concho in back and a three-piece silver buckle.
I
strongly recommend all riders under the age of 12 be required to wear a
helmet; as should a beginner rider of any age.
When
children and beginning adults are riding for the first time they are not only
going to make mistakes, they are going to be searching for their center of
balance while on a moving animal.
Anything could happen. As
instructors we want to put safety first.
Requiring
the use of a helmet is simple.
The
selection of a helmet is simple. The
equine industry has spent a lot of time and money developing a helmet that
offers outstanding protection. When
purchasing a helmet for your business or advising a client on the type of
helmet to purchase always stress it must be a safety-approved helmet.
Most
helmets are approved, tested helmets; but untested and poor quality helmets are
still being offered.
Spurs are
with out a doubt the most misunderstood riding aid in
the horse world. There is a great misinterpretation that spurs are mean or
spurs are cruel. Spurs can be mean and cruel, but only if the rider chooses to
use them that way.
The
purpose of spurs is to offer an extreme subtle communication opportunity from
the rider. It allows the rider to subtly
communicate almost unseen adjustments in the horse’s body. Used properly, spurs will aid the rider’s
performance.
Flat
saddle riders use a stainless steel spur with a blunt point at the end. The spur shank length varies from ¼ of an
inch to 1 inch. The spur is worn high on the heel of the boot.
Western
riders have about 200 choices when it comes to spurs and spur design. There are approximately 20 different types of
rowels and 20 different lengths of spur shanks and angles.
Teach
your students that the key to spur use is in the understanding the spur is an
aid, not a punishment. Use caution and
good judgment when adding the use of spurs to a learning rider’s lesson. They
can improve communication, but they can also cause disaster.
Whips,
crops or bats are designed to be used aids.
Their purpose is to reinforce the leg and help send the horse forward.
Most
commonly used with hunter horses and dressage horses, the use of this aid can
improve the level of a horse’s performance.
I do not
recommend the use of whips, crops or bats for beginning riders.
As with
the selection of any aid, err to the cautious side.
Who Provides Equipment?
Should
your riders provide their equipment, or should you?
The
answer, of course depends on how you run your business and/or the desire of the
facility out of which you teach.
If the
rider is using a horse that you provide, I recommend you provide the
equipment. We discussed the importance
of saddle fit and care of the horse. The
lesson horse plays a major role in how profitable you
business is. You do not want to risk
this valuable asset.
The horse
should be ridden in a bridle that you know he is comfortable wearing and is
suitable for the level of performance he’ll be asked to provide. A horse will not go in just any bit because
we choose to use it.
We make
our bit selection after considering the configuration of the horse’s mouth (See
the online course, Bits, Saddle Fitting and Hoof Balance) and his level of
training.
If the
rider owns the horse, then the rider should supply the equipment use with your
approval. Checking and deciding on the
correctness of the equipment is part of your responsibility as the
instructor. Often those just embarking
on the journey of riding horses base their purchases on how much something
costs. They are just learning, so they do not know how to evaluate quality much
less function.
If a
rider has a saddle that does not fit the horse, immediately explain why, and
show them the problems.
If the
bit is not a quality bit and is not working well with the horse, discuss it with
the rider. Select another bit you feel
will work better. Have the rider try it.
Direct
the rider in the purchase of more productive equipment.
Your job
as a riding instructor is to educate, not judge.
Always be
productive when teaching…. explain why, and then explain and show an example of
a higher quality piece of tack. The tack
chosen will determine how well the rider can communicate with the horse. It will be a determinate to the level of
riding achieved.
ASSIGNMENT:
1. Describe in detail how to
determine saddle fit. Take a picture of
a saddled horse, and discuss whether or not the saddle fits properly and why.
2. Explain the difference between
a snaffle and a curb bit. In your opinion describe which type of bit you would
choose for your students and why.
3. List and briefly describe the
different flat and western saddles.
4. Who is ultimately responsible
for the achievements of the student, the comfort and care of the horse, and the
overall safety of the instruction program?
Please send your report to cathyhansonqh@gmail.com