Rev Up Your
Dressage Scores
Lesson
Two
PLACEMENT IN THE ARENA
A dressage arena is a measured
symmetrical space, specifically for training a horse, with very specific
dimensions that serve a valuable purpose.
A large, or standard arena, is 60 meters long
and 20 meters wide. Mathematically, it’s 3 times longer than it is wide, which
creates a space for 3 evenly sized circles to be ridden down its length.
These are 20 meter circles - the
first size circle requiring a horse to begin to bend. Anything larger and the horse can negotiate
it in balance without having to bend. Since the primary aim of dressage is to
soften and supple a horse, it is logical that a dressage arena is sized to
begin this process.
Specific letters are placed
strategically around the arena as markers.
The letters of the dressage
arena have an uncertain origination. I was once told that they were
chosen according to the sounds of the letters, so when called out, it would be
clear to the rider.
The letters and “call-out” were first
used around 1900 at an Olympics competition to test the accuracy for every
rider, and to make it easy to see that the rider was going where directed. The letters guide the rider into precise
figures and accurate transitions.
Riders should be looking ahead and
toward the direction they want to go; planning where they will be going instead
of looking down at their hands or horses’ ears.
A rider who plans well seems to
never have to say anything to the horse. The focused rider can quickly feel the
slightest deviation by the horse and can softly and quickly correct the
horse. Horses ridden in this way are
confident, calm and content.
Practice riding with arena
letters. The letters mark the outside of
your riding ring and give you a focus point so you can make turns, circles and
other maneuvers more accurately. It can help you in all aspects of
riding.
There are two dressage arena
sizes. The small arena, generally used
for “intro” and “training level” competitions and the standard arena in which
all other competitions will be ridden.
Standard dressage arena dimensions are
20m x 60m (66' x 198') and small dressage arena dimensions are 20m x 40m (66' x
132'). If you are building a riding ring and have the space, stake out the
larger arena size; you can move the end markers to create the smaller arena
when desirable.
The Small Arena: The letters for
the small arena are AFBMCHEK. (See image 1) (Remember this by the
acronym: A Fat Bay Mare Can Hardly Ever Kick – or make up your own.)
Down the center line between A and C
are letters DXG with X the center of the arena.
These aren’t generally marked.
You can make them smaller and place them underneath the side letter,
indicating they are “center of the arena” locations.
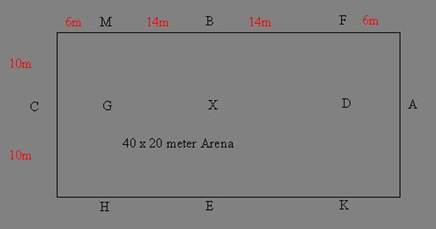
Measure
your arena accurately. The letters A and
C (establish the width) should have 10 meters on each side. Letters E and B mark the middle of the long
sides and are 20 meters (65’ 7”) from either end.
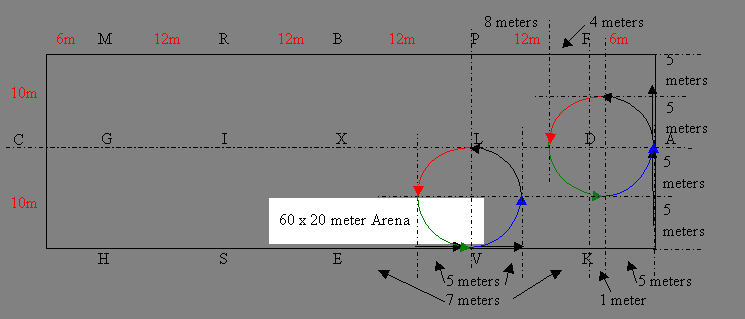
The Standard Arena: The letters for
the larger Standard arena are AKVESHCMRBPF with DLXIG assumed, but not marked,
down center line between A and C (See image 2). When marked, they also
are marked in smaller letters underneath the corresponding side letters.
(Remember the letter sequence by making up an acronym.)
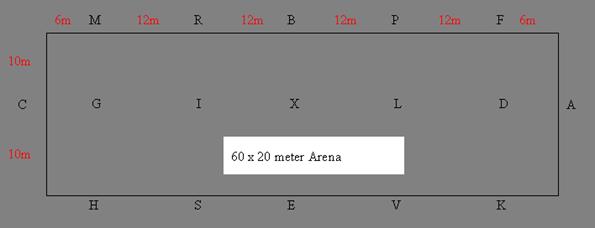
Place letters H, M, F and K six
meters (19’8”) from the ends. B and E on the middle of the long sides are
30 meters (98’5”) from the end of the arena and the other letters RSVP are
spaced 12meters (39’4”) on either side of B and E. X is the center of the
arena.
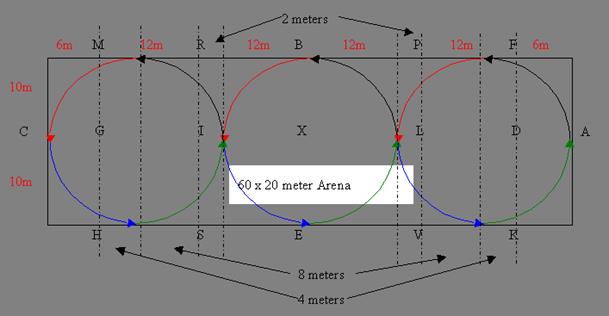
Imagine riding figures within
the standard arena. Since the arena is
20 meters wide, the width between the centerline and each long side is 10
meters. You can perform six 10-meter circles along the length of the arena, or
three 20-meter circles if you are going from long side to long side.
Compare that with the Small arena.
The most helpful way I know of
learning to ride perfect circles is to first practice drawing them….over and
over and over again. Draw them freehand
and see how they fit within the arena space. Keeping the size of your drawings
in mind, draw several circles and then draw the arena around them. How well did you do in remembering the
“sizing”?
Can you make your circles, without
flat sides or allowing them to become ovals?
Look at the directives on your
test. There is a diagram of a circle
that tells you exactly where a circle is placed and how it looks within the
arena. Draw that over and over until you can imagine riding that with a horse.
This may seem too simple, but it is a
great visualization strategy to help you picture the arena and where you need
to place yourself within it.
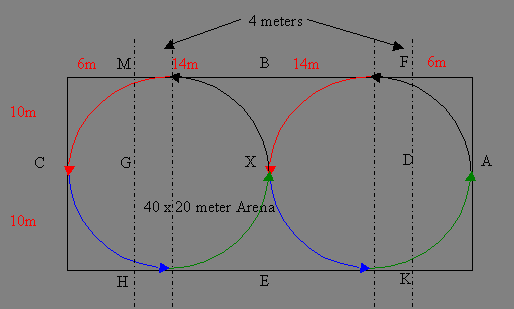
Here is an example of a Standard arena
with some well-placed 10 meter circles.
When you get good at drawing the
circles, then practice drawing the entire test within your “on-paper”
arena. As you draw, say the test
instructions aloud from start to finish. While doing this, imagine you
are on your horse, and try to feel your body moving as you visualize riding him
- say it, see it, feel it.
VISUALIZATION
Imagine riding your horse as
often as you can when you cannot actually
be on him. It is important you try to visualize your perfect ride and how
you will handle anything unexpected. Knowing your horse’s strong and weak
points should help prepare you.
Practice drawing an introduction or
training level test until you can draw it perfectly as you call out the
instructions. You are going to be surprised at how well you remember your test
when you are actually on your horse.
Every time you have a great
ride, take time immediately after the ride to ride it again in your mind. Make the ride often enough in your mind as
quickly after the actual ride as you can to make the ride easy to visualize any
time you wish.
The more often you can “re-ride
the test” in your mind, the stronger the images will become and those images
will keep your “body memory” active.
When you have a negative ride,
forget it instantly. You want a “loss of
memory” when it comes to performances you don’t want to repeat.
If
you can’t forget the ride immediately, you can visualize that ride with all the
corrections you could have made.
Visualizing the corrections will keep you from dwelling on bad
experiences. Thinking negatively will
only give those thoughts strength.
When you can visualize the arena and
where you and your horse need to
be, you’ll find riding the test is much easier.
It is estimated that if you visualize
the test while you ride it, keeping your mind quiet and positive, you can
improve your performance by up to 75 per cent score-wise, and that’s a real
rev-up to your score.
Most sports therapists use this
visualization technique for all levels of athletes in all sports.
When a horse is involved, it is
extremely important the handler remains positive at all times. The horse takes its cue from its handler or
rider. A horse will sense your mood and
respond in kind. You do not want the
horse to react to worry or frustration moods.
PRECISION
Working
on the basics helps you create good habits.
When riding your horse in the arena,
start on the rail.
You need to ride as close to the rail as
possible, and in doing so you need to keep in mind the horse is wider in the
hindquarters than in the chest.
In riding close to the rail,
riders tend to focus on the front of the horse, keeping the forehand close to
the rail, while allowing the hindquarters to move to the inside. If the hindquarters move to the inside, that
makes the horse neither straight, nor correct.
We do not want the horse
traveling crooked along the rail at any time.
The horse’s hindquarters should
be close to the rail while his shoulder will be slightly farther away from the
rail if the horse’s body is straight.
You may not feel as if the horse is
“on the rail”, but he truly will be if he is straight.
To check your positioning of the horse
along the rail, have someone square up your horse along the rail while you are
mounted. Note how it looks to you. Then dismount and view the horse from the
front and rear.
Standing in front of the horse you’ll
be able to see that there is more space between the rail and his shoulder, and
a lot more space between the rail and his head/neck.
When you re-mount, place your
horse as you think he should be, then have someone
check the positioning to make sure you are correct.
This is as close as you can be
“on the rail” correctly and remain straight.
Obviously you cannot ride the corners
the same way you do a straight line. You
do not ride as if you are making a square – corners are ridden as if they are a
quarter of a 10 meter circle.
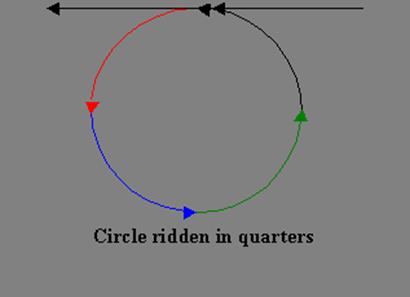
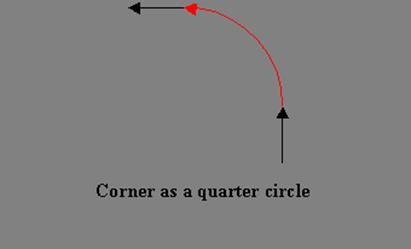
Be sure you are not cutting off
the corners, but are riding a perfect arc though the corners.
It will take a lot of practice to get
good at riding the corners correctly, so ride as many 10 meter circles as you
can in the corners. Ride the corners at both the walk and trot.
As you gain skill and your horse
becomes more balanced, your corners will get tighter and closer to the rail.
(When you get really good at corners, you will have longer and straighter lines
along the short side between the corners.)
Do not add straight lines after the
corners until you know for sure that your horse is very balanced and able to
perform those corners correctly.
You will not go wrong riding the
corners as parts of 10 meter circles.
If you are cantering, your
corners are more like the roundness of a 20
meter circle. Never try to get so tight that you jam the horse into the
corner, or so loose that you do not even recognize a corner is there.
The judge is going to look very
closely at your corners, so you need to be as precise as possible.
As you increase your abilities
and move up the levels, your horse’s canter corners will get closer to 15
meter sized circles. But until you
are truly at that level with your horse, please keep them at 20 meters.
Never push your horse into tighter places than he can navigate without complete
balance and suppleness. This can take years of correct riding and
training, and is only asked for in the much higher levels.
Another important movement is
often troublesome is the dreaded “turn at A -- continue trotting and halt at
X.” The secret to this movement is to use the 10 meter circle
method.
You start the 10 meter circle in
the corner before A, and that will bring
you around to the centerline (at A), doing another quarter turn, and then
continuing straight to X and halt. You are actually doing a 10 meter
circle, just making it a “U-turn”.
What often happens is that the rider
gets to A and then turns. If you do that you will overshoot the
centerline. If you do that, you can’t
make a straight line down the center to X.
Starting a 10 meter “U” turn in the
previous corner, places you in front of A so as you turn down the centerline
you are straight and exactly where you need to be. A good tip to remember is that you need to be
ON the centerline after your turn, not leg yielding over to it after the
turn.
Make sure your “corner” is before A so
as you come around you are exactly ON the line.
Using this system will place you
perfectly no matter where you have corners or turns.
Another precision mistake occurs
frequently when riders are moving across the diagonal.
Riders tend to pass the letter or turn
right at the letter to go across the ring. You will rev-up your score if
you travel across the arena on a straight line between the two letters.
To make that perfect diagonal pass, you need to turn slightly BEFORE the letter
so that as you straighten out, you are ON the line.
Where exactly do you turn or stop at a
letter?
High scoring riders know that you are
“officially” at the letter when the letter is opposite your leg. Your
score will suffer if you halt at X when the horse’s nose reaches the letter, or
by stopping with the horse’s hindquarters at the letter.
Scoring high is gets harder and harder
as you move up the ladder of levels, so don’t waste points by failing to be
precise in your movements, transitions and stops.
You want to be sure you are
doing the movement asked for at the exact placement in the arena. You may
not have the best mover in the class, but being precise in your movements can
make up for many weaknesses.
Precision cannot happen without
PRACTICE. Practice all your patterns around the arena at the walk until
you know exactly where you need to be in relation to the arena. If you
have drawn your patterns and visualized your rides, it makes this part
easier. Be relaxed and have fun learning this. Make sure you give
yourself enough time to learn a new test before you try to perform it.
Never go to a show and ride a test
“cold”, or even with just a caller. You and your horse must be prepared
if you want to score well.
Never ride a test if you have
any doubts about any part of the test.
The idea of a dressage test is to show what you have learned and
mastered, not what you are currently learning.
Practice is very important …
only perfect practice makes perfect tests.
Now, I do not mean to drill the
horse, or even to ride the whole test over and over. It is best to break
down the test into each movement and to learn and be comfortable with each
segment. Only when you are comfortable should you string all the elements
together.
As you practice, put three or four
segments together until they become one movement in your mind.
Change the way you practice the
movements so the horse does not anticipate requests. Do not spend every
day in the arena. As a matter of fact, train outside the arena and in as
many different places as you possibly can.
When training for dressage, mix
up work sessions. Go trail riding, or
jump. Give the horse plenty of days off
and lots of turn out time.
Practice, but do not make it drudgery.
Assignment:
Task
One:
Describe
how you would prepare yourself mentally and physically for riding a new test.
Task
Two:
Send
a video of a simple pattern—Centerline, two diagonals, follow the rail, halt.
If you have a marked out dressage
arena (small one would be perfect for this) it does not have to be perfect
size, just generally relative to one… At a WALK ….
Enter at A, walk down centerline towards C, turn Right, go through corner to M,
go across the diagonal towards K, go through the corner towards A, keep going
and go through the other corner towards F, go across the diagonal towards H,
stay on the rail and follow it all the way back to A and halt when your leg is
at that letter – you will be facing towards the next corner. I am not judging on exactness of placement of
letters, but of your corners and the straightness along the rail and across the
diagonals, and the placement of you and your horse at the letters themselves.
If you do not have a dressage arena
for this, use 4 cones, buckets, milk jugs filled with sand or water etc… place
them an approximate space apart to create a rectangle that you could ride in as
if it were a dressage arena. If you can use 8, then place them as the main
letters of a small arena. At the walk
only -- Enter where A would be and travel down the centerline straight to C,
turn Right towards the next corner, go through that corner then cross the arena
to the far other side just before the next corner, turn Left through that
corner, travel straight towards the next corner, go through that corner, then
across the arena to the far other side
just before the next corner, go Right through that corner and then travel
straight on the rail until you get all the way back to A and halt when your leg
is at that letter – you will be facing towards the next corner. It is the same exact pattern as above, but
written for you if you do not have the letters.
The best thing to do is it draw out the little
pattern and/or follow the diagram of the dressage arena.
Load
the video to YouTube or another video
hosting web site.
Please
send the link to the video and your report (in the body of an email or as an
attachment) to: angietlr@gmail.com