Preparation for Competition
Lesson Six
BANDING AND BRAIDING
Banding and braiding is easier said
than done.
It is not that banding and braiding
are so complicated, or that the techniques are so difficult to learn. The rub comes when your fingers get tired and
sore from pulling and braiding and banding.
From the hand’s point of view, it is a lot of work.
But practice makes perfect---bands
and braids. So practice, practice,
practice and soon it will be almost easy…..almost, but still a job. (At large shows, there are usually a lot of
banding and braiding professionals. If
your time is limited—it usually takes 30 minutes to band and up to an hour to
braid—you may wish to hire the job done.)
The first task is to decide what it
is you want.
In many cases the style currently in
fashion related to the competition of choice will dictate whether you band or
braid; and if you braid, exactly what kind of braids. There are styles for every breed and styles
for virtually every level and discipline of competition. Study the bands or braids of the winners, and
then try to duplicate that winning look.
Considering your horse is a “show”
horse, his forelock, mane and tail should be in good shape—clean with no
tangles.
Does the mane need to be shortened?
For banding of most western horses,
the mane should probably not be longer than 4 inches. You should choose a
length which is flattering to your horse.
If your horse has a pretty, trim neck, shorten the mane so it stops just
above the big muscle which runs parallel to and a few inches below the crest of
the neck.
If your horse’s neck is thick, it is
best to leave the mane about ½ inch below the muscle
to cover the bulk.
If you are going to be showing an
English horse with braids, you won’t want the mane to be shorter than about 6
to 8 inches. Once braided, the mane will
be about 4 inches and then the braid will be doubled or made into a button.
If you desire a French braid, running
braid or Continental braid, then your horse’s mane must be very long. In most cases, only certain breeds would
wear such braids, and you should be familiar enough with the styles of your
competition to know what is and what is not appropriate.
SHORTENING THE MANE
If the mane is really long—and it
shouldn’t be at this point in the horse’s show career—you can use a thinning
comb to cut off large portions at a time.
(TIP: Never
try to shorten or pull a newly washed and conditioned mane or tail. It will be too slippery. Don’t put any conditioner on a mane about to
be banded or braided.)
Thinning comb
A thinning comb is small with closely
placed teeth and sharp cutting edges. If
you want a mane of approximately 4 inches in length, take a small portion of
hair and place the comb on it about 4.5 inches from the crest of the neck. Now pull down sharply on the comb. The hair should break off with the desired
irregular edge.
You will pull the mane to the desired
4-inch length.
Using electric clippers is not
recommended, however, it can be done with a very long, thick mane. If using electric clippers, carefully cut
through small sections of the mane, again about 4.5 inches from the crest of
the neck. If you use electric clippers,
check constantly to be sure you are leaving the correct length of mane.
Again, you will pull the mane to the
desired 4-inch length.

Pulling Comb
A trick to help reduce the horse’s
reaction to mane pulling is the use of a strong leg brace or liniment on the
roots of the hair at the crest of the neck.
(You can also use Listerine—doesn’t even have to be mint.) You are going to start “pulling” the mane in
the middle of the neck, so dampen about a four-inch long section of mane with
the liniment. Apply liniment to each new
section of mane as you work up and down the mane.
To thin, even and shorten the mane,
take a few of the longer hairs and hold them at the end in your left hand. Assuming your are right handed, use a mane
comb in your right hand and back comb the hair away from the group being held
by your left hand. Wrap the hair in your
left hand around the comb and with a quick short jerk, remove the hair. Use the same procedure with a few hairs at a
time. It is slow work, so don’t get in a
hurry.
Keep checking as you move along to
make sure the thinning and shortening you are doing is leaving the mane the
even length you desire.
Most horses will not object too much
to “pulling”, especially if you don’t try to pull too much hair at one
time. If the crest of the horse’s neck
is being pulled toward you when you attempt to “pull” the mane, then you are
taking too much mane at one time.
Pulling a mane is a long process, but will go more quickly and smoothly,
if it is done in little tugs rather than big yanks.
Whether the mane lies on the left
side of the horse’s neck, or the right side doesn’t really matter. What does matter is that it lies “flat” and
“quiet” on which ever side it chooses.
You can band a longer mane to “teach”
it to lie flat on one side or the other.
Or you can braid the mane to keep it on one side. Finally, which is what I do, you can have the
horse wear a “Slinky” or “Mane Tamer” to keep the mane in place.
Mane Tamer
BANDING THE MANE
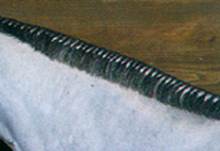
If you want to visually lengthen your
horse’s neck, band smaller sections of mane which gives you more bands, making
the neck appear longer. You will have
to try a few, then stand back and take a look.
It will not look good if you use too little amounts of mane in each
band.
If you want to shorten the appearance
of a long thin neck, put in fewer bands by using a slightly wider portion of
mane.
A thin, wispy mane will look better
is you use a wider section of mane for each band, while a thick, course mane
will lie flat only if you use a narrow section of mane for each band.
The mane should be length you want it
before you start banding. The mane
should have been washed, dried and brushed out.
You need to dampen the portion of
mane you are banding. Dip a stiff brush
into a small bucket of water and brush the mane wet and flat.
It is easiest if you stand on a stool
so you are well above the horse’s neck.
CAUTION: Be sure you are not left or right of the
section of hair you are about to band.
You want the section to be banded directly opposite you. If it is not, you will tend to pull the
section crooked.
Starting at the top
of the neck, separate a section of mane about a half-inch wide. Using a fine-toothed comb, comb through the
hair until every hair is smooth and flat against the horse’s neck. Keep the lower portion of mane out of your
way by pushing your comb into it.
Having the comb in the next section of hair to be banded is conveniently
handy and the comb doesn’t get lost.
You can also you a butterfly clip to hold the mane not being banded, if
that is easier for you.
Take a rubber band in your left
hand—again assuming your are right handed—insert your left index finger and
thumb into the band, making it wide enough that you can grasp the section of
hair to be banded.
Hold the section of hair downward
against the horse’s neck with you right hand, keeping the hair strands tight
and smooth.
The rubber band is still in your left
hand. Place it over the section of mane,
grasping the hair. Using your right
hand, grasp the rubber band just below your left thumb to hold it in place
while you pull the section of hair through the rubber band with your left hand. Try not to pull the hair upward as you pull it
through the rubber band.
The rubber band should now be in your
right hand. The hair should be smooth
and tight. Hold the hair downward with
your left hand and with your right thumb and index finger twist the rubber band
once. This time the left hand holds the
rubber band while the right hand pulls the hair through.
Twist and pull five times (or until
you can’t twist it again), having changed hands with each twist.
I like to finish by twisting 3 or 4
more times without changing hands. I
think this helps create a neater appearance and holds the band in place longer.
To tighten the bands, split the
underneath hair in half and pull sideways.
You want the bands snug, but not too tight which will be uncomfortable
for the horse. This is the step which
flattens the band to the neck. When
finished, trim the bottom of the mane with trimming scissors to even the entire
mane.
When the mane has been banded you can
decide what to do about the horse’s forelock; band it, brush it or braid it.
Give the newly banded (or braided)
mane a light spray of gel, then cover the mane with a towel until the gel
dries. This usually guarantees a flat,
neat band. Tack stores sell several
kinds of mane and tail gels.
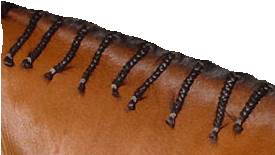
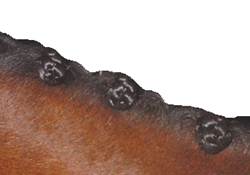
BRAIDING THE MANE
You can buy braiding kits, or you can
assemble your own.
You will need:
1. Twelve-inch stands of yarn
matching the color of your horse’s
mane.
2.
Small rubber bands.
3. A braid pull-through. You can make one from some bailing wire
or you
can use a rug latch hook or crochet needle.
4. Scissors.
5.
A sectioning comb.
6.
Hair gel.
A slightly damp, slightly gelled mane
holds stray hairs in place and gives a great finished appearance.
You will need to stand on a stool.
Start at the top of the mane and comb
off a section of hair to be braided. (If
you have a grooming apron, put your tools in the pockets so everything is
handy.)
Start braiding the section, keeping
the braid nice and tight as you go.
About half way down the braid, place a piece of yarn, folded in half, in
the center of the braid and continue braiding, incorporating the yarn as you
braid. When you get to the end of the
braid, wrap the two pieces of yarn around the tail of the braid and knot the
yarn.
Continue to braid sections of the
mane until you are finished. Now you
should have a row of braids with about 4 inches of yarn hanging from the end of
the braid.
To finish a plaited loop, slide the
hook down the top of each braid, through the mane and slip the loose yarn
though the eye of the pull through. Pull
the hook up and out the top of the braid—the braid tail and yarn should now be
through the mane and resting on the crest of the horse’s neck.
You can now crisscross the yarn under
the braid, then bring it back around the middle of the braid and pull tight,
creating a small bump, and tie a square knot.
Keep everything very tight. Clip
off the loose ends of yarn.
A slightly different way to braid for
a hunter or dressage horse eliminates braiding the yarn into the braid.
Section off a part
of the mane, again starting at the top of the neck near the poll. Start a three-stand braid, wrapping right
over center, then left over center. Continue to the end of the hair.
To secure the end of the braid, place
a folded strand of your yarn or linen string behind the braid. Wrap the string around the braid and take
the loose ends through the loop made by the fold in the string. Pull the string tight.
Now slip the string through the top
of the braid and by pulling the string, fold the braid in half. Pull tight.
Separate the ends of the string and encircle the top of the braid. Pull tight and tie a square knot. Clip off the ends of the string.
“Button” or “Rosette”
If you want a “button” or “rosette”
then you simply repeat the braiding process until you have the braided loop.
Using 10 to 12 inches of thread, push
a needle into the middle of the “loop” from the bottom of the braid, coming out
the top. Then push the needle and thread
down through the end of the loop of the braid, coming out the bottom. From this position you push the needle
through the base of the braid at the crest of the neck and pull tight.
The result is you have
“doubled” the loop and now have a tight “button” resting nearly on the top of
the crest of the neck. Tie the button
tightly into place using the end of the thread, then clip off any excess
thread.
BRAIDING THE TAIL
There are a number of
styles for tails. You will know which is
best for your breed and discipline. The
most common style is the Hunter Braid.
Clean and smooth the tail.
Dampen the tail at the dock. (If the horse has a “bushy” tail at the dock,
you will want to “pull” unruly hairs to maintain a neat appearance. Some dressage competitors like to use
electric clippers and clip close to the dock and both sides to eliminate
“fly-away” hairs.)
Start with hair at the very top of
the tail and separate three small sections.
(You will have two sections on one side and one section on the other
side. Take hair from the side and bottom
of the tail, not the top.)
Begin a three-strand braid, bringing
each new strand from behind the tail and adding strands from behind the tail as
you braid down.
Keep tension even as you
braid.
Stop adding new strands when you
reach the end of the tail bone.
Braid the loose ends of the three
strands you have to make a short “pig-tail.”
Secure the end of the pig-tail with a rubber band, then
sew through the end of the pig-tail with needle and yarn.
Finally draw the braid into a loop by
inserting the needle and yarn through the center of the upper braids coming out
about three or four segments up. Tie the
yarn off in a square knot and clip off the ends of the yarn.
FALSE TAILS or TAIL EXTENSIONS
Tail extensions or false tails may be
used cosmetically, or to help hold down a tail that is carried too high. Check with your breed association as false
tails are not approved for some breeds (example: Arabians and Morgans). AQHA
approved the use of weighted tails in 2012, except in versatility ranch horse
and ranch horse pleasure.
Methods
of attaching the tail extension will vary between manufacturers. Show associations may also have rules
regarding how the false tail is attached.
For example, the American Quarter Horse Association states: "Tails
may be lengthened by hair-to-hair attachment only, with no attachments of any
kind to the tail bone.” Practice putting
on the false tail before arriving at the show. It will take practice to get the
look you desire. Too low and it will
create too much swing.
When
purchasing a tail extension look for a color that matches the color below the
tailbone while looking at it from a distance of about 10 feet – get too close
and you will not get a good perception of the over-all color. Do not buy a tail
that is too thick for the horse – too thick and it tends to get caught between
the back legs. Buy a tail that is the
right length for the horse.
Other
hints for keeping the tail from becoming caught between the hind legs is keep
the tail extension clean and tangle-free, keep the chestnuts on the hind legs
smooth and the use of a silicone grooming product on the inside of the hind
legs may help.
Do
not leave false tails in overnight.
FORELOCK BRAID
The forelock braid is just a regular three
strand braid.
Once the braid is complete, you can
fold it in half and hold it with a rubber band or thread. The braid can also be rolled into a “button”
and secured.
If the braid is very short, and the
horse is a filly, a delicate bow of ribbon can be tied to the braid.
SOME DOs AND SOME DON’Ts
Do give the mane and tail a weekly
shampoo. Use a medicated shampoo if the
mane or tail shows signs of dandruff. Be
sure to rinse completely. No shampoo
residue should be left.
Do separate the wet hair with your
fingers instead of combing. Separate
from the bottom up, not the top down, to prevent hair damage and breakage.
Do apply a hair conditioner to mane
and tail. There are several kinds.
Do use horse or human
shampoo. (There is a myth about using
human shampoo, and it is a myth. The
“ph” balance of human hair and horse hair is essentially the same.)
Don’t brush through the horse’s tail
every day. The more your brush, the more
hair you lose. When brushing, hold the
bulk of the tail in one hand and brush from the bottom up, never from the top
down.
Don’t comb a wet tail or mane.
Don’t use a silicone based product on
mane or tail on a daily basis as it will dry the hair and cause it to break
off.
Don’t braid the tail to keep it
clean. Too much braiding causes the
fragile hairs to break off. (It is not
necessary to braid a tail to use a tail bag.)
Assignment:
1. In what event are you competing?
Describe in detail how the mane and tail needs to be
prepared for competition. Please include
pictures, you may use ones you’ve found on the
internet.
2. Please send a video of you preparing your horse’s mane
for your event. If you are braiding or
banding it is not necessary to prepare the entire mane – just do a few braids
or bands to demonstrate your technique.
Send assignments to cathy@horsecoursesonline.com