HORSE
PHOTOGRAPHY
Lynette Smith
LESSON THREE
Defining Exposure
• What does the term “Exposure” mean?
• Shutter Priority and Aperture Priority
• ISO – how it affects exposure
• RAW vs. Jpeg
• White Balance
What
does the term “Exposure” mean?
Basically, photography is all about light.
To
get the correct exposure for your photograph, you need to know the settings
that you can adjust and what they do. The
main players are ISO, f-stops and shutter speed.
What does "exposure of the image" mean and how
will it affect your digital camera photos?
Simply put: exposure is the
unit of measurement for the total amount of light permitted to reach the
electronic sensor during the process of taking a photograph.
If the shot is exposed too long the photograph
will be washed out because there is too much light. If the shot is
exposed for too short a period of time the photograph
will be dark because there was too little light.
Almost all cameras today
have light meters, which measure the light in the given shot and automatically
set an ideal exposure time. Most people depend on the built-in light
meter, and that is fine. But if you
know how to control your exposures, you can get some creative and often times better pictures.
Shutter
Priority and Aperture Priority
The two main controls your digital camera
uses to set exposure are the shutter speed
(how long light hits the film) and aperture (the size of the
lens opening which allows light to hit the film).
Shutter speed and aperture work together. You can get the same amount of light with a
small opening that remains open longer as you can with a large opening that is
open less time.
Shutter speeds are measured in seconds and more commonly
fractions of a second. (1/2000 of a second is very fast and 8 seconds is
extremely slow).
Shutter speed is also a way to control movement. When the shutter is open for more than a
fraction of a second and there is any movement from your subject or your
camera, the movement will cause a blur in your image.
In order to freeze the image and
get a sharp photo, you need a faster shutter speed.
In effect, the shutter
determines what image is captured on your film.
The shutter
is a small plastic “door” that opens and closes allowing light onto the film or
prevents light from reaching the film. The shutter is opened when you press the
shutter release button on your camera.
The shutter speed determines how long the shutter remains open.
A shutter speed time in
typical everyday photography is about 1/250th of a second. If the shutter stayed open for 1/100th of a second then you have almost twice as much light coming
in. If the shutter stays open for
1/500th of a second only half as much light comes in.
Shutter speeds can be as fast as 1/8000th of a second. The faster the shutter speeds, the more you
freeze the action of a moment. Click
here to see an example of pictures showing shutter speeds.
Slower shutter speeds are
often selected to suggest movement in a still photograph of a moving
subject. Excessively fast shutter speeds
can cause a moving subject to appear unnaturally frozen. For instance, a cantering
horse may be caught with all feet in the air and all indication of movement
lost in the frozen moment.
If you are photographing
fast moving objects such as cantering horses, you need to select fast shutter
speeds to capture the sharpest picture you can if that’s the effect you’re
looking for. Or you can choose a slower
shutter speed--a longer amount of time for light to enter--that can introduce
an element of blur to the subject creating a different image.
A
good rule of thumb is to have a shutter speed that is twice your focal
length. If you’re using a 200mm lens,
your shutter speed shouldn’t be slower than 400.
There are creative times
when you want to take an action picture with a slower shutter speed to
emphasize the action by allowing the picture to blur. (Example: the bottom
picture above.)
There are also times you
may want to stop the action and freeze the subject so that it is crystal clear.
Apertures are measured in what is referred to as f/stops (a
very wide aperture is f/2.8 and a very small aperture is f/19). Your shutter speed and aperture settings need
to be balanced in order to provide a proper exposure
to any photograph.
This can seem puzzling, but it isn’t if you keep in mind
the higher the aperture number the smaller the aperture is. For instance f/22 is
a very small aperture setting meaning a very small hole in the lens’
barrel. f/5.7 is a
quite large aperture setting creating a fairly large
hole in the lens’ barrel. The smaller numbers let in more light.
F-stops can be a somewhat
confusing in the beginning because the numbers do not work the way you would
expect. For instance, a higher f-stop
number indicates a smaller aperture diameter -- in other words, as the iris
opening decreases in size the f-stop number increases. A lower f-stop number indicates a larger
aperture diameter therefore the iris opening increases in size and the f-stop
number decreases.
F-stop settings are normally written with a forward slash
such as: f/16. Common f-stops you will hear referenced are: f/1.4, f/2,
f/2.8, f/4, f/5.7, f/8, f/11, f/16, and f/22.
Note:
A small f-stop (large aperture) results in a small depth of field and a
larger f-stop (smaller aperture) gives a large depth of field.
Your f/stop
is determined by the lens, not the
camera.
Depending
on the lens you have on your camera body, you will have a range of f/stops
available to you.
Practice
saying this to yourself: large aperture
numbers mean small opening in my lens, therefore less light. Smaller numbers mean a larger opening
allowing more light.
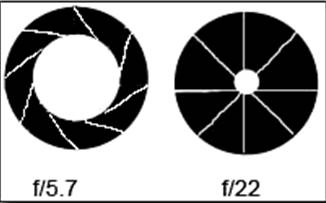
f/5.7 – large aperture (lets
in more light)
f/22 – smaller aperture (lets
in less light)
F-stop and aperture are definitely the
most complicated and confusing aspects to exposure control
and composition. Here’s a good rule of thumb.
Use a
small number f-stop (large aperture) for portraits so you get your subject in
focus in a small depth of field; you aren’t concerned about the
background. Ex: Small F-Stop = Small
Depth of Field = Less Light Needed
Use a
large number f-stop (small aperture) to maximize the amount of background in
focus. Ex: Large F-Stop = Large
Depth of Field = More Light Needed
A standard
“Kit” lens typically comes with an 18-55mm with a range of
f/4 to f/5.6. Meaning that at 18mm (zoomed all the way out) you can go as low
as f/4, and at 55mm (zoomed all the way in) you can go as low as f/5.6. Typically, the lower the f/stop on your
camera the more expensive the lens will be.
Along with letting more or less light into the camera, the size of the aperture
governs the 'Depth of Field'. Depth of field
is the range of distance in which the subject is acceptably sharp. A
smaller aperture will give you a greater depth of field and a larger aperture
will give you a more restricted depth of field.
If you are photographing
vast landscapes, horses in a field on a sunny day, the chances are that
everything will be in focus and you will not notice
this occurrence at all. Depth of field is much more noticeable when taking
close-up shots, such as portraits or headshots of horses.
It is often attractive to
have the background of your picture out of focus. This is easy to achieve by
selecting a larger aperture to restrict the depth of field. For example, f/2.8 gives less depth of field,
while a smaller aperture like f/16 provides a greater area from front to back,
giving good definition to details.
A wide-angle lens will
give you almost limitless depth of field.
ISO
– how it affects exposure
The third item that
affects proper exposure is the speed of the film referred to as the ISO
number. ISO stands for 'International
Organization for Standardization'.
The film speed ratings
are used to signify the relative amount of light necessary to provide a proper
exposure. ISO settings determine how
sensitive your camera is to light. When
you shoot at a lower ISO (less sensitive), you get better quality images with
less of the “digital noise”. However,
when shooting at a higher ISO (more sensitive), you can capture stop-action
(fast-moving) shots better, like a gaming event, jumping or roping.
When
shooting at lower ISO’s you must use lower numbered f-stops (i.e. f/2.8) and
slower shutter speeds. Meaning, you lose
depth of field and increase chance of blur.
On the other hand, when shooting at higher ISO, you will tend to lose
some detail and increase the amount of noise in your image.
On a digital camera the
ISO setting is built into the camera.
Until digital, the only way to change the ISO setting was to swap out
the film. With a digital camera changing
the ISO is as simple as changing a setting internally in your camera.
When working with film,
the more sensitive it is to light the faster the film and the higher the ISO
number will be. What that means is it
takes less light to expose film with an ISO rating of 400 (exposes faster) and
will require more light to expose film with an ISO
rating of 100 (exposes slower).
How does all this effect digital cameras?
In the digital photography world the phenomenon
is called 'noise' not 'grain', the cause of the problem is slightly different.
Grain is a film issue. Noise is a digital issue. "Grain" refers to
the maximum resolving power of film. It is a literal term; film is sensitive to
light because it contains tiny grains of silver halide, which change when they
are exposed to light. Smaller grains of silver halide mean higher image
sharpness, but also lower light sensitivity. The more sensitive a film is, all
other things being equal, the more grainy the image
is, because the larger the grains of silver halide.
Digital cameras do not
have grain by definition; they do not use grains of silver halide. They do have
noise--unwanted analog noise from the sensor.
When light levels are low, the sensor has trouble reading the scene
properly and pixels of random color are thrown into the picture.
The 'better' digital
cameras have, usually hidden away among the manual settings, a sort of
simulation of the film speed effect. My camera for instance, a Canon EOS 40D,
has an ISO range from 100 to 3200. This feature is not available in fully auto mode, but is available in all the other modes. When I’m shooting fast action, like a horse
cantering, I may choose ISO 400 or 800.
If the light isn’t great because we are working inside an indoor arena,
I may shoot at ISO 1600, which offers more light. Click here to
see ISO examples.
You’ll really notice the
difference when it’s magnified at 100% zoom, but at a normal size image the different is more difficult to see.
I realize talking about
ISOs, shutter speeds, apertures and more can be very confusing. However, it is important that you master the
concepts since they are all interrelated.
The significance of each one and how it affects your equine photography
will become more noticeable as you gain more experience.
RAW Images vs. JPEG Images: What’s
the Difference?
A frequent question from both
experienced photographers and those just beginning in digital is: should I shoot
in RAW or JPEG format with a digital SLR (dSLR)
camera?
RAW
images are uncompressed digital photos that save image data precisely the way
the image was captured by the camera's sensor.
When you’re shooting in RAW mode, the exposure and color temperature
settings (i.e. white balance) are not applied to the image and the photo is
saved in an uncompressed format. The resulting image is called a raw image
file.
Using
“conversion software” you can adjust the image sharpness, contrast, tone and color, add filters, adjust the white balance,
adjust the exposure by two stops either direction and choose which format and
resolution you want the file when saved.
If you
shoot in JPG format, once the image is taken, aside from the post processing in
Photoshop, you are very limited with what you can do to 'fix' any problems that
may arise.
RAW files hold all the
RAW data captured by the camera. Unlike conventional photography where light is
exposed against film with a specific chemical formulation to provide deep
saturation or soft skin tones that would otherwise be automatically applied
based on the type of film used, RAW digital files contain raw data that is not
interpreted and is unaltered. RAW files
in their simplest description can be thought of as digital negatives. They are
a pre-production starting point.
Since
raw images are not compressed, they take up considerably more disk space than a
JPEG file format. The file size will be
about twice as large. With raw images,
the original image detail is not compromised by image compression resulting in
a higher quality than JPEG images. Your typical user may not notice the
difference in image quality; your professional photographer typically will
shoot in RAW mode to maintain the best quality for each image.
To give you an idea of file size, when shooting
in JPG mode on a 4 Gig card you can end up taking approximately 800 plus
photos. When shooting in RAW mode on a 4 gig card you will end up with approximately 340
images. If you shoot in RAW mode and
discover you’re almost out of memory with no cards left, you can switch your
camera into JPG mode and it will provide more room on
the card. The initial images will be RAW
and anything after you switched would be JPG.
Keep
file size in mind, because it’s easy to fill cards
quickly at a horse show.
Cameras
made by different manufacturers save RAW images in different file formats. Here is a list of common RAW image file
formats used by various digital camera manufacturers.
·
Adobe – DNG
·
Canon – CR2 & CRW
·
Fuji – RAF
·
Kodak – DCR
·
Minolta – MRW
·
Nikon – NEF
·
Olympus – ORF
·
Pentax – PEF
·
Sony - SRF
Keeping
track of the various RAW formats can be challenging, however, most
image-editing programs such as Adobe Photoshop CS support most raw image
files.
JPEG (Joint
Photographic Experts Group) is a “lossy” compression technique for color pictures pronounced, "jay-peg". Lossy means "with
losses" to image quality. JPG compression has very high efficiency
(relatively tiny files) because it is intentionally designed to be lossy,
designed to give very small files without the requirement for full
recoverability. JPEG format compresses
image data into a smaller file size. A
JPEG file contains less data (how much depends on the specified size and
compression/quality settings) than an equivalent RAW file,
but is able to closely reproduce an image once fully loaded.
When
saving an image with photo editing software it is possible to save an image
with different levels of JPEG compression. This enables you to create files
that take less storage space sacrificing how well the file displays,
or take up more storage space to more accurately reproduce the original
image.
The Pros of
RAW format:
·
RAW is a digital negative capturing all the data from
your camera providing a foundational element where you can apply all of your edits without sacrificing image quality.
·
RAW file software editors allow you to quickly and easily change the output of your image such as
adjusting exposure, white balance, noise reduction, image size, saturation,
contrast, levels, curves, sharpness, output resolution, bits/channel, etc.
·
RAW file software editors allow you to load saved
adjustment settings and some even enable users to
batch process a group of files versus making changes to one file at a time.
·
The Cons of
RAW format:
·
RAW files take up a lot more space on your camera's
compact flash card or micro drive than other formats. JPG images on a 4 – gig card result in about
800 photos whereas RAW files on a 4-gig card decrease to approximately 340
images.
·
RAW files require you perform some amount of post
processing using photo editing software to convert your image to an editable
file type for editing, printing and/or online display.
·
RAW file software editors have a learning curve, and can be intimidating.
·
RAW files essentially contain more data and take
longer to open and process than a JPEG or a TIFF File.
The Pros of
JPEG format:
·
JPEG is a file format that has been adopted as a
standard and can be loaded in a variety of programs for easy and simple
display.
·
Most common format for uploading to a website gallery.
·
JPEG files take up less space on your camera's compact
flash card or microdrive than other formats.
·
JPEGs can be loaded easily by most all image editing
software programs.
·
Most dSLRs enable you to
choose what size JPEG files (S, M, or L) to save to your compact flash card or microdrive when shooting. This enables you to use smaller
images that are easier to handle for email attachments, web display or as an
alternate preview mechanism if your camera supports saving files in JPEG and
RAW formats simultaneously.
The Cons of
JPEG format:
·
JPEGs are not a loss-less file format. Each time the
file is saved data is compressed, with some data being lost in the process. The
net impact can be loss of color saturation, color range and sharpness.
·
Degrade (lose image quality) each time they’re
compressed and transferred. Compression
reduces the file size at the expense of discarding information about the image
itself.
·
Not the best format for printing gallery-quality
prints.
Which Format
Is The Better Format To Use?
It boils down to personal
choice and matching up the pros and cons to your photographic needs and
style. Some photographers feel more
strongly about one.
I shoot RAW images
because I like the creative flexibility and the high quality the image
provides. RAW files are typically the
preferred file type for producing an “art” photograph with a digital camera. The reason being you can adjust the color and
tonality more efficiently with better results than you can with a JPEG or TIFF
file.
Another great reason for
shooting RAW: sometimes you forget to check your settings and errors
occur. RAW images allow you more
flexibility to correct for errors made while shooting the event. RAW files have saved me by allowing me to
really edit the image to a more accurate version of the event I was shooting.
White Balance Indoors and Outdoors
Indoor and outdoor light
is much different and can give your photograph an
entirely different hue. Most digital
cameras offer a setting to adjust the problem referred to as “white
balance”. The function of white balance
is to find a reference point for what is “white” and then to correct offbeat
hues based on your reference point while you shoot.
Most film cameras have no
white balance setting, so you have to deal with brown/tanish tones indoors and blue tones outdoors. You will find most digital cameras have a
manual setting for white balance that will ensure the best results.
When setting white
balance, depending on your camera, you could have 3 -8 different options
available. Auto,
is typically the default setting where the camera will automatically set the
white balance when you take the photo.
Daylight is great for
natural lighting where you have all sun and no artificial light coming into
your photo. Some cameras have an
“Indoor” setting while others divide the “indoor” setting into types of light,
such as tungsten or fluorescent.
If you shoot in RAW, and
the light balance was in “Auto” and you don’t like the result, you can change
the light balance option post-processing.
When you’re taking photos
in an indoor arena without a flash, you have less light. You can compensate for this without using a
flash by adjusting your camera’s ISO speed.
In an indoor arena, my
ISO is typically set at 1600 to make sure that I’m getting the shot.
Some trial
and error adjustments will be needed based on your specific camera and
lens. You’ll have the options
of changing the shutter, aperture and ISO.
When working indoors your
“white balance” will be set for inside lighting. Be sure you change the setting if your
subjects move outdoors. A failure to
change the setting may leave you with “no” images.
Now that the technical
information is out of the way, we’ll move forward in the next lesson to learn
more about photographing the horse, horse events and more!
Assignment:
In a detailed report:
1. Tell me the camera you are using and what lens (f/5.6 etc).
2. If you have the opportunity to photograph in an indoor horse arena,
take a few photos at different ISOs, shutter speeds and aperture’s. If you cannot get to an indoor arena, take
some photos of pets inside a house or building.
3. Take some photographs of horses using different ISOs, shutter speeds
and apertures outdoors.
4. Compare the differences between how your camera is set up for indoor
shots and outdoor shots. Tell me what
you discovered.
5. Submit your best photo from indoors and outdoors with the settings
you used for each.
Please send your assignment and pictures to info@lynettesmith.com