Equine Massage
LESSON
SIX
I.
Basic
Principles
II.
Massage
Techniques and Modalities
III.
Massage
Tools
This lesson looks at massage
modalities and techniques.
My goals are:
RELIEVE tension and soreness by loosening
tight muscles.
RESTORE an injured muscle or muscles to a
healthy state.
REBALANCE the entire muscular system of the
body, adjusting of balance areas.
I. BASIC PRINCIPLES
I have three
basic working premises for achieving my goals.
First, describe what it is that I want to accomplish. Second, describe the primary method I will
use. Third, recognize the importance of
the mind/body connection. These three
basic principles are the foundation of everything I do in my massage work.
The first step
is to attempt to create an anatomically correct body. My aim is to come as close to an anatomically
correct body as the horse’s problems will allow. In order to do this, I must have a clear
picture of the body’s anatomy; how the bones and muscles are arranged for the
most comfortable and efficient movement based on this anatomy.
The
second step is to use the “contract to relax” method of massage. Regardless of what massage techniques I’m
using (and there are many), those that cause a tight or sore muscle to contract
or tighten more will facilitate a greater release. So, the most basic and efficient method of
getting tight muscles to release their tension is to first get them to contract
more—“contract to relax.”
The
third step is recognizing the mind/body connection. The mind affects the body and the body
affects the mind. In order for these
releases to become permanent, the sub-conscious, habitual movement patterns may
have to be changed. Sometimes it
requires special exercises to re-program a body’s movement patterns. The body has to be made aware that there are
alternatives to the way it is accustomed to doing a task. Until the body becomes aware that there are
other ways of doing a job, it cannot make changes.
ANATOMICALLY
CORRECT BALANCE
I touched on
this concept of correct anatomical balance in lesson 2 (anatomy). I discussed
“specific intent” in an earlier lesson.
Specific intent is a concept that involves more than just doing massage
to loosen a muscle. It involves being
able to see how the dysfunctional muscle (or muscles) affect the whole
structure, and once the tight, sore or injured muscles have been loosened, how
they have to be re-integrated with the other muscles (the ones with which they
work). And then, finally, the area has
to be re-balanced with the entire muscular/skeletal system.
So,
we will be doing massage with the specific intent of bringing the body back
into anatomical balance.
But first we
have to have a good understanding of what constitutes “anatomical balance”.
Both the
skeleton and muscles are arranged as mirror images on each side of the
spine. Because both sides are the same
in structure and function, they work best when their movement is the closest to
being the same. We call this concept
“symmetry”.
Any
discrepancies in the way the two sides work diminishes their effectiveness,
both longitudinally as well as laterally.
When they are not working the same, we describe it as being
asymmetrical, or crooked. This problem
can range from minor to quite severe.
There are a
number of reasons why a horse could be crooked.
The most common is the horse’s inborn, innate “sidedness”. In people we refer to this as being right or
left handed.
Other reasons for
a horse’s asymmetry could be injuries that have caused the horse to use its
body in different ways to compensate for the injury; or poor riding habits and
training techniques that have thrown the body out of balance.
Fortunately,
almost all types of crookedness are responsive to massage.
How a horse
shows its crookedness is unique to each individual, but there are some patterns
that are fairly common. It’s important
for you to recognize them because they will have a lot to do with how you
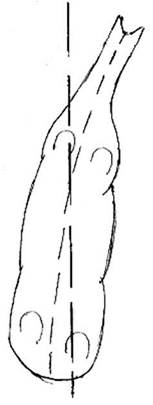
approach the massage. Below are three
diagrams that show a horse in perfect lateral balance and the two most common
deviations.
If a horse
were totally symmetrical (straight), its spine would be straight from poll to
sacrum (no curves to either side), its rib cage would
be perpendicular to the ground (no tilt to either side). A line drawn from the point of one shoulder
to the other would be at right angles to the vertebrae of the rib cage, and a
line drawn from the point of one hip to the other would also be at right angles
to the spine. (See diagram A)

Diagram A
The Balanced Horse
Diagram A is
the theoretical ideal, but all horses are going to be crooked; some more that
others.
When a horse
is crooked, the rib cage will usually tilt in such a way that the withers will
lean to one side (usually to the right), and the lower portion of the rib cage
will swing out in the opposite direction (usually to the left). When this happens, the position of the
shoulder blades on the rib cage will change.
The shoulder joints will no longer be at right angles to the spine.
The tilt of
the rib cage also affects the tension in the muscles on either side of it. The muscles on one side (usually the right)
will have more contraction than those on the other. If this uneven muscle tension extends into
the loins (lumbar area) the balance of the pelvis will also be affected and the
points of the hips will no longer be at right angles to the spine.
Diagram
B
Haunches
Left
“C”
Curve
One of the most
common ways for the body to be crooked, or go out of balance, is shown in
diagram B. The haunches move to the left
of the line of travel and the forehand weight is thrown onto the right
shoulder. On a circle to the right the
horse will usually make the circle smaller as it goes around.
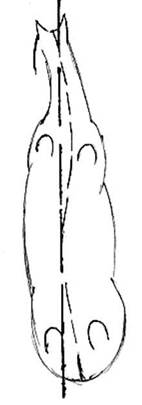
Diagram
C
Haunches
Right
“S”
Curve
Diagram C
shows the other most common deviation from “straight”. In this one, the horse brings it haunches to
the right of the line of travel. There
is usually more contraction of the loin muscles in this deviation and not as
much rib cage tilt. The horse will
usually “pop” its left shoulder and the drive from the hindquarters will push
the horse off in the direction of the left shoulder.
This type of
asymmetry will make it difficult for the horse to turn to the right; it will
very likely turn its head and neck to the right, but keep going off to the
left.
These are the
two most common deviations from symmetry.
They can also be modified and complicated by training, handling and
injuries.
Once you
understand this concept of anatomical balance and develop a sense for seeing
the asymmetry (both in the horse’s movement and response to your touch), you
will be prepared to sort through all the compensations and deviations. Recognizing the compensations and deviations
allows you to decide what massage needs to be done.
In addition to
the problems created by the lateral asymmetries, lateral crookedness also has a
great influence on longitudinal balance.
If the two sides of a horse cannot work to the same degree, it prevents
the horse from driving from the hindquarters evenly, it can’t lift its back and
it cannot take even contact with the bit.
Training
techniques that force a horse to assume body positions that are uncomfortable will
cause horses to find all kinds of ways of compensating, and becoming crooked is
one of the more common.
An unbalanced
rider can also make a horse crooked. A
horse’s body, in order to try to be comfortable under a rider, will gradually
adjust and conform to the way the rider’s body either allows or inhibits the
horse’s body movement. If you are tuned
to this concept of symmetry and balance, you may notice posture patterns in
riders that indicate they are unbalanced and either causing or contributing to
the horse’s problems.
You will have
a chance to work with the rider’s problems when you start working out remedial
exercises for the horse (lesson 8). At
that point you may have the opportunity to discuss these imbalances with the
rider, explaining the effects on the horse and suggest the rider also get some
body massage. Do this with as much tact
as possible.
CONTRACT TO
FACILITATE RELEASE
One of the
most effective ways to get a tight, contracted or sore muscle to release
tension is to first get it to contract more.
Most of my work, regardless of what massage techniques I’m using, is
based on this principle.
My basic
approach is to apply enough pressure to a tight muscle to get it to make a
response. That response will be a
contraction. When I release the
pressure, the contracted muscle will respond by relaxing and being able to
stretch. This stretch may be very small
at first, but gradually more and more of the muscle will release.
This process
is called Tense-Relax-Stretch. It is
used frequently in human sports massage therapy. The description of this Tense-Relax-Stretch
says that by intentionally causing a specific muscle to tense, we can get a
greater subsequent relaxation and stretch of that muscle. Example: tense muscle A—release the
tension—stretch muscle A.
The pressure
needed to get a contraction from a tight muscle will vary with the horse. Certain types of horses (those with dense,
bulky muscles) are more likely to tighten muscles in response to stress or
injury than to exhibit soreness. If this
type of muscling goes into tight, contracted spasms, it may require
considerable pressure initially to initiate the contract/relax response.
With a lighter
muscled horse, or one that is very sore, even very light pressure will cause
the muscles to contract and begin the release process. With this type of horse, you will have to be
very sensitive to the amount of pressure used to start this release
process. Too much pressure will add to
the horse’s discomfort.
My first two
basic premises dealt with the primary goal of my massage work (the return to,
and maintenance of, anatomical balance) and the basic physiological effect
(tense-relax-stretch) that I primarily use to accomplish this.
The third step
involves the concept that much of how we use our bodies is done by habit
(habitual responses) and our conscious mind loses touch with what is really
happening in our bodies.
Habitual
movement patterns are governed by our sub-conscious. Once we learn to perform a task, we no longer
have to think about how we do it. These
habitual patterns are very important in our lives, because without them we
would have to learn to walk, use a fork and brush our teeth all over again
every day.
In learning,
we repeat that which was successful; so how we first learn to accomplish a task
is the way we will continue to do it—we will repeat what was successful.
Many patterns
develop in our early learning years (how we walk is a prime example) and one
therapist said that how we take our first steps is how we will walk forever
unless there is some intervention. Other
patterns develop as we learn to do new things.
But not all of
the patterns we learn are good for our bodies.
Some movement patterns can eventually cause problems. Because they become so deeply ingrained in
the sub-conscious, they are very difficult to change—we cannot change something
of which we are totally unaware.
Horses have
unconscious habitual movement patterns just as we do, and for the same
reasons. They also do things on
“automatic pilot” or “because that’s the way I always do it”.
In order to
make permanent changes in a muscle’s tension and restore correct movement, it
is not always enough to just loosen and rebalance the muscles. We have to have some way of making these
changes permanent; otherwise the old, sub-conscious patterns will gradually
pull the horse’s body back into its old, familiar ways. We have to change the pattern in the mind as
well as in the body.
There are two
ways I approach this problem. First the
massage will make the horse more aware of its body and its responses to
pressure. Second, I use remedial and
rehabilitative exercises to re-program the body for more correct movement. I describe these exercises in lesson 8.
SOME GENERAL
INFORMATION
The following
is general information that will be helpful when doing massage on horses.
1.
It
is difficult to do good massage work if you have long finger nails; you have to
be prepared to keep them quite short.
2.
You
will be more effective in your massage work if you can work equally well with
both hands—practice being ambidextrous.
If you primarily use the same hand to work on both sides of the body,
the way you affect the muscles of the two sides will be different.
3.
In
almost all instance, the direction of the hair follows the direction of the
muscles. If you work with the direction
of the hair, you are going with the length of the muscle; if you go across the
hair, you are going across the muscle fibers.
4.
In
general, movement and pressure across the muscle fibers is more intense than
movement and pressure that goes with the muscle fibers.
“How Much Pressure
Should You Use?”
This is one of
the most common questions.
You have to
use enough pressure to get a response from the muscles. At the beginning of this lesson I talked
about the tense-relax-stretch technique.
The pressure that you use has to be enough to cause the muscle to tense (contract),
even if only minutely. Without this
muscle response, your massage will be purely superficial, not much more than
what a good grooming would accomplish.
That’s okay as part of a preliminary warm-up, but it will not affect
muscle tension at any deep level.
You also have to
be aware that one horse may react to a much lighter pressure than another
horse. This will depend primarily on the
density and bulk of the muscles of the horse.
Sore muscles
are going to be much more reactive to pressure than muscles that are tight but
not particularly sore.
Any kind of
massage that begins to use deeper pressure can cause discomfort, and you will
have to be very sensitive to the horse’s reaction. Highly sensitive horses will need a much
lighter touch, and with some horses, in the initial stages of your massage
work, your pressure may be affecting primarily the skin and nerve endings.
Horses with a
normal level of sensitivity will allow you to work down into the muscles
without over-reacting like the super-sensitive horse.
Horses with
tight, dense muscles will require a lot of pressure just to separate the muscle
fibers of the superficial layer so that they can achieve some small amount of
loosening; beginning to improve circulation.
Working down
into the deeper muscles will take time on the highly sensitive and the dense,
tight horse.
Regardless of
the type of horse and the number of times it has been massaged, the techniques
and pressure that you use must always be adjusted to the horse’s level of
sensitivity. Every horse will tell you
its tolerance level to pressure. You
will have to work within those parameters.
As the massage progresses and the horse begins
to relax, you can use deeper pressure.
But the initial work should start at a level the horse can tolerate.
In subsequent
massage sessions, all horses will improve in their ability to release tension
and soreness to lighter touches.
Don’t hold
pressure for long periods, especially if the horse indicates discomfort with
the pressure.
I use a “press
and release” technique. I press until I
feel some kind of movement or change in the area. I might hold the pressure 10 – 15 seconds, or
I might release almost immediately—it depends on the horse’s reaction—but then
I’ll immediately reapply the pressure.
If a horse
leans into my pressure, this is an indication that the muscles are tight, but
not sore. I’ll use heavy pressure and
hold it for several seconds. If the
horse does not move away from the pressure, I’ll release and then immediately
reapply pressure. Working on tight
muscles, I use pressure that has a lot of my body weight behind it.
Often, if the
horse is braced against my pressure and I release it quickly, the horse is
thrown off balance for a moment. If,
during that moment, I reapply the pressure the horse may move and cause the
muscle to rebalance, even if only slightly.
These small rebalancing movements will begin to release the tightness.
If a horse
“flinches” from pressure, it indicates that the area is sore. In this case, I’ll be mindful of the horse’s
sensitivity as I apply pressure, release quickly, then reapply and
release. This type of press/release
causes muscle contractions that begin the release process. Gradually, you’ll
feel the muscle yield to your touch without flinching.
I often demonstrate
the difference between good muscle tone, a tight muscle and a sore muscle by
having the student put a fist on my ribs and push. I will first push back against their pressure
and explain this is the reaction you get when muscles are tight, but not sore.
Then I’ll have
the student push and I’ll flinch and jump away from the pressure. I explain this is the reaction you get when
muscles are sore.
Finally, the
student will push and I’ll let my body move and sway with the pressure,
explaining the reaction results from muscles that are in good condition and
capable of proper contraction and extension.
Muscles in good tone might feel like dense foam rubber under your
fingers.
One last
thought about pressure: In massage, speed determines depth. The slower you work, the deeper the pressure
can be.
II. MASSAGE TECHNIQUES
This section
describes a number of massage techniques that I have found to work effectively
on horses. Some of these I use
extensively, some occasionally, depending on the horse and its particular
problems. Some of my preferences are
based on my size and strength. I will be
asking you to try all of them in order to find those that work best for
you. Depending upon your size and
strength, your favorites may be different from my favorites.
In
doing massage, you will use your hands and fingers in a number of different
ways. See the accompanying pictures.
1.
Thumb
pressure. This is very strong, deep
pressure applied at one point. Click
here for picture.
2.
Finger
tips. This pressure won’t be as strong
as thumb pressure. I use it frequently
on sore backs. Click
here for picture.
3.
Fingers
supported by the thumb. This gives more
pressure than fingertips alone. (No picture available.)
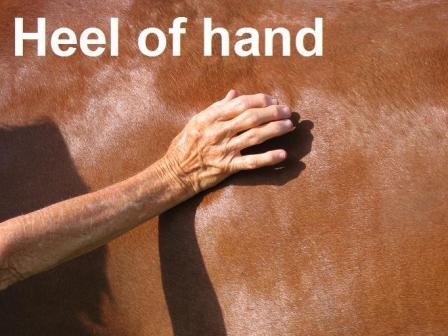
4.
Heel
of the hand. This is a broad soft
pressure that does not go deep. It’s
good for superficial muscles. Click
here for picture.
5.
Fist. This pressure is deeper and harder than the
heel of the hand. Click
here for picture.
6.
Thumb
and fist. Here the fist supports the
thumb when using deep, static pressure. Click
here for picture.
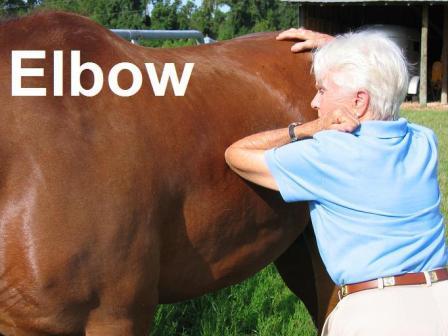
7.
Elbow. The elbow can exert strong, deep pressure
similar to thumb pressure. I find it
useful along the sides of the horse when I can’t effectively use other
techniques and the horse wants to lean into my pressure. Click
here for picture.
8.
Palm
of the hand. This is a very light
pressure that I use with some of the softer techniques at the end of a massage
session.
Link
to video demonstrating the techniques in lesson six: https://youtu.be/2gk6qDEI7_4
Open in a second
browser window and follow along as you read the lesson.
THE MODALITIES
EFFLEURAGE
The first, and
most basic, massage stroke is effleurage.
It can be done with fingertips, the heel of the hand, the fist or the
entire palm of the hand. It is a long, gliding
stroke that goes from one end of a muscle to the other. Effleurage is done by moving in the direction
of the muscle. It works best on long
muscles, especially the long back muscles.
Click
here for picture.
Effleurage can
be superficial or deep.
Superficial
effleurage’s primary intent is relaxation and improved circulation. When used on horses it will resemble a good,
thorough grooming and can be used, if necessary, on highly sensitive horses in
the first session. Superficial
effleurage can give you important information about the degree of tightness or
soreness in a muscle and is effective in warming muscles up.
Deep
effleurage is effective at loosening tight muscles and releasing tension.
Deep
effleurage will use slower, heavier pressure, and, as the hand or fingers go
through healthy muscle tissue, it will feel as if it is pushing a wave in front
of it.
The best
description is to compare it to clay and the different consistencies of
clay. Clay that is easy to work allows
your fingers to mold it without resistance, but some clays will be stiffer and
harder and will resist you finger pressure.
Some clay will
feel soft and squishy, without strength.
Sometimes the clay will have a good consistence, but there will be knots
of harder clay within it.
In muscles
these hard spots will be trigger points, spasm, adhesions or coagulated
blood. If you have an opportunity to
work with some clay, by all means do so.
There is much similarity in feel between muscles and clay.
Another good
comparison would be kneading bread dough.
It has the same elastic quality that good muscle tone will exhibit.
Another
comparison: a smooth feel in a muscle would be pushing your fingers into creamy
peanut butter. Muscles with knots and
hard spots will feel like chunky peanut butter.
When you’re
using effleurage and your fingers run into an obstruction as they’re moving through
a muscle (chunky peanut butter), you will then switch to another technique—one
that is more appropriate for what you are feeling in the muscle.
If you’re
using deep effleurage and there is bone behind the muscle, such as in the
shoulder blade, the pressure of your hands pushing the muscle against the bone
will help facilitate greater spreading of the muscle fibers.
CONNECTIVE TISSUE MASSAGE
Connective
tissue occurs throughout the body and forms a covering for muscles, bones,
joints and organs of the body—it ties everything together. It does not have the elasticity that muscle
fibers have; its job is to hold the muscle fiber together and give them shape
and strength. Sometimes this connective
tissue can become constricted and bound up and does not allow the muscles the
freedom of movement that they might otherwise enjoy.
It is possible
to release, spread and expand the connective tissue that is just under the
skin. Click
here for picture.
Connective
tissue massage has similarities to effleurage in technique, but the intent is
different.
Effleurage
spreads the muscle fibers; the intent of connective tissue massage is to spread
only the fascia that covers the muscles.
It stays more on the surface rather than going into the muscle.
The pressure
is light and not particularly penetrating.
The speed is slow. Use your
fingertips, going in the direction of the muscle fibers.
It can be
compared to moving and spreading toothpaste in an almost empty tube. Try to visualize moving a small amount of
toothpaste around in a tube with your fingertips. You’re not trying to move
through the muscle (that would be more like pushing your fingers into a full
tube of toothpaste), but, rather, just over the surface covering.
Connective
tissue massage on a horse will have its best use in areas that have
considerable connective tissue. These
would be the fascia section of the Latissimus dorsi
in the horse’s back, the fascia covering that connects the External obliques to the Rectus abdominis (the lower portion of the
horse’s sides just below the rib cage) and the Internal obliques
(the groin area).
Look at your
anatomy charts and see if you find other areas with considerable exposed fascia
that could benefit from connective tissue work.
FRICTION
Friction is
heavy pressure applied in short, quick, back and forth strokes by fingertips
and thumb. The direction of motion can
be circular, across the fibers or with the fibers. The most effective is across the fibers. Click
here for picture.
It is also
very effective when used at the attachment ends of muscles, either the origins
or insertions.
It is used to
break up hard knots of muscle fibers that have stuck together or to break up
scar tissue.
Friction can
also be used around joints to loosen tight muscles that cross the joints.
This can be an
intense technique—too much can be irritating, and it may not be appropriate for
some horses, most notably highly sensitive horses or those that are very sore.
Using a stiff
rubber curry comb that allows you to cover a broader area as you move back and
forth across a muscle is not as intense as using your fingers, and this can
still be effective.
Deep
cross-fiber friction is an even more intense version of friction-- THIS IS NOT
SOMETHING I USE OR RECOMMEND ON HORSES, ESPECIALLY NOT ON LOWER
COMPRESSION
Compression is
a technique that I find very versatile and the one that I use the most.
Compression
massage is done by applying pressure into the body of a muscle. I find it most effective when used as a
rhythmic push and release process. It
can be done with the heel of the hand, the back of the fist, fingertips, an
elbow or a stiff rubber curry comb. Each
of these is appropriate for different areas of the body.
This technique
loosens tight muscles and relieves soreness in two ways. First by pressing the muscle against deeper
muscles or against a bone it will begin to spread the muscle fibers. It is very effective at doing this with the
muscles that cover the shoulder blade (scapula). Click
here for picture.
Secondly and
more importantly, it is a good way to initiate the “tense-relax-stretch”
process. For this, you use intermittent
compression, pushing into the muscle, releasing the pressure, and then pushing
again. This pumping action increases
circulation by allowing fresh blood to flow into the area as the pressure is
released.
Compression
can be used on large or small muscles and everything in-between.
The heel of
the hand works well on the large muscle areas and can exert pressure over a
fairly broad surface. It works well on
the sides of the torso and the top of the haunches. Click
here for picture.
Using the back
of your fist works well on the attachments of muscles to the lower neck
vertebrae. This also works well on the
haunches.
Fingertip
compression can exert a great deal of pressure in a small area and is very
effective on the long back muscles.
Using your
elbow will be helpful and efficient when the horse leans into your
pressure. The elbow, as the fingertips,
exerts a lot of pressure in a small area.
In using compression
to initiate the tense-relax-stretch reflex, you’ll want to know how much
pressure to use and how long to hold it before the release—well, the horse will
tell you. Each horse will be a little
different, so use as much pressure as the horse needs to contract the
muscle. Once the muscle contracts, you
will release. A few tries and you’ll
know just how much pressure is the right pressure.
When using
compression, the loosening comes from the release of the pressure. If you are working with a horse that is very
tight, but not particularly sore, the reaction to your pressure will be
different than that of a sore horse. The
tight horse will most likely lean into the pressure and, at first, you will
have to be the one that releases the pressure.
Gradually the horse will learn to release the pressure by yielding.
I usually
maintain pressure for 5 – 10 seconds, pushing hard against the muscle, then
release, and then push again. Gradually
the horse will begin to make small adjustments in its balance. These small adjustments are the beginnings of
tension release, and you’ll see signs of relaxation.
If the muscles
are sore, the horse will react quickly to the pressure and will flinch or
quickly move away from your hand. In
that case, release the pressure, and then re-apply it. With time and application you’ll find the
horse’s response to your pressure changes.
The horse will give a little in the muscle, but not flinch or jerk
away. With this reaction you should also
see the horse’s eyes soften. The horse
may lower his head and neck and it will chew or yawn. Many times, as you see these signs, you will
also feel the muscle release, or “melt”, under your fingertips. Eventually, you’ll be able to feel the
release before the horse does and you’ll know that he is going to relax and
chew.
This relaxing
and chewing is very noticeable when you’re working on the horse’s back and its
poll, but you’ll get the same responses in other parts of the body as the
muscles relax.
Holding a small, fairly stiff curry comb in your palm while doing
compression is effective with tight horses that lean into pressure. In this case, I will often push into the
muscle and then rotate the curry comb slightly to the right. The additional “bite” of the curry comb will
help spread the muscle fibers as well as initiating the tense-release process.
MUSCLE COMBING
Muscle combing
is just what the name implies—combing across or with the fibers. It’s an effective way of separating muscle
fibers, especially in tight, dense muscles.
Even though I
most often use it on heavier muscles, it also works well on sensitive,
thin-skinned horses. It all depends on
how much pressure you use.
Muscle combing
differs from friction in that it is a more superficial technique, affecting the
surface layer of muscles.
On a sensitive
horse it will usually be nothing more than scratching an area with your
fingertips. The sensitive horse will
find the pressure well within its tolerance level and may actually show
enjoyment. It can be a good way of
letting the nervous horse get accustomed to your touch.
When working
with the heavy, dense muscled horse, you’ll often find the muscle fibers are so
tight you can’t get them to separate and you can’t seem to get a response with
other techniques. In this case, the
pressure of your combing will have to be stronger. I often use an actual comb (metal mane comb
or a big plastic comb) to start the loosening process.
The types of
horses generally requiring this technique are the foundation style Quarter
Horse (very heavy muscled), some warmbloods and heavy draft horses.
The places
where combing is most effective are the back muscles, the surface of the
shoulder blades and tops of the haunches. Click
here for picture.
The one
disadvantage I’ve found to muscle combing on dense, tight muscles is that
occasionally, the day after the massage, a horse may seem somewhat stiff in the
areas that were combed. This is a result
of the amount of pressure you may have had to use. This stiffness will only last a day. I always explain to the owner of this type of
horse that the “stiffness” might occur.
Once the
muscles begin to release, you will be able to use other, less intrusive,
techniques.
Muscle combing
is not a technique that I have much occasion to use, but it’s a good one to
know when you need it.
KNEADING
Kneading is a
technique that has limited applications, but works well on some big muscle
masses that do not have bone behind them.
The two areas
where I use kneading are the muscles between the hind legs (adductors) and the
chest muscles in front of the fore legs.
Click
here for picture.
I use my
fingertips to knead and work the muscles much like a kitten will knead its
mother’s stomach as it nurses. Though I describe
this kneading as being like kitten paws, it does not necessarily mean the
pressure will be light. As with any
other massage technique, you have to gage your pressure to the horse’s
responses.
The muscles of
the haunches between the hind legs are often very tight; sometimes so tight
it’s difficult to get your hand between them.
To do this work, stand next to the horse’s hind leg, facing in the same
direction as the horse and slide your hand between the haunches from
behind. If you’re standing next to the
left hind, you would slide your right hand between the legs. Use your fingertips to knead all of the
muscles on the inside of the left haunch.
When you’ve
had a good response, go to the horse’s right side and repeat, using your left
hand on the inside of the right haunch.
In addition to
releasing tightness in these muscles, there is another advantage to this work
between the hind legs. Most horses don’t
seem to object to it and it lets you introduce the horse to touch and pressure
in this area. This way the horse can get
comfortable with the idea of being touch in that area before you start massage
in the sensitive area of the groin.
The muscles of
the chest in front of the fore legs are part of the system that holds the fore
legs to the rib cage from below and they also bring the front legs
forward. They go from the breast bone
(sternum) to the humerus and the radius.
In many
horses, especially those that take short steps and are heavy on the forehand,
these muscles can be very tight. You would
use the same kneading with your fingertips as you did between the hind legs.
Fortunately
all of these muscles are good size and easy to get your fingers into.
STRESS POINTS
Stress points
and trigger points are quite different in where they occur and what causes
them, but the technique for releasing them is the same—deep fingertip pressure.
STRESS POINTS
"Stress
Points" are spots in the body where stress can build up and cause
soreness. They are caused by stress and over-use
of the muscular system as a result of the exertion and training involved in the
various types of athletic sports where we use our horses. They will be found at the origin portion of a
muscle, where it attaches to a bone.
When a muscle is being used, this portion can be can be affected by
stress more than the other parts because of the lesser amount of elasticity in
that area of the muscle. Click
here for picture.
TRIGGER POINTS
“Trigger
Points” are quite different. The full
name is neuromuscular trigger points and there is a nerve component to
them. This nerve component is not
present in stress points.
A trigger
point is a small, localized spot of hyper-sensitivity within a muscle; it has a
lower pain threshold than the rest of the muscle. With trigger points the spasm
and pain is almost always in the belly of the muscle, rather than in the
origin. The pain is caused by an
incorrect setting of the nerve that controls the tension in the muscle. Trigger points usually arise in muscles that
are under great biomechanical stress, especially those subjected to some kind
of injury or trauma. Click
here for picture.
Both stress
points and trigger points show up as hard knots of painful tissue. Both are treated basically the same—with
direct pressure.
The
application of direct pressure increases circulation to the “knot”, spasm or
adhesion. This increased circulation
increases the exchange of metabolic waste for fresh oxygen and the spasm will
begin to soften.
Pressure to
stress points and trigger points can be applied with a single finger, a finger
supported and braced by other fingers or by thumb pressure. This pressure is held for a period of time
without the alternating press/release I described for compression.
Trigger point
pressure is usually held for 10-15 SECONDS and is then gradually released. It can be repeated two or three times and you
will gradually feel the knot soften and disperse.
Stress point pressure are held for much longer periods of time—sometimes
as much as 5 to 10 MINUTES without interruption.
The amount of
pressure used and length of time it is held must be determined by the reactions
of the horse.
MODIFIED POSITIONAL RELEASE
Positional
release is another approach to releasing neuromuscular trigger points.
To use this
technique, the sore point in a muscle is identified, light pressure is applied
and the two ends of the muscle are brought closer together and GENTLY held in
that position for 90 second to 2 minutes.
During this time, the tension in the trigger point releases.
I often use
this technique when working on sore areas in a horse’s neck. I will find the sore spot, put my fingers on
it and then carefully bring the horse’s head and neck around toward its
shoulder and hold it for a minute or so.
The head and neck have to turn without stiffening or tightening for this
technique to work. Do both sides. Click
here to see picture.
Riders use
this technique frequently when, from the saddle, they induce a horse to bring
its head and neck around to receive sugar or other treats.
This technique
can also be used to get muscle releases behind the shoulders as well as in the
neck. In this case you would put your
hand on the shoulder, bring the horse’s head around toward the rib cage just
behind the shoulder. This has to be done
GENTLY. If there is any stiffening or
tightening, or the horse quickly takes his head back, the technique will not
work. Click
here to see picture.
This technique
is called “doubling” when done by the rider.
Carrot
stretches are another way of doing this modified positional release, but they
only work correctly if the horse stretches his neck around and holds it in the
stretched position.
Sometimes
when trying to bring the horse’s head around, the horse will start circling
instead of standing still. This is
acceptable; it often helps to get the release.
Keep your hand on the neck or shoulder and circle with him. After a few circles, the horse will stop and
the area of tight muscles will have softened.
ROCKING
In human
massage, most massage work is done with the person lying down. In this way, muscles do not have to do the
work of supporting and keeping the body up-right. In equine massage, this is not the case and
you will often be working to release tension in muscles that are actively
supporting weight.
A number of
the techniques that I use involve causing the horse to move and change its
balance. If you apply pressure just as
the horse moves, it is possible to get the releases you want because you catch
a muscle (or muscles) at a moment when the muscle is not static and weight
bearing.
“Rocking” is a
good technique for getting muscles to re-adjust and re-balance.
Some horses
are stiff and “locked down” and it can be difficult to get any responses from
them in your initial massage session.
These are usually the dense muscled horses that are very stiff, but not
particularly sore. In this case, rocking
one body part against another can start the loosening process. It is done by alternately pushing one area of
the body and then another, causing the body to rock back and forth.
Using the flat
of your hands, you would put one hand somewhere on the forehand, usually on the
shoulder, but it could be on the lower neck or on the ribs behind the
shoulder. The other hand will be
somewhere on the hindquarters, perhaps on the point of the hip, the area in
front of the hip joint or on the flank.
You will need to experiment with your hand placement, because each horse
is different. With hands in place,
alternate your pressure from hand to hand.
This rocking motion will encourage the horse to adjust its stance to a
more relaxed, balanced posture. Click
here to see picture.
A very stiff
horse will resist shifting its weight and may even push or lean back into your
pressure, but gradually it will begin to soften and yield; then you can shift
to other techniques that are more specific.
Rocking can
also be a nice finishing move. When a
massage session is drawing to a close, the horse will give signs that it has
relaxed physically and mentally. It may
chew, yawn, soften its eyes, lower its head and sigh. At this point I like to do something that is
soft and gentle. Sometimes I’ll put one
hand just behind the withers and the other on the loins (just in front of the
croup bone) and do an alternate rocking that is so
light and subtle as to be almost a light vibration.
If rocking is
used early, your pressure will need to be fairly strong. But if used as a finishing
touch, the pressure will be very soft and the motion very gentle.
Rocking can
also be used any time during a massage to test the loosening and balance to
that point. If the horse is still fairly
stiff, he’ll either push against your pressure or move his feet. If the body has released tension, the horse
will sway with your pressure, but will not move his legs or change position.
The
techniques that I have described are only some of many that can be used when
massaging a horse. You will use a number
of different ones in the course of a massage, choosing the ones that are most
appropriate for whatever you are feeling in the horse’s body. You may even develop your own techniques,
different from the ones I’ve described.
The important
thing is to help the horse’s body return to functioning in the way it was designed
to function—its muscles contracting and extending smoothly to move joints and
bones, and doing it efficiently and with the least resistance possible.
You must work
within the horse’s tolerance level to achieve these results.
III. MASSAGE TOOLS
Some of the
horses you’ll work on may be quite large, very heavy or very stiff. To be effective in working on these types of
horses, you must be able to get the muscles to respond to your touch. Many people doing massage often use some
types of “tools” to facilitate their work, allowing for deeper pressure while
conserving their hands.
Whether you
use tools or just your hands will depend on your size and strength. I am small, so I find some simple tools
helpful, especially on the big, heavy horses.
All of the
tools I use are grooming tools, familiar to all horse owners.
Since my hands
are small, I use some tools to increase the size of the area to which I can
apply pressure. My favorite is a small,
stiff rubber curry comb with serrated edges that fits snuggly into the palm of
my hand. With this I can increase both
the area and depth of pressure when doing effleurage, compression or
cross-fiber friction.
Sometimes I’ll
use one of the plastic curry combs that have numerous rows of “bristles”.
The other tool
I frequently use is a small metal mane comb.
I use it for muscle combing and often when working on trigger points or
stress points in the heavy horses. It
allows me to exert deep pressure in an area without putting undue pressure on
my thumb and fingers.
These tools
fit my hands and work for me. If you
choose to use tools, you will have to experiment with what’s comfortable and
works for you.
I do recommend
using ordinary horse grooming tools because they are designed for use on horses
and won’t do unexpected damage to the skin or cause soreness.
I encourage
you to show horse owners how to do some basic massage on their own horses by
incorporating it into their regular grooming routines.
Some people
use “activators” when doing trigger point or stress point work. Activators are commonly used by
chiropractors. It is important that the
pressure exerted by an activator be properly adjusted. If the pressure is too light, it will be
ineffective. More often, the pressure
will be too heavy and can cause soreness.
I DO NOT recommend using an activator.
One last
thought on using tools. They are most
useful for heavy, tight muscles; the highly sensitive, sore horse won’t need
much more than your fingertips.
If you do use
something like a small rubber curry comb to increase the area you can cover, be
cautious when applying pressure.
Link to video demonstrating the
techniques in the lesson:
https://youtu.be/2gk6qDEI7_4
ASSIGNMENTS
I would like written reports on all of the assignments listed
below. Please send report to pegasus.simat@gmail.com
- If you
have done massage on horses previous to taking this course, I would like
you to do one or two massages using your old system and techniques. Analyze what you have been doing. Did you use just one or two techniques
or a variety? Were the techniques
similar to the ones I described or different?
- Practice
all of the techniques described in this lesson. Practice on a variety of horses of
different body types and muscle density.
Practice until you feel comfortable and competent with all of the
techniques.
- Which
techniques did you like the best?
- Did
you find yourself using some techniques more on certain areas of the
horse’s body?
- Which
technique, or techniques, did you like best:
a.
On the horse’s back
b.
On the horse’s neck
c.
On the muscles on top of the haunches.
d.
On the shoulders.
6.
Did you try any work on the belly line, groin or between the hind
legs. If so, which techniques worked
best for you?
7.
How did your hands feel? Did they
feel like they lacked strength when you were doing the massage, or sore
afterward? Did you use one part of your
hand more than others?
a.
heel
b.
thumb
c.
finger tips
d.
back of
fist
8.
Did you try using some tools?
Describe which ones and how you felt about doing so. Did you feel that it was more effective in
some areas than just using your hands; if so, which ones?