Showmanship
in Hand
Lesson Five
This lesson includes backing, left
pull turns, and some pattern work as we begin your preparation for
competition. Plan to spend five to six
weeks on this lesson.
Backing is used in many patterns,
especially intermediate and advanced patterns.
The backup should be fluid and smooth,
moving off the handler’s body. The chain
or lead will not be used in the finished backup. In a simple pattern, a straight backup will
be requested. It is possible that a more
advanced pattern will call for the backup to be performed in a curve or turn,
so be prepared.
To start teaching the back, begin in
the correct body presentation position, facing forward. From the presentation position, turn and face
the horse’s hindquarters. Your body
should be in a square position, not angled toward the horse.
The left hand will remain in the
correct position with the lead held in a large loop at your side, with the
elbow bent.
The right hand will be held in front
of your chest, the hand level with the ring of the halter.
The horse’s neck should be level,
allowing the horse’s head to be in a natural position.
Your right elbow will be bent 90
degrees. If the horse’s head is in the
correct position, it will not be necessary to extend your arm upward or
downward.
When asking the horse to back, always
do so from the correct position. Stepping sideways while asking the horse to back is not correct.
Once in the position for backing, the handler
will walk a straight line.
Of course, at this point the horse
will not know what is expected, so as the handler begins to walk the chain will
make contact with the horse.
Begin walking first
to teach the horse to respond to your body leading the maneuver, not the chain.
Depending on the sensitivity of the
horse, the chain will make contact and the horse will begin to step back. Some horses will not respond, so at this
point small bumps or jerks with the chain are acceptable. With the smallest response from the horse,
release the chain, so the horse is rewarded for stepping back.
At this stage of learning,
straightness will not be perfect and multiple steps of 10 or more are not
expected. The goal at this point is to
turn to the backing position and start the horse shifting his weight back and
possibly stepping back a couple of steps in response to the handler walking
forward.
A horse will learn fairly
quickly once he understands to move backward in response to the handler’s body
movement.
To help the horse, try this
exercise. Walk, stop, turn to backing
position and back a few steps, turn and immediately walk forward, stop, turn
and back a few steps. Repeat this five or six times.
When walking forward
or backward, walk with purpose, keeping your eyes straight ahead. Do not look at the horse. Do not bend over in the waist or incline the
shoulders forward.
Ask the horse to back as if he is a
pro. When the horse
steps backward from your body, even if only two steps, stop and praise him and
allow a rest from the exercise.
A common error in teaching the
horse to back is waiting for the horse to step back on his own. The handler slows their step creeping back as
the horse steps back. Make progress by
establishing the back up by your step not the horse’s step.
As the horse starts to catch
on to stepping back, straightness needs to be addressed. There are a few key points. Start with the horse straight. Look up over the top of the horse’s hip, not
at the ground. Walk a straight line.
Keep the horse’s body straight.
Starting with the horse
straight comes from the horse’s body being straight in the walk or trot, and
then stopping balanced and straight, prior to asking for the backup.
If asked to square the horse prior to
backing, it is important the horse is squared properly. Remember the most common reason for a crooked
horse is the handler pulling the head toward them while leading, stopping or
backing. If the horse’s head is turned
to the left while backing his hip will naturally drift to the horse’s right.
To help establish straightness while
backing, make sure the lead is long enough so pressure is not being applied to
the horse’s head. If the horse is turning toward the handler on his own bump
him with your right hand fist to remind him to stay straight.
Use the fence to help establish
straightness. Walk along the fence and
then ask for the back up. This exercise
will help if the horse is drifting right while backing. Use two ground poles set 10 feet apart to
help correct left or right drift when backing.
To increase the accuracy, move the
poles closer together as the horse progresses.
To test the straightness of
your backup, set two cones 15 feet apart.
Begin in the back up position with the cone on your right. Back to the second cone and end with the same
distance between you and the cone. To
increase the difficulty of this exercise, increase the distance between the
cones.
For the stubborn horse that
does not want to step back, try this fix: use a crop in your left hand with the
handle of the crop toward the horse. If
you move forward, asking the horse to back, and the horse does not move, bump
the horse in the center of his chest with the crop.
Continue walking and asking for the back up, if the horse slows, bump
him in the chest with the crop.
To correct the horse with the head tilted to the left, use a surcingle
and tie one rein or small lead to the side of the surcingle and to the right
ring of the halter. Be sure when fitting
the lead, you don’t create a new problem by having the lead too short and
pulling the head to the right.
PULL
TURNS
The pull turn is a pivot to the
left. It is used in intermediate and
advanced patterns. In a showmanship
class the horse will only be asked for pull turns of 90 degrees. The pull turn is difficult because the horse
must move toward the handler instead of away—just the opposite of all that he has been taught to this point.
To begin, start in the pivoting
position, facing your horse’s head. To
start teaching the pull turn, use your hand on the lead or chain close to the
halter. This must be done because the
horse’s head must stay straight. By
holding the chain close to the horse’s head, the handler can keep the horse’s
head placed in front of his chest and not allow the head or neck to bend to the
left. Once the head or neck bends, the
horse will not remain balanced through his body and the pull turn will be lost.
Lift slightly on the lead to remind
the horse to shift his balance back onto the hindquarters. Step backward, asking the horse to follow
your body. Pressure will be used on the
lead at first to teach the horse to move toward the handler. Ask for just one or two steps. At this point correct steps are more
important than many steps.
When the horse steps correctly, the right front leg will cross in front
of the left front leg. The left hind foot will stay on the ground with the
right hind stepping around.
Visualize the horse being very stiff
and straight and lifting the forehand slightly as he moves toward the
handler. With any try from the horse,
praise him. This is a difficult
exercise, and the horse needs to know he is close to doing what you are
asking. Do not expect more than one to
three steps when first starting. Don’t
worry; with consistent work progress will come quickly.
As the horse begins to get the
idea, loosen the contact on the lead after getting the first step and while the
horse is still moving. (The creation of
forward movement is difficult.) Build on
small successes by adding more steps on a loose lead. The goal, of course, is to get the pull turn
on a loose lead. To do a correct pull
turn, the horse must understand how to follow your body.
It is important when
increasing the left turn steps to keep your steps on the curve. If walking straight backward, you will pull
your horse out of his pivot. Remind
yourself to move your left shoulder back to continue on the curve while
performing the left pull turn. If
needed, draw the line in the dirt to help guide your steps.
Even though the pull turn will
be performed in 90 degree’s segments in a class, keep increasing the difficulty
of your training by asking for pull turns of more than 90 degree’s. For training purposes the advanced horse
should be able to turn to the left a full 360 degrees. We are now seeing in advanced showmanship
classes curves to the left of more than 90 degrees while traveling forward, so
it is possible the left pull turn will be increasing in distance as the horses
and exhibitors become more competitive.
BACKING AND TURNING
Now that the horse is able to back and
turn or pivot left and right, the turn can be applied when backing. Performing a backing turn with the
hindquarters traveling to the left is the easier turn because the right pivot
is used. Begin by backing straight. As
you approach the place of the turn, slow the back up, turn your body to the
turning position and move toward the horse to pivot the horse 90 degrees. Then continue to back. The horse has just backed around a corner.
Practice the back and turn until the
horse can do it perfectly.
The more difficult maneuver is
teaching the hindquarters to travel right.
This maneuver involves the left pull turn.
Begin by backing straight. As you approach the turn, slow the movement,
and turn your body into the pull turn position.
Pull 90 degrees and continue backing.
As before, practice until the horse responds perfectly.
To turn more of a curve, begin by
backing straight, turn your body very slightly toward the horse and walk toward
the horse creating the curve as the horse moves away from you.
To create a curve, motion must not be
lost.
When asking for the curve to the
right, instead of slowing and moving your body to pull turn position, move to
slightly to your right, crossing your left foot almost in front of your right
which allows the horse’s forehand to move toward you and the horse’s
hindquarters to move to the horse’s right.
Use a set of three cones to
practices backing in curves. The cones
should be set up 15 to 20 feet apart.
Practice backing and curving through the cones in a serpentine pattern. Back around the end of the third cone and
back through the cones to the beginning of the pattern. To increase the difficulty, soften the
serpentine shape in order to stay closer to the cones. Symmetry and consistency in pace are
important to have a winning back up through a set of cones.
PATTERN
Novice Showmanship
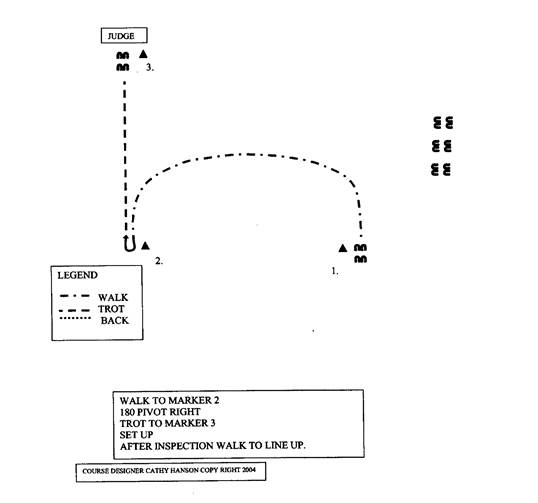
This pattern will show your ability
to: travel on a curve, pivot, travel straight while trotting, squaring and
presenting.
While walking, be sure to walk
briskly and keep your eyes up. The chain
should be loose, showing your horse’s ability to follow the handler’s
body. Stop at the second cone with your
body. Do not pass the cone. Perform a pivot to the right of 180 degree’s,
keeping your chin up and move smoothly into the trot. Trot the horse straight to the judge, and
stop. Square the horse and present to
the judge. As the judge walks around the
horse be sure to stay consistent and crisp in your crossovers. When the judge
is finished and gives you permission to be dismissed, pivot your horse 90
degrees to the right. Check your judge
by looking back over your left shoulder and walk to the line up.
Line up side by side. Be sure to provide a safe distance between
your horse and the horse next to you.
Square up and present your horse.
Make sure you are on the correct side
of your horse, depending on where the judge is standing. This pattern shows the judge on your horse’s
right in the front quadrant, so the handler would stand on the left side of the
horse. This is one variable that could
change in the show ring. The ring
steward could direct the exhibitors to many different parts of the arena. The steward will not always direct the exhibitor
as the pattern indicates.
PATTERN TWO
Novice Showmanship
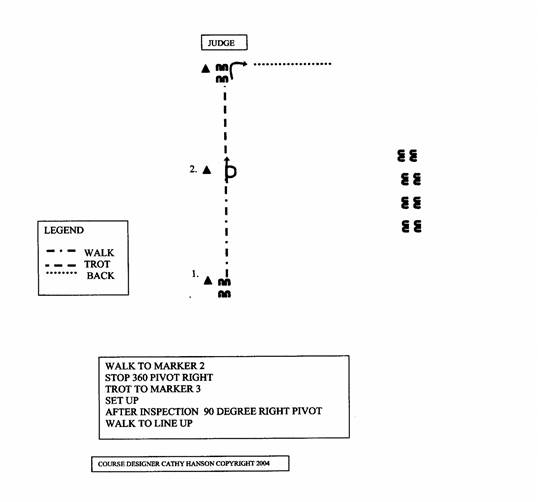
This pattern will test your ability to
be straight. The stop and pivot are
crucial in this pattern. The stop must
be straight to allow the pivot to be accurate and be completed correctly.
When beginning the pattern, you should be lined up on the judge. Begin with your horse straight to the judge
and end with the horse straight to the judge.
Walk to the second marker. Halt
with your body at the marker. Keep your
eyes up and see the judge and your line, as you are completing the pivot. If you under pivot or over
pivot the horse will not be straight when moving into the trot.
Ask for the trot after completing the
pivot and trot to the judge. Set up and present. After the presentation, pivot 90 degrees;
check the judge by looking back over your left shoulder and line up side by
side.
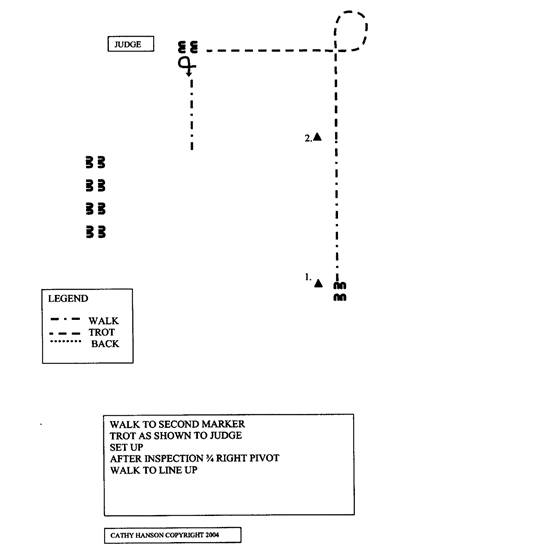
PATTERN THREE
Intermediate

This pattern will test backing skills,
pivoting and straightness.
Begin with the markers on your
left. Start slightly before the first
marker, in presentation position—this will help you. When the judge nods for your turn to be
judged, you will have an extra step to turn your body and be trotting by the
first marker. Be sure to be trotting at
the first marker. Stop completely, with your body, at the third marker. Back your horse straight to the second
marker, stopping when his hip is aligned with the marker. This will allow you to trot straight away
from the marker as the pattern indicates after pivoting. Pivot 90 degrees to the right and trot,
stopping directly in front of the fourth marker. Pivot 270 degrees and walk the horse to the
judge. Set up and present. After presentation, pivot 90 degrees and line
up side by side.
PATTERN FOUR
Intermediate
This pattern will test your skills
while trotting and turning. Straightness and the pivot will also be judged.
Walk to the second marker. A
smooth trot transition exactly at the second marker is required. When circling, the horse must move away from
the handler, yet not fall into the right.
The horse’s shoulders must stay square.
The handler must not touch the horse to cue him to turn. It is important to be aware of the judge, and
to make the circle of correct dimension, so as to be traveling with the horse
straight to the judge after completing the turn. Maintain the same cadence as trotting to the
judge. Do not allow the horse to begin
to slow in preparation for the stop. Set
up in two steps or less. Crossovers. When
dismissed pivot 270 degrees, check the judge and walk to the line up.
PATTERN
Advanced
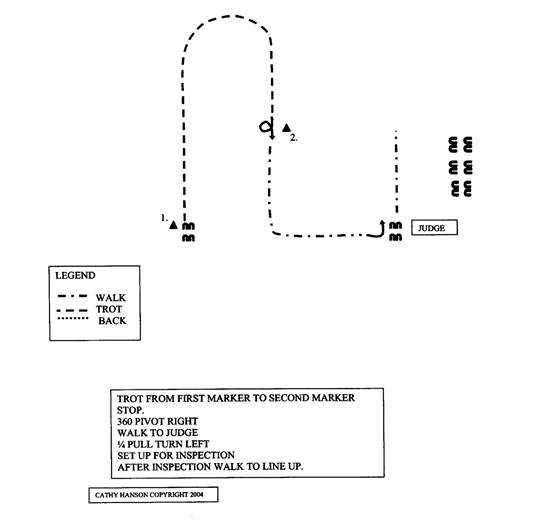
I don’t expect the handler or horse to
be ready to perform an advanced pattern perfectly at this time. However, practicing a more difficult pattern
will show your weaknesses and your areas of strength. This knowledge will help to move you and your
horse to a higher level.
This pattern will use curves,
pivots, and pull turns to test the skills of horse and handler.
After permission from the judge, trot immediately. The chain will not cue the horse. Curving to the right, maintaining upright
shoulders and finishing straight at the second marker with a straight balanced
halt is the goal. The person will stop
at the marker. Pivot 360 degrees.
Immediately step off into a forward walk and curve left, leading the horse
straight to the judge. Stop in front of
the judge and perform a pull turn to the left.
Set up. After inspection, wait
for the judge to give you permission to exit and then walk to the line up. As you depart look at the judge one last
time. A judge may place themselves at
your horses hindquarters, in this case look back at
the judge to make sure your horse is lined up straight, so that the judge gets
a good view of the horse.
PATTERN SIX
Advanced
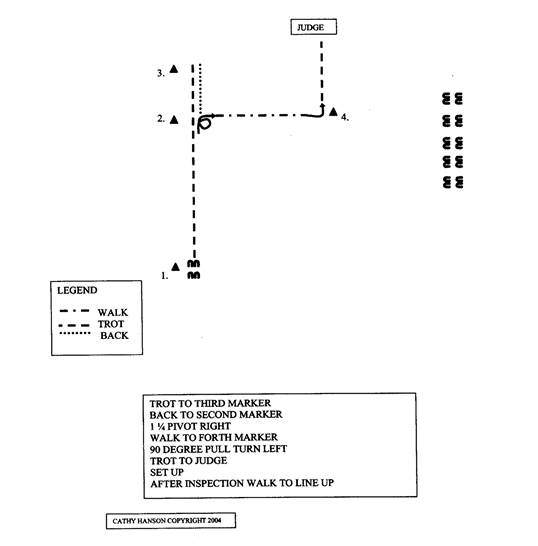
Pattern six will test your skill in straightness, backing pivots and
pull turns.
Begin at the first marker in presentation position, at the judge’s
request trot to the third marker and stop.
Transition smoothly to the back up and back the horse’s hip to the
second marker. Pivot one and one-quarter
turns and walk to the fourth marker and stop.
Pull turn 90 degrees and trot to the judge. The pull turn must be accurate to ensure
straightness to the judge. Set up. Inspection and crossovers. When dismissed, pivot 90 degrees
for a smooth departure, check the judge and walk to the line up.
(There is no quiz for this lesson.)
Assignments:
Please answer
the following. Send your report to cathy@horsecoursesonline.com
1. Describe
a balanced correct back up.
2. Give
two examples of an unbalanced back up.
3. How
are the above examples corrected?
4. Give
in detail your experience in teaching the horse to back in a curve. What was easy? What was difficult? How did you problem solve?
5. Name
the important elements required to perform a pull turn.
6. Describe
the handler’s body position during the pull turn.
7. What
do you feel is your horse’s ability at his time? Novice, intermediate or
advanced? Why?
8. What
do you feel needs to be addressed before your horse would be ready to show and
perform a novice pattern?
9. Write
a training plan to address the horse’s weak areas.
10.
Write several paragraphs on your horse’s performance while practicing each of
the six patterns. Include your horse’s capability;
weaknesses; strengths; progression; problem solving.
11.
VIDEOS: Please send videos of you
performing the six patterns described in this lesson. Please post the videos to YouTube, and send the links to cathy@horsecoursesonline.com