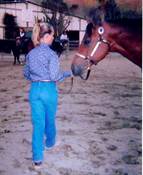
Showmanship
in Hand
LESSON THREE
By this time your horse is
leading at the walk and trot. He is stopping and squaring. It is now time to learn to step around the
horse in order to present the horse to the judge.
When
moving from one side of the horse to the other side, the maneuver is called a
“crossover”. The purpose of the
crossover is to create a safe position for the judge while reviewing your
horse. You must allow the judge the best
opportunity to see your horse, and you must always be able to have eye contact
with the judge.
The “crossover”: showing the lead is loose and not
turning the horse's head.
The lead is not touching the horse.
The
horse is divided into four sections.
Imagine a line drawn down the center of the horse from his nose to his
tail. Then imagine another line drawn
across the horse just behind his withers, or through the heart girth. Those lines divide the horse into four parts.
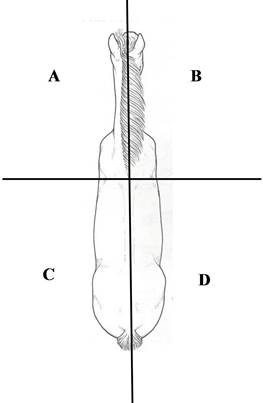
As the judge is walking around the horse and stepping
into these four imaginary sections, it is important the handler is in the
correct position at all times to maintain eye contact, give the judge a full
view of the horse and judge from a safe position.
When the judge is in front
section “B”, the handler will be on the opposite side of the horse (A). If the judge is in the left front section
(A), the handler will be in the right front section (B). When the handler is on the opposite side, the
judge has an unobstructed view of the horse. When the judge is in a front section it is
still easy to maintain eye contact with the judge.
When the judge is in a hind
section(C or D), the handler must be on the same side of the horse as the
judge. In this position the
handler will never lose eye contact and can protect the judge in case the horse
misbehaves. If the horse were to kick
out toward a judge, the handler can easily see the potential problem and pull
the horse toward herself, thereby moving the horse’s hindquarters away from the
judge.
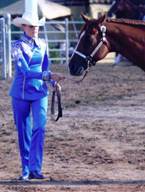
The
handler begins in presentation position, section “A”.
Presentation position places
the handler on the horse’s left side, standing angled between the horse’s eye
and muzzle with the handler’s legs and feet together and toes pointed toward
the horse’s left front foot. The handler
will be standing to the side of the horse’s head and slightly ahead of the
horse.
To move to the right side of
the horse there are two different foot patterns you may use—a three step or a
four step.
The three step
will begin with the right leg crossing in front of the left, followed by the
left foot stepping left with a turn of the toe pointing to the horse’s right
toe, and then the right foot stepping into presentation position next to the
left foot. The handler will now be on
the right side of the horse in presentation position.
To move back to the left side
of the horse, cross the left foot in front of the right. The right foot then steps into presentation
position with the toe turning the horse’s left front foot. The left foot then follows stepping next to
the right.
The three step move requires a
big step in order to crossover far enough to the other side of the horse. This step works for handlers with long
legs. The four step,
of course, does not require as large a step, so it is easier for small
children, youth or people with shorter legs.
Begin in the same presentation
position. The first step of the four
steps will be the left leg moving to the left, and then the right leg crossing
over and turning the foot toward the horse.
The left leg now makes the third step, moving behind the right leg. The final (fourth) step is the right leg
being placed next to the left. To cross
back the right leg leads, the left crosses in front turning the toe toward the
horse, the right foot steps behind and the left is placed next to the right.
The second step of the 4 step crossover
...notice the right foot starting to turn.
The last step must be a
definite step. Sliding the foot into
position next to the other foot is not acceptable.
While
executing the crossover, the steps must look smooth and comfortable. Practice both types of cross-overs and then
choose the number of steps you can make smoothly and easily. Once you have chosen, practice, practice and
practice until it becomes second nature.
You do not want to have to think about which foot you need to move. It is desirable to have a confident look, and
knowing where to place your feet will allow you to concentrate on other areas
of the performance.
Now it is time to enlist the help of a friend who can play
the part of a judge. The judge or friend
will walk around the horse, and the handler must crossover at the correct
moment.
The handler has just walked up
to the judge, halted, squared and is now presenting the horse from the left
side. The judge steps to the right side
of the horse (right and left is known by the direction in which the horse is
standing) and is now located in the front right quadrant. The handler stays on the left side. The judge then walks toward the hindquarters
of the horse, crossing the line at the horse’s heart girth, so the handler must
now cross over to the right side of the horse.
As the judge steps directly behind the horse, the handler will stay in
position, since the judge has not crossed the division line yet. Once the judge has stepped to the left side
of the horse, the handler may then step to the left side of the horse as well. As the judge crosses the heart girth area,
the handler steps back to the right side of the horse. The judge will now be in front of the horse
once again. The handler will stay in
position until asked to perform the next maneuver, and then at that time the
handler may step back to the left side of the horse.
DO’S
Do – keep your eyes and chin up when
crossing over.
Do – lead with your hip when stepping
across.
Do – Spread your collar bones,
keeping the shoulders back and down.
Do – hold your stomach in and stand
tall.
Do – lengthen the lead slightly when
crossing over, so you do not
accidentally
pull the horse’s head.
Do – check your horse periodically to
make sure he is still set up and
squared
correctly.
Do – practice with a western show hat
to become comfortable moving
around
the horse while you are wearing a wide hat with a wide
brim.
Do not – twist the feet in the dirt
when crossing over.
Do not – alter your steps. Always do the same number of steps.
Symmetry is important
in showmanship.
Do not – touch your horse when
crossing over.
Do not – cross over until the judge
has crossed into a different quadrant.
Do not – get ahead of the judge in
the crossover. Wait until the judge
cross
over into the next quadrant.
Do not - become overly animated in
your steps. Take natural
steps.
Troubleshooting
The horse is
moving with the handler when crossing over.
Make sure the chain is
lengthened enough to hang under the chin and not pull the horse’s head with you
as you are crossing.
Bumping
into the horse during the crossover.
You are standing to close. Step back one more step for the presentation
position.
Having
to adjust the last step to be correctly facing the horse’s toe.
The turning or twisting of the
second step is fairly significant. Turn
your toe more, so the last step places you in just the right spot.
Simple
Showmanship Patterns
With the maneuvers you have learned so
far, you are capable of performing some simple patterns. It is fun and will help you be more
comfortable putting the maneuvers together.
When performing a pattern, be sure to complete each maneuver before
moving to the next maneuver. The pattern
should flow. Smoothness is key to performing a winning pattern.
Good
presentation position...
ready to begin
pattern.
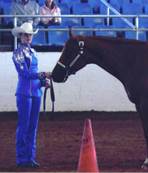
Pattern
One
Set
up three cones in a straight line. The
distance between the cones should be 30 feet. To increase the difficulty, move
the cones closer together.
Begin
with the horse set up at the first cone which is on the handler’s left. Walk to the second cone. Trot to the third
cone. Stop and set up.
The
horse should step forward with the handler without pressure from the lead. The horse must stay straight. The trot
transition needs to take place exactly at the second cone, and it must be
smooth and straight. The handler will
stop precisely at the third cone. Set
the horse and present. Have your helper
walk around the horse so you can practice the crossover.
Pattern
Two
Use
the same three cones. Begin by being
ready to move forward from the first cone.
Trot to the second cone and stop.
Walk to the third cone and set up.
Practice the crossovers.
Pattern
Three
Use the
same cones. Begin at the first
cone. Walk to second cone. Stop and set up. Practice crossovers. Trot to the third cone and stop and set up.
Assignment:
1. Locate a friend to act as judge. Demonstrate moving around the horse during the presentation portion of the pattern.
2. Make a video of you performing pattern
one: Set up three cones in a straight line.
The distance between the cones should be 30 feet. To increase the
difficulty, move the cones closer together.
Begin with the horse set up at the first cone which is on the handler’s
left. Walk to the second cone. Trot to
the third cone. Stop and set up.
Please post the videos to a YouTube and send the links to cathy@horsecoursesonline.com