Showmanship in Hand
LESSON ONE
Showmanship in Hand is not a halter
class.
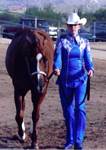
Showmanship in Hand is the
demonstration of the handler’s ability to fit and show a horse at halter. The Showmanship class was created within the livestock
industry, where young people are judged on their ability to fit and present
livestock. Today it is becoming a very
popular class at horse shows.
There are two parts to the showmanship
class.
The first part is the showing of the
horse. The horse and exhibitor will be
required to perform a pattern consisting of a variety of maneuvers. The handler must be able to lead the horse
at the walk and trot. Stop and square,
present the horse, back the horse and pivot the horse.
The handler is responsible
for the presentation of the horse to the judge.
 The competitor must be aware of the
horse’s straightness, being sure the judge has every opportunity to see the
horse at its best. The handler must be confident
in his or her presentation, and be well prepared for anything that may occur
during the class.
The competitor must be aware of the
horse’s straightness, being sure the judge has every opportunity to see the
horse at its best. The handler must be confident
in his or her presentation, and be well prepared for anything that may occur
during the class.
The second part is the conditioning of
the horse. The second part of the class requires the competitor to be sure the
horse is in “fit” condition. The horse
should show his good health in his coat, weight and muscling.
The handler must know how to groom the
horse, clip the horse and add the finishing touches to complete the perfect
picture.
In today’s showmanship class, the judge creates a pattern, and each competitor must perform the pattern with perfection. The pattern complicates the test of the handler’s skills in the presenting of the horse.
The horse is a prop used by the handler to perform the test.
Accuracy, smoothness and correctness in performing the maneuvers are the elements required to win a showmanship class.
The handler’s “showmanship” skills
must show confidence, poise and efficiency, as well as a partnership with the
horse.
Lesson one will guide you through the
learning of beginning maneuvers, while the other lessons will help you increase
your showmanship skills until you are an “advanced” competitor.
The fitting of the horse will be covered
as well as the training, showing and preparation of the horse.
Teaching the horse to respond to your
direction and to perform the exercises with grace and accuracy requires a
handler/horse partnership. You will be
partners; dance partners! Dance partners
move together gracefully and as one.
A commitment must be made to practice
daily, because without practice the dance will not be polished and smooth. If you are ready to make the commitment –
read on!
HALTER, LEAD AND FIT
To begin, halter the horse as if
performing in the show.
Establish the equipment and correct fit from the very beginning. The horse will learn to focus on his job and know what is expected of him when he recognizes his “showmanship equipment.” (It is not necessary to use a leather show halter when practicing, however a leather halter and leather lead with a chain are preferred for showing.]
The most important thing to remember for practice is to have the correct fit and the correct length of chain from the ring to the lead. I prefer not using a lead with a large snap because the weight of the snap will actually cause the horse to cock his head to the left. In showmanship, straightness is extremely important.
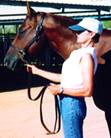
Fit the halter correctly.
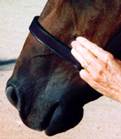
The noseband should fit over the
center of the nose, with a three-finger measurement below (about 2.5 inches)
the cheekbone. The halter should fit the horse comfortably. It should not apply pressure to the head, or
be hanging too loosely.
The chain will be fitted under the
chin. Direct the snap from the outside
to the inside of the ring on the left side of the halter, go under the chin and
through the ring on the right side of the halter, from the inside to the
outside and then attach the snap to the ring on the right side at the top ring
of the halter. The knob on the snap must
be to the outside, so that it will not apply pressure to the horse’s head, as
well as, be easily accessible.
Allow four to five links of chain to
extend from the ring on 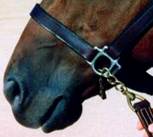 the
left side of the halter to the leather of the lead. You should find a lead with a chain that
properly fits your horse. The lead itself, not including the chain, should be
at least six feet in length. The chain links should be one half inch in
diameter. A chain twenty-six inches in length is a common length for most
horses.
the
left side of the halter to the leather of the lead. You should find a lead with a chain that
properly fits your horse. The lead itself, not including the chain, should be
at least six feet in length. The chain links should be one half inch in
diameter. A chain twenty-six inches in length is a common length for most
horses.
Now that the halter and lead are
fitted, you are ready to begin.
The goal of the first few lessons is
to teach the horse to properly lead and stop.
The goal is to lead and stop the horse
off of the handler’s body, not the lead.
Straightness begins to be established
in the very first lessons.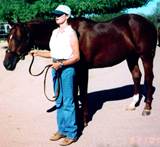
Begin by standing next to the horse
between the poll and the shoulder. Hold
the end of the lead, coiled in one large loop with the left hand. Hold the lead close to the chain, but not
touching the chain and directly across from the ring on the halter. The left
elbow will be bent with the hand just below the hip.
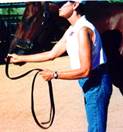
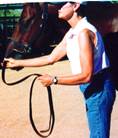 To cue the horse to walk forward,
extend the arm straight out and incline the shoulders forward. Avoid bending at
the waist. Think about leading with the hips, so to create a forward
business-like walk. We want the horse to
see the body shift forward and then feel the chain make contact with the
chin. We will be teaching the horse to
move forward when the right arm - hand moves forward.
To cue the horse to walk forward,
extend the arm straight out and incline the shoulders forward. Avoid bending at
the waist. Think about leading with the hips, so to create a forward
business-like walk. We want the horse to
see the body shift forward and then feel the chain make contact with the
chin. We will be teaching the horse to
move forward when the right arm - hand moves forward.
Do not make eye contact with the
horse. Look straight ahead. If the horse does not move forward the chain
will engage and begin to teach the horse that if he does not respond to the body
movement chain pressure will follow.
Walk with the horse then stop. Verbal commands are fine. They communicate to the horse that something
is going to happen – to get ready.
To stop the horse, incline the
shoulders back and stop your body. If
the horse does not stop, let the chain come into play by exaggerating the
shoulders and applying pressure from the chain.
Do not use the chain in a downward
motion. Move the chain straight back
staying level with the halter ring. When
using the chain in a downward motion it pulls the horse’s head down therefore
shifting the horse’s weight onto the forehand.
This will create possible problems later, as the horse will not be
balanced to perform maneuvers such as squaring, backing and pivots.
Practice walking and stopping the horse while
moving in straight lines. Practice this
over and over. The goal will be to walk
the horse forward and stop without using the chain. Do not think you have mastered this exercise
if the horse performs correctly once.
The horse must perform this exercise perfectly, every time, and without
the chain ever used as a cue.
Once the walk and stop are mastered it
is time to begin trotting.
The same format will be used. Incline the shoulders forward and extend the
arm. It is okay to make a clucking sound
to help create the trot.
DO’S AND DON’TS
Do walk with purpose. The horse needs to walk right along and with
you.
Do practice often.
Do
praise your horse for a correct performance.
Do
fit your halter and lead correctly.
Do
have someone watch to make sure your horse is straight.
Do
not jerk with the chain.
Do
not allow the chain to apply any pressure prior to using your body cues. Always cue with your body first.
Do
not adjust your walk to the horse’s pace.
Teach the horse to walk at your pace, a pace with purpose.
Do
not get ahead of the horse or even with the horse’s eye.
Do
not look at your horse when leading off.
SOME COMMON PROBLEMS
Horse is turning the head to the left. This happens because the handler does not
realize he or she is pulling the head to the left when cueing the horse to move
forward. Be sure to keep the horse’s
head straight forward, and extend your arm straight when cueing to move
forward.
If
the horse is stubborn and continues to bend left, use a surcingle and lead to
correct. Tie the lead to the right ring
on the surcingle and the snap to the ring to the halter. Fit the lead so the horse is not able to turn
his head left. The lead should not be so
tight as to be holding the head to the right.
The horse needs to maintain straightness on his own.
The horse nips at the handler. Many
times the horse is tempted to nip because the handler’s fingers are close to
the mouth, or the chain is teasing the horse by not being kept in the correct
position. Check yourself and make sure
you are not creating the problem. Avoid
feeding treats by hand as well. The
horse is not able to distinguish between work and play time.
Avoid getting into a game with
the horse. While focusing on the command
being given – give the horse a gentle karate chop just below their cheek. This is to remind the horse to stay straight.
Use a low fitting noseband to keep the horse’s mouth closed.
Another trick for the compulsive
nipper is to use the chain thru the mouth. This can really take their mind off
of nipping. Be sure when using this
method to release the pressure on the chain. If you do not, you may create
other problems or the chain may cause sores on the corners of the mouth.
The horse refuses to walk forward. The horse that will not walk forward is being
resistant. The resistance needs to be broken.
The horse when being resistant has his shoulders in a locked
position. His neck and head are usually
held up, as if to say, “I’m not going anywhere.” By rotating the horse’s
shoulder’s slightly forward, and lowering the neck and head we are able to
unlock the resistance. The horse will then be able to move forward with grace
and ease. To do this, apply a downward and forward pressure with the chain. The
purpose of this is to lower the head and neck, therefore rotating the shoulders
forward and into a position to easily move forward. Maintain a steady pressure
– do not jerk the horse. Do not look at
the horse. Be prepared for the horse to
dislike this correction. A horse could
possibly strike toward the chain, so do not get in front of the horse.
Keep the pressure constant, but as
soon as the horse moves forward release the pressure, keep walking, and give
plenty of verbal praise. After a few
sessions with this technique the horse usually becomes very willing.
The use of a
whip can be beneficial, but can cause other problems. If possible,
correct in other ways before resorting to a whip. Tapping the horse with a
whip on the hip will create forward motion.
Use a long dressage type of whip.
Ask the horse to step forward and if he does not immediately move, tap
the horse on the hip. Hold the whip in your
left hand and use it behind your body.
The possible problem created from this correction, would be the horse
moving away from the whip to the right, thereby losing straightness.
The horse will not stop. Apply more pressure with the chain. Bump the chain causing the horse to back up a
few steps. Use a short walk and stop exercise to reinforce the stopping
cue. Walk a few steps and stop. Walk a few steps and stop. Repeat until the
horse stops well. Praise and stand.
The horse stops crooked. This
usually happens when the horse is not stopping while balanced on the
hindquarters, or is leaning on the forehand.
Lift your right hand slightly to elevate the head when stopping. This will encourage a weight shift to the
hindquarters. Be more aggressive when
stopping. The horse needs to stop, not
be delayed.
The handler may be pulling the head to
the left when stopping. Keep the head
straight in front of the horse’s chest by extending your arm straight out. Stop the horse along side the arena
fence. This will help prevent the
hindquarters from swinging out. Use
parallel poles to perfect the straight stop.
The handler stays to the outside of the pole and leads the horse
between. The poles act as a barrier and
help maintain straightness.
Assignments
1. Email several
pictures of the halter and lead that you will be using on your horse for this
course.
2. Please send a video of you performing the leading (walk and trot), and stopping techniques as described in this lesson. Be sure your body demonstrates the exaggerated cues. Practice with your horse for several days before submitting the video. The steps in this lesson must be mastered before advancing to the next lesson.
You may post the video to YouTube, and send me the link. cathy@horsecoursesonline.com