LESSON
FIVE
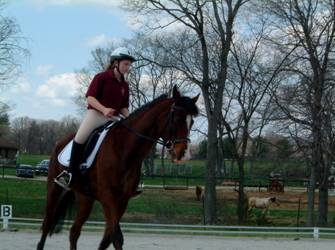
RIDER'S SEAT & POSITION
Let's get on!
Be sure when you tack up, you
remember Lesson II. The saddle should be
re-checked to be sure it fits and it is off the withers and behind the
shoulders of your horse. The girth will
be at least a hand's width behind the horse's elbow. Also make sure you have a jointed mouthpiece
snaffle and it is not pinching the corners of the horse’s mouth.
Mount
somewhere that is safe for you to ride.
Hopefully you have a horse that is patient so you can concentrate on
yourself for a while. If not, borrow a
quiet, calm horse. If that is not
possible, have a friend hold your horse so you can do these exercises.

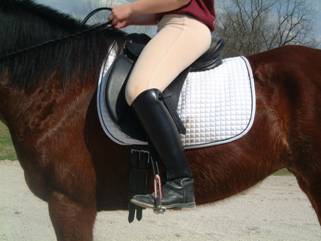
When you
settle into the saddle, adjust the stirrups so they are hanging at your
ankles. (Get off and adjust them if need
be.) At that length, they will hold your
toes up enough, and your heel can drop down enough to be secure. There should not be the severe angle in you
ankle that you often see in hunt seat riders.
Your foot, in dressage, should be virtually level with a slight deepening
of the heel.
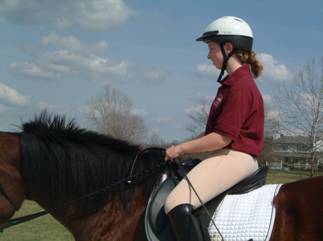
Sit in the
saddle. How does it feel? Can you comfortably put both sides of your
"behind" in it? Is it too wide
or narrow in the front of your pelvis?
Does it tilt you forward or backward?
It needs to fit you as well as it fits your horse. If the saddle is in the right place, it
should be level on the horse's back and you should feel balanced.
Place your feet in the
stirrups. Your legs should hang
virtually straight down. If there is a
line on the outside of your breeches it should run slightly forward and
downward. If you are sitting in a
"chair seat," thighs pointed forward, you need to pull your knees
back to point your legs downward along your horse's side.
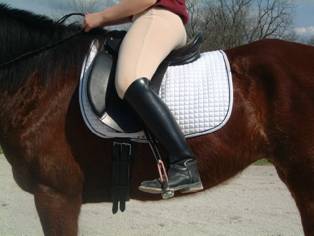
If your legs are correct,
your heel will be straight under your hip which will allow you to stand up
easily from your stirrups. If your feet
are too far in front of your hip or behind your hip, you will not be balanced
when standing in your stirrups.
This is a great way to check
your leg position any time. If you can
stand in the stirrups without making adjustments, your legs are in the best
position. If you can't stand, you
probably need to bring your legs back and under you to stand. Try to tuck your buttocks under your body
when you do this. It will put your hips
in the best place and your legs in the most supporting position.
Your hips are very
important. They are a "ball and
socket" joint. This is the part of
your body that "follows" the horse.
Meaning, that is where you absorb the motion of the horse. If your hip joints are loose, the rest of
your body can be still and not interfere.
Place yourself in the saddle
and allow both sides of your hips to sink into the saddle. What you may feel instead of your hips are
your seat bones, which are pretty much under your hips. The problem is, most people dig their seat
bones into the saddle and lean on their pelvis.
Doing this moves the hips out of position and creates negative back
pressure from the points of their seat bones.
It causes your horse’s back to hollow.
You must sit upright and back
on your "pockets", in other words, rock your pelvic bone back until
your seat bones are tucked underneath your body. This allows the fatty part of your buttocks
to slide underneath the seat bones, cushioning them. When this is done, it places your hips back
where they need to be in order to be effective.
Pull your tummy muscles
inward and upward. This will tuck your
seat without having to tighten the muscles of your bottom--they need to be soft
under you.
Your tummy muscles support
your back. Sound familiar? What supports the horse's back?
With all this adjustment, you
may be leaning back a little. Once your
buttocks are in the saddle, you need to lean your upper body forward just
slightly until you are vertical. Keep
your buttocks in the saddle. Resist the
urge to rock forward on your pelvis.
There should be no
"arch" in your back; it should be soft and straight. You may feel "hunched" a little,
but it feels that way more than it actually is.

This may feel a bit awkward,
especially if you have ridden a lot of “hunters.” Hunt riders ride quite forward. If you have ridden western, the proper
dressage seat will feel quite natural.
Caution: do not arch your back and do not sit forward on your seat
bones.
If you are not sure your seat
is correct, imagine you have on a big, silver belt buckle. Where is it pointing? Is it pointing down at your horse's
neck? That means you are leaning
forward.

If your seat is correct, the
belt buckle will be pointing straight ahead and tilted just a bit skyward. The further upward it is pointing, the more
your bottom is tucked underneath you.
Wherever it is pointed, try to keep your waist straight and back level
and vertical.
Here is an exercise to feel
where your hips are, and how to use them.
First, let's find our seat
bones. Rock your seat side to side. Try to feel your seat bones, those two small
points of pressure when you sit a certain way.
They are not comfortable for you or your horse. When you find them, then make sure you have
equal pressure on them. If you feel out
of balance, rock slightly side to side until you have even pressure on both
bones.
This place is called
"Zero Placement", or "Halt Mode". (More about that later.) Now, I want you to recognize this position
when you attain it.
Your back should be softly
straight and not arched; your shoulders can come back a little. Your legs should be hanging down at your
sides, under your hips.
I call this exercise,
"Countdown". Pretend you are
sitting in the middle of a clock. Ahead
of you is 12. Behind you is 6. Your right hip is 3; your left hip is 9.
If you are straight, your
hips will be on
Practice these
placements. As you go from 3 to 9 and
back, feel when you have more pressure on one seat bone then the other, then
equalize the pressure. When your weight
is on your right side, you are considered to be on 3. When your weight is on your left side, you
are considered to be on 9.
As you go from12 to 6 feel
your pelvis rock from front to back and feel when you are centered again. When you are on your pelvis, you are on 12;
when you are leaning back, you are on 6.
These exercises will make you
aware of your body position, and how to reposition it. You will be aware when you are leaning and
how to find center again.
When at Zero Placement, do
not stay long. Tuck you bottom
underneath those seat bones slightly.
That will be the signal for your horse to go, and it is the
"Sending" seat. This is the
ideal position for riding. Stay in this
position as often as you can. It keeps
you straight, keeps your hips down, and keeps your seat bones off the horse.
When you can be aware of
where everything is, and can keep from leaning, then you can use this in your
riding.
Let your horse walk and get
used to the new position.
Now, let's use your
clock. If you want to turn to the right,
move your right hip from 3 position to 5.
Allow your left hip go forward from 9 to 11. Wherever you put one hip, the other will be
at the opposite on the clock. You have
to be conscious of this at first, because some rider’s hips do not swing easily.
To turn the horse, you use
your hips. If your hips are working
correctly your legs will follow through and do the correct thing. We will go over this part in more detail
later.
Wherever you want your horse
to go, turn your hips, face, and body in that direction. Be sure that you keep even pressure on the
sitting bones; do not lift one out of the saddle.
Easier said than done,
but very important that you get this. Do not lean.
Use your new exercises to learn to recognize the feeling of leaning.
When you want a tighter
circle, bring your inside hip back farther, and your outside hip will go
forward farther. Your horse should be
going in the direction you are turning.
Horses naturally respond to the positioning of your body.
At this point, I just want
you to observe your horse's responses.
Do not be disappointed if he does not respond exactly as you hope. We are about to learn more ways to help him
understand your requests.
You will be correct if you
look where you want to go, turn your shoulders in that direction, and then
bring your hips around to match your shoulders.
Your horse should want to match his shoulders to your hips. The horse will bend through his back if your
hips are doing their job.
If the horse is still does
not understand the cue, slightly vibrate the rein in the direction you want him
to go. Turn your body; do not lean. It is important that you are upright and
twisting while keeping your bottom in the saddle. Be careful your outside buttock stays in the
saddle; it is the one which tends to float upward rather than move forward.
If you remember your
"clock", the exercise should become easy for you.
Most horses will only move in
one direction well. If you were
successful in the earlier suppling lessons, then it should be much easier now
for your horse to go both directions equally well. If you are having major problems with these
exercises, go back to the in-hand work and supple the horse some more.
Your legs reinforce your body
position change orders. If the horse does not turn, use your inside leg to send
his rib cage over, just like you did on the ground in Lesson III. Just swing your inside leg back from your hip
and press him a few times. You keep your
seat in the position we’ve been working on and just let the leg slide back and
press the horse over.
If you turn your hips
correctly, your inside leg will move back a bit, and your outside leg should go
back farther to keep him from throwing his haunches out. You press and send his rib cage over.
If you want to send the
horse's haunches to the outside, slide your inside leg back farther and press
the horse. Your outside leg lightens and
allows the horse to swing his haunches out this time.
Your torso needs to follow
the lead of your hips. It needs to swing
in the direction you want to go. Your
shoulders need to follow through and stay level. If you lean, they will dip or drop and your
horse will do the same thing. As riders
we want to be upright and we want our horse to be upright also, balanced
laterally and vertically, yet bending.
It sounds peculiar, but only
by getting the horse to bend correctly can we get him straight.
Be sure you do not twist just
at the waist. Your hips must do the
twisting to bend the horse, as your waist and upper body follow. If your horse has a tough time turning, then exaggerate
the turning of your shoulders. They are
almost as important as your hips. Your
body alignment must be telling the horse the same thing consistently.
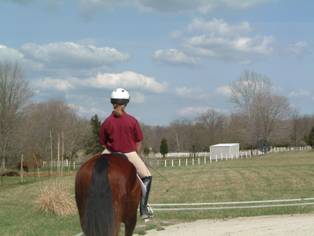
Be sure you are looking where
you want to go! Your head and neck must
turn, chin and eyes stay level!
Everything must communicate
the same message to the horse.
If you only turn your head or
waist, the horse is not being given the full message.
The tighter the turn or bend
you want, the tighter you turn your body.
Comparable parts! The horse and
you become one that way.
What your hands do is
important. You need to hold the reins
with light a contact, where the reins are straight and firm, but not too
restricting.
Every horse is different, and
needs a slightly different feel. You
will discover with a little practice what your horse likes best.
If the horse attempts to
back, or throws his head, your reins are probably too tight. If he just walks off with you, they are too
loose. The feel should be similar to
what you feel when longeing or leading him.
The reins run under the
middle three fingers and lays over the pinkie and the thumb. The fingers are held firmly closed with a
"spongy" feel.
The loose end of the reins
comes out of the top of the hands, between the thumb and forefinger. The upper
finger joints point at each other. The thumbs point upward toward the opposite
ears of the horse's head. It is similar
to holding a coffee mug at a very slight tilt.
If you turn your wrists too
much, the "coffee mug" will spill its contents in your lap. Keep your hands positioned so nothing spills.
Do not cross one hand over
the mane to the other side. Keep your
right hand on the right side, and your left hand on the left side. When you do that, you will have more control
over your horse's actions.
Your hands should be as wide
apart as your hips. Another way to
envision your hand position is to say your hands should be directly in front of
your elbows.
When you bring your hands too
close together, it affects the corners of the horse's mouth as if you were
pulling back. I want you to have as
little "pulling" action as possible.
As a matter of fact, if you need to use your hands to tilt the horse's
nose in the direction you want to go, do not pull back on the rein. Merely squeeze your hand closed a little
tighter, and if that does not work, spread your hand away a little further in
the direction you want to go.
Your elbows stay at your
sides and your arms are kept soft and straight.
They will make a straight line from your elbows, through the reins, to
the bit. If you pretend your elbows are
like the weights of a fishing pole, and your hands are the bobbers, it will be
easy to remember that your hands follow the horse's head, and the elbows stay
at your sides.
If the horse raises his head,
your hands go up. Yes! Do not pull his head down, for it will only
create tension and cause him to bow his neck against you and keep his head
up. Have you ever tried to pull his
head down with a lead when he wanted to look at something, or was ignoring you? It usually makes him put it up higher, or
causes a fight.
If your horse's head comes
right down easily, then you should not have the urge to pull it down
anyway. We will discuss this more in
detail later.
Keep your elbows at your
sides, over your hips, and let your hands follow the horse's head. For the most part, your hand's main job is to
keep a light to firm contact with the horse's mouth through the reins, and to
keep his neck straight. If he can bend
his neck, he will displace his shoulders and be able to stiffen his body and
avoid your cues.
It is very, very important
that you learn to get his neck straight for most of the exercises we will be
doing.
Nothing here is
superfluous. All the steps are important
and build one upon the other to create a bigger, more complicated picture.
If any of the steps are left
out, you will not be able to perform the exercises and improve your horse's
body.
Practice using your seat,
legs, torso, arms and hands. Do some
turns and serpentines. Go straight. See where your horse turns easily, where he
resists. Just play! Do not try to do anything too serious. Do not get upset if he does not respond. Just practice using your new cues. Exaggerate your position. Be subtle.
See what happens! We will get
more specific with cues and exercises in the next lesson. Now we just want to have fun and practice.
REMEMBER:
Keep your bottom tucked
underneath you.
Your tummy muscles support
your back.
Sit up straight, but do not
arch your back.
Let your hips sink into the
saddle.
Keep your hips level and
evenly weighted.
Turn your hips in the
direction you want to go.
Do not lean, TWIST your body.
Follow through with your
torso and shoulders.
Be sure to turn your head and
look where you want to go.
Keep your head and chin
level.
The further back you put your
leg on the horse and press, the more he is going to move his hindquarters away
from the pressure.
Your hands keep the horse's
neck straight with light but firm contact.
Your elbows stay at your
hips, and your hands stay about the same width apart as your elbows.
There should be a straight
line from your elbows to the bit.
If the horse raises his head,
raise your hands the same level.
Do not cross the rein over
the neck or pull down on the reins.
Practice the
"countdown" exercises. We will
be doing a lot more with this as we progress.
This is a beginning guide to
what we will be working on. These
positions will be refined and defined to include more specific details as we
move on. If you can get a good grasp and
feel of this, then the next lesson will be a breeze!
As a warm up, I usually do
the in-hand work each time before I ride, especially if the horse is young or
mature and stiff. If you teach the horse
how to respond from the ground, not only can you see how he moves and will
feel, but the horse gets a clearer understanding of what is being asked of him
once you are in the saddle.
You do not have to spend much
time at the exercises if he is responding well. Just do a light "touch
up" to be sure that he is using himself well. If he is having trouble doing any of the
exercises from the ground, you can be sure he will most likely not be any
better under saddle.
Go back over previous lessons
and be sure you are asking him correctly.
Most horses will do as you ask if they are physically able. Sometimes, people are not asking the right
"questions", so they get the "wrong" answers or
responses.
A NOTE TO THINK ABOUT!
If you do not have a solid
relationship with your horse, or he is anxious and spooky, then you need to do
more ground work with positive reinforcement and work on getting his trust and
respect. Horses will usually not give
respect to someone they can push around.
They want to know that you are in charge and able to keep them
safe. You have to show that you deserve
their trust by your calm actions. Avoid
hasty reactions.
Beating a horse into
submission is never the answer. They may
give you the lead, but they will usually not be able to trust you or will take
advantage once your guard is down. This
is not a positive relationship.
You show the horse you are in
charge by moving his space. Like in the
in-hand exercises, you are moving the horse's space, and therefore becoming the
alpha. It can take a while, but that is
part of becoming the leader of your little team.
The "alpha" is the
one who can move other horse's body's around with calm aplomb. It is not necessarily the bully or the older
horse which becomes alpha. It can be
difficult to see who the alpha is in a boarding situation where they are mixed
up often or new horses are introduced all the time. Horses will usually be challenging everyone
all the time and never really relax. In
a fixed "herd" or field, it is much easier to observe their
relationships with each other.
As a human, if your horse has
the lower status the more he may listen and behave for you, but the spookier
and anxious he may be if you do not show solid, calm leadership. And usually the other horses in his field
will not be too upset if he leaves the field.
If you have the lead horse in
the group, he may challenge you more often, but will usually be the calmest and
boldest. If you remove him from the
field, the others will usually be more upset and anxious because you are
leaving with their leader.
The "boss", or
alpha horse is usually calm and steady and protects the herd. Horses will
respect that, even though they may challenge him from time to time; because if
the alpha can not handle them, then worry he won’t be able to protect them.
If you do the in-hand
exercises often, you will not only increase your horse's body physically, but
you are bonding with your horse and letting him know you intend to be the
alpha.
If you stay calm, and take
the role as leader, you can create a better, positive relationship with your
horse. If you have this, he will perform
better for you and trust your leadership.
Your work under saddle will improve as a result.
There are many dynamics
involved, and if you just take your time and go through each step, revisiting
them when necessary, or doing them as warm up exercises often, you will find
your time with your horse will be more rewarding!
TERMS
ALPHA--The lead horse in a group of horses; the boss of
the team; the one demonstrating leadership through calm and respectful actions.
CLOCK--A method of imagining yourself on a clock face,
12:00 ahead of you, 6:00 behind you, 3:00 on your right, 9:00 on your left.
COUNTDOWN--Using the "clock" exercise to improve
awareness of your hips; exercise to supple your own body as well as your horse's
back.
HALT MODE--You rock up on your seat bones, back straight,
sit deep and exhale.
HERD--A group of horses, usually related if in the wild,
in a field or pasture together; a stable (no pun intended) group with
established social orders and progressive status ranks.
SENDING SEAT--Your bottom is tucked just under your seat
bones, cushioning them, sending the horse forward and following him as he
moves.
TOUCH UP--Going back over previous exercises to fix a
current problem.
ZERO
PLACEMENT--Your seat bones are resting directly on the horse's back; it becomes
the Halt Mode.