Dressage:
Foundation for All Riding Disciplines
Lesson Nine
ARENA CRAFT
Whether
or not you decide to show in dressage, it is a good idea to understand the design of the dressage
arena.
The arena is put together in such a way that it
helps you perform the prescribed movements; the dressage arena is rectangular
and has good straight lines and 90-degree corners. It is marked with letters so you can judge
distances and position along the rail.
It encourages precision, balance and straightness.
There
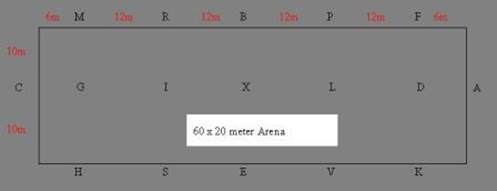
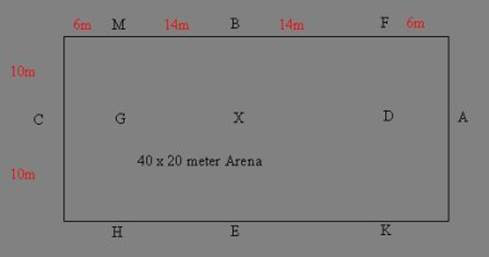
are two regulation sizes. The small
arena is 40 by 20 meters, and the large arena is 60 by 20 meters. Most lower-level tests are ridden in the smaller arena, while
upper-level tests are ridden in the International Equestrian Federation larger
configuration.
Both
arena sizes are 20-meters wide. The
arena is invisibly divided in half lengthwise.
That makes both halves of the arena 10 meters wide. (Do the sizes sound familiar yet?) Also, the halves are divided once again,
making them each 5 meters. So there are
four rows of 5 meters. The middle line
is called the "centerline", the other two lines are called the "quarter-lines". This holds true for both sizes.
The
arenas are also divided in half. For the
smaller arena, that leaves two 20-meter lengths on each side, and for the
Federation size that makes three 20-meter lengths on each side.
You
will be able to fit two 20-meter circles in the small arena and three 20-meter
circles in the larger one. Now, knowing
where the centerline is, you can fit 10-meter circles from there to the side of
the arena. The corners are a great
guideline for 10-meter circles.
Knowing
the length and spacing of the arena allows you to perform certain movements to
specifications in the dressage ring. You
will be able to be exact in your performances and from there learn where you
need to improve. Technical skills and
exact measurements show you your progress.
What are the spaces?
The width of the large arena is 20 meters. It is broken into four equal segments of 5
meters each. The center of them, being
the centerline, is marked at both ends.
The near end, which is where you would enter the ring, is marked A, and the far, opposite end, is C. The letters are physically placed a few feet
from the arena so they do not interfere with your horse.
The
direct middle of the ring is X. Looking at X from A, B would be on the right
rail, and E would be on the left, both directly across from each other. X is directly between them. Marked underneath the letters E and B is the
smaller letter X, denoting that X is between them.
Going
from the near end of the arena to the far end, there are other letters
designated, but not physical, along the center line. From A is D then L then X then I then G then
C. D is centered directly between K (on
the left) and F (on the right). L is
centered between V and P, respectively.
X is centered between E and B. I is centered between S and R.
G is centered between H and M.
The letters A and C are not between any other letters. They are between the corners of the arena.
A diagram of the 20 x 60-meter arena with letter placement.
The
small arena is shorter by 20 meters. It
is laid out the exact way, but does not have the letters R, S, V, P, I, or
L.
Here
is a diagram for the 20 x 40 meter arena:
These
arena dimensions are universal. If you
learn to ride in one, and know the letter placements in
I have done some research and have found no rhyme
nor reason why these letters are selected, or why they are placed where they
are. As far as I know, no one
knows. If they do, please let me know!
The interesting part of the dressage ring is that
the walls only need to be a foot high.
It is not something you can turn a horse loose in, like a round
pen. The rails can be made of anything;
wood poles, plastic poles, plastic chain or anything that can be set or laid
down to mark the boundaries.
The letters can be made with cones, placards,
buckets, anything you can mark letters on so they are visible from the center
of the ring. I once made an arena out of
landscape timbers on the ground, and milk jugs with the letters marked out with
electrical tape. Use your imagination if
you would like to make one.
The important thing is the spacing. I would suggest a small arena; it is easier
to make and uses less space and less materials.
It can be made very portable as well. There is really no need for the larger
arena unless you want to compete seriously or are riding higher than First
Level.
Now
that you have the diagrams of the arenas, can you imagine how you would work
your exercises in there? You can work
your 20 meter & 10 meter circles, spirals and serpentines within the
dimensions. Knowing the layout of the
arenas will help you get your technical skills down pat. Now, you can really make some patterns of
your own with the exercises you are leaning.
Many
people do not understand how important the size of the circles and other
movements are. With the dressage ring,
you have a guide to help you work anywhere from a 20-meter pattern to a
10-meter. You can do your lengthening
across the diagonal of the arena, and collection to the centerline or on the
short sides. Do your small circles in
the corners, and your 20-meter circles at either end or in the center of the
ring.
Here
are some examples of good spacing in the small arena. These are the most commonly asked for
movements in a dressage test.
4. Ten
Meter Half-Circle. Used in the form of a
turn, usually to or
from
the centerline (to C), then right or left to the rail. Riding straight down the centerline (never at
a canter for this), prepare to turn 5 meters before C, putting a deep bend in
your hips and keeping your legs active to
ask for the 10-meter turn as you approach the rail, then ride straight
away along the rail. Remember the U-Turn exercise? For practice, do full 10-meter circles in the
corners to get the dimensions correct.
There is nothing wrong with using a measuring tape and putting small
cones down to help guide you.
5.
Ten-Meter Figure-Eight/Serpentine.
Used in the form of changing direction through the 20-meter circle. If you have your 10-meter circle working well
in the corners then try it at E & B.
Fit your circle from either E or B to X.
Ride it a few times, being sure you are keeping your horse round and you
are bending your horse well, then halt at X and do it in the other direction
from X to the other letter a few times. Then do it continuously, changing direction
at X each time. A
figure-eight? Sure thing! A little collected? Yep!
Now,
perform it from, say, E, then change directions at X and then continue a loop
to B. Be sure you are straight, facing A
or C, when you are at X. Make both your
half circles the same size. You will
have a 2-loop serpentine. There are no
slanted lines in this exercise. Both circles or half circles must be round, with a
straightness at X, then an immediate bend in the new direction. It should not take more than 3 strides to
change bend at X. Bend to the right,
straighten, bend to the left. Use your body!! Do not rely on the reins.
6. Change
Direction Through-the-Center. Add a
20-meter circle to the previous exercise.
Do the 20-meter circle between E & B, being
sure to touch both sides of the arena for a stride, as described in #3. Then at either letter B or E, do the 10-meter
serpentine to the other letter. Then
follow up with another 20- meter circle, which will be in the opposite
direction than your last one. Practice
this in both directions. If you are
having difficulty at X, then halt there between directions a few times until
you get your bearings. Once you have a
handle on it you can perform it anywhere.
It is considered the most balanced way to change directions while
maintaining gait, rhythm and balance.
7.
Half-Circle and Return to Track. Usually done from either E or B, to X, then to K or F,
respectively. Ride a 10-meter
half-circle from, say, E, looping to X, and then straight to K. Then follow the rail around to B and do a
half-circle to X, then straight to F.
You can make this a continual pattern. Perform it anywhere in the arena
as long as you know where your 10- meters are.
Do it from rail to centerline to rail, or from centerline to rail to
centerline. I call this a Teardrop; that is the form is seems to make when done
correctly. Be creative with this
pattern, it lends itself to many ideas.
How about a 20-meter return to track?
How would you perform that? Any other ideas?
8. Lengthening
& Collection. Lengthen anywhere on
the long side, collect along the short sides.
Practice going from one to the other, using your
corners to change. The job of the
corner is to help you collect or spring out for lengthening. Use the corners wisely.
9.
Diagonals. Ridden
from just-after a corner to just-before the next, diagonal corner. For instance, ride a straight line from A to
the corner, collect into a 10-meter turn (yes, corners are partial 10 meter
circles) to F, straighten and go straight through X to H. Then follow the rail to M, through X to
K. Turn your horse slightly before the
letter so as you straighten, you are on the correct track. If you turn exactly at the letter, you will
put your horse beyond the track.
Lengthen and collect where needed.
Be tactful and keep your horse forward.
Refer to previous lessons if need be.
It is always good to return to the basics.
10. Halt at X.
Since you always enter at A, you will usually halt at X. (There are some exceptions). After you halt, you would salute the judge
and wait for the judge to salute you, then trot on
toward C. If there is only one judge,
he/she will always be placed at C. You
want to trot in at A and prepare for a halt at X, by either coming down to a
walk before X, or doing an immediate halt on X from the trot. Have good contact and remember to close your
legs and push your horse up into the bridle.
Be sure to prepare your horse for the transition. If you know your horse is hard to stop, start
asking early, before X. If he stops
immediately when asked, then you will not need so much preparation. To salute, you put your reins and crop in
your left hand, drop your right arm down at your side, and then nod your head
down slowly for a moment. The judge will
return the salute with a nod of the head.
You then pick up your reins and trot on directly from there. Always head for C. Some horses spook at the judge's booth so be prepared to send your horse forward into a good bend.
11.
Laterals--Ride laterals anywhere. It is best ride laterals from the rail to the
centerline and vice versa. Or, use your
quarter lines and go to the rail, etc.
Use your imagination.
12. Rein-back--Ride anywhere. Set your horse up for a halt,
usually performed on the centerline at one of the letters,
or at C in front of the judge, and ask for five steps of a rein-back. Then send him directly forward again at the
trot. I would not practice this at X
often, because some horses will anticipate backing up when you just want a halt
and standstill. Remember to use your
legs!
13. Many
exercises can be performed anywhere in the arena. These just-mentioned are the most common ones
you would be using. Think about placement
of your patterns and adding exercises everywhere possible in the arena. Be creative, but learn the ones just
presented; they will help get you started.
You
may be asking what is all this stuff about tests? Well, if you are at all interested in
showing, it is a good idea to know what it is all about. Even if you do not want to show, you should
be aware of how judges score, and what the dressage principles are all about.
Dressage means training, and the dressage tests
are designed to let you know about the training level you and your horse have
reached.
The
beginning levels start at Walk/Trot.
There are two tests at this level, Tests A and B. Then there is Training level, which has four
tests, called Training Level, Tests 1, 2, 3, or 4. Then there is First Level, Tests 1, 2, 3 or 4. Then Second Level, Tests 1, 2, 3, or 4. Then Third Level, Tests 1, 2, 3, or 4. Then Fourth Level, Tests 1, 2, 3, or 4.
Each
Level up requires the mastery of more difficult movements. The Tests in each Level are designed to
gradually increase difficulty from 1 to 4.
It is believed that once you are riding well at Test 4 of a particular
Level, you are ready to proceed to the next Level.
You
may start showing at any Level in which you feel comfortable. But you cannot skip around doing any Level or
Test pell-mell. There must be an organized and systematic progress, very much
like the training it represents. Each
Level represents a certain degree of training that must have been achieved.
Therefore, it is suggested you only show in the Level in which you have already
mastered the movements.
If
you have a young horse, I always recommend you start at Walk/Trot, just to get
into the ring and get a safe feel of what it is all about. If you have an older horse, or one that you
feel safe taking anywhere, then start at Training Level.
Each Level explains
what you need to know so you can make an informative decision on
your horse's behalf.
On the average, once you start showing, spend at
least a year in each Level so you do not rush your horse's progress. Many people spend a few years in each Level
to perfect their training. Know your
limits and your horse's limits, and spend the required time to expand them. You may find that both you and your horse are
at a higher level than you imagined.
You can have fun in any Level.
The
scoring is interesting. The tests are
written in such a way that every movement has a possible highest score of 10 --
Perfect, and a lowest score of 0 -- not performed. Five is considered “Satisfactory.” Everything below five is considered
progressively worse, above five is progressively better. On the average, most scores are around 4 --
7. Less common, but within reach, are 8's
which are “Very Good,” and sometimes 9's, which are “Excellent.”
Next
to each score, a judge will usually give a small comment or two about what was
wrong with the movement, or how to improve the movement. These are very helpful. It is instant feedback. If you agree with it, it gives you something
to feel good about. If you do not agree, try to learn what the judge saw and
what the judge believes…you will always learn something which will improve your
performance and skill at some time in the future.
Most
tests begin this way:
Enter A at a trot, halt and salute at X, continue
down centerline at the trot.
That is considered one movement. The judges will score you anywhere from 0 - 10. What are they looking for in that one movement? Good solid halt from the trot, standing still, straight lines, and a nice forward, balanced trot.
Another
movement:
Starting
at B, trot a 20-meter circle, gradually letting the reins slip out of your
hands and letting your horse's neck stretch.
Before B, gather up your reins and do a working trot.
The
judges are looking for a solid, forward trot, a round 20- meter circle, good
stretch from the horse while keeping his rhythm and tempo, and a smooth
transition back to the working trot.
Despite
the technical aspects of these movements, the judges are looking for the horse
to move very much like the movements we discussed at the beginning of this
course: A horse with a good, swinging
back, balanced, even strides, smooth transitions and being on-the-bit. They are supposed to penalize a tense horse
with hurried strides, hollowed back, and falling on the forehand.
As
for the rider, they want the rider to be balanced, elegant, tactful,
compassionate, and be moving quietly with the horse. The rider's aids should be subtle and
invisible. "The two should be as
one."
The
movement, horse, and rider are judged as "one" throughout the test.
There are usually 10 - 20 movements per test.
Every movement is graded. Even the walk is judged. The lengthening and collected gaits are
judged as well.
At the end of the test, the judge will score the
rider's position, the horse's gaits, relaxation, and submission etc. The judge also usually adds a few words of
encouragement or expressions of concern at the bottom of the test.
The
percentage of the total score is tallied and, out of a total of 100%, you will
receive your score. A beginning score is
often 40% -- 55%. That is not considered
a hideous score for a beginner. An
excellent score is closer to 100%. A
very good score is 75%. When you start
receiving consistent scores of 63% or higher, at least 3 times, it is usually
considered a good sign to move up to a higher Test, or to the next Level.
A word about the judges. The judges are human. There are good judges and there are
not-so-good judges. I keep a judge's
list. It is compiled with judges that
are looking for horses that move well and give back constructive comments. They may not necessarily score me well, but
if they are correct in their assessment of my ride, I find them greatly
helpful.
How to spot a not-so-good judge. That can be tricky. They may even score you very well. But they tend to get stuck on one certain
aspect of your ride and score you constantly on that. For example, the very most common theme: horse
above bit, horse's head high, horse above bit, horse not on bit, horse above
bit …….. etc.