RIDE COMPETITIVE TRAIL
to WIN
Lesson Four
By Vickie V. Zapel,
PrI
CONTROLING ALL OF YOUR HORSE’S BODY PARTS
THE FOUR MAIN BODY SECTIONS OF YOUR HORSE
1. The
horse’s head (face and mouth) and poll (bony protrusion at the top of the head
between the ears) are allowed to move up, down and sideways by the Atlas, the
first cervical vertebra and the Axis, the second cervical vertebra. These vertebra joints permit head movement at
various degrees of height: above his withers, level with his withers or below
the withers.
2. The
horse’s shoulder is attached to his body by muscle; the forelegs have no joint
attachment.
3. The
horse’s rib cage is suspended from the spine, so a horse moving with his belly
dropped will have a low or “hollow” spine.
In order to carry himself and a rider in
balance, the horse needs to lift the rib cage by “rounding up” his spine.
4. The
horse’s hindquarters (hips, stifles, hocks) create his movement power. All his action is initiated in the
hindquarters, so you must control the hindquarters to attain collection and
straightness in movement.
To be highly effective
at competitive trail you need to be able to control all of
your horse’s body parts in combination and separately. To learn all the rider cues and horse
footfall sequences for all maneuvers you may wish to enroll in Training
Performance Horses at www.equinestudiesinstitute.org
There is no rush to get
your horse working obstacles. Take all
the time you need to learn to correctly control your horse, making it easy for
him to perform while protecting him for awkward movement injury.
Most of your
competitors will ride with 80% of their cues coming directly from their hands.
Your ultimate
goal is to have 80% or more of your communication with your horse to be
through your weight and leg aids. Your
weight aid is always communicating something to the horse, so you must be sure
your weight is always in the correct place for the response you want.
Think about it this
way, if you are driving a car and the only cue (control) you have is the
steering wheel, how accurate or safe a driver can you be?
To advance your riding
ability not only do you need to control your horse’s body parts independently, you need to put the different independent parts together to
ensure your horse can easily perform the maneuver you are requesting. This means putting the horse into the
correct frame and controlling each foot fall.
When I was a kid I learned to drive on my father’s tractor. Tractors are only stable on level ground and they are designed to push or pull. Without my father’s knowledge, I and two
other neighbor girls would take the tractor into the woods.
The big fun was that we
all sat on the singular tractor seat. The girl in the center used the steering
wheel, the girl on the right worked the gas and the girl on the left worked the
brake pedal. None knew what either of
the other two “drivers” were going to do next and we compounded our fun by
going up and down the steep hills recklessly out of control.
This situation was
indeed dangerous and definitely not recommended. We came within inches of rolling that tractor
dozens of times.
The point of the
story: you cannot expect to have an
enjoyable, safe ride, if you are not in control of all of
your horse’s body parts. Only when you
can move any part of his body, independently or in combination, will you have a
horse able and willing to negotiate trail obstacles.
You do not want your
horse to feel as if he has three different riders simultaneously in his saddle,
each cueing him to do something different with no coordinated effort. If you have been riding this way,
unintentionally of course, your horse long ago learned to tune you out. He does the best he can to get you where you
think you want to go, but he can’t get you there with balance and grace.
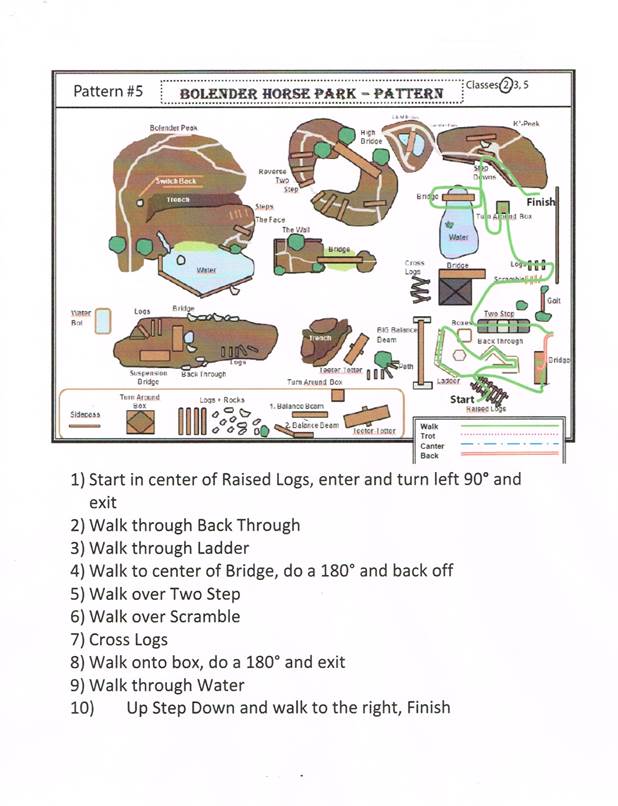
To see how “body
control” is going to help you and your horse, review pattern #5 below. It is a level 2 pattern of the type you could
find at an AQHA sanctioned trail challenge.
Although the course depiction is fairly accurate, what you can’t see is
that there is only marginal space between the raised logs, ladder and back-
through. Consequently, your horse has to bend, turn and straighten, bend turn and straighten
in different directions as you follow the pattern pathway to the
obstacles. You’ll have shoulders turning
one way with the hips following at a different angle and while all of this is
happening you have logs, steps, ladders and bridges
under your horse’s feet.
You’ll recall from
lesson 3 that level 2 of an AQHA sanctioned Trail Challenge reads as follows; LEVEL
2 – Intermediate Level: this is considered an established partnership. The rider and horse are familiar with one
another, exhibit trust when negotiating obstacles and are conditioned to ride a
longer course.
MOVING
FORWARD, BACKWARD AND SIDEWAYS WITH STRAIGHTNESS
How difficult can moving forward be?
You
move forward all the time; riding down the driveway or
down the trail head. However, can you move forward in a perfectly
straight line? Can your horse walk a
straight line for three horse lengths?
Walking
straight means your horse’s head, neck, rib cage and hips are perfectly aligned
while moving forward. If they are not,
can you fix your situation while applying the proper cues to straighten his
body while he is in motion?
The
better you can explain and use the cues needed to move the body parts into
alignment, the more control you’ll have.
Greater control allows greater finesse when maneuvering between and
through obstacles. Greater finesse
equals higher scores.
Remember
in the judging criteria, wherever possible the judge wants to see you enter and
exit each obstacle straight. Sometimes there simply is not enough room
to enter or exit straight, in that circumstance you need to get as straight as
possible within the obstacle itself while you are moving. So, if you cannot ride an
absolutely straight line down the driveway, you are going to have great
difficulty riding a straight line into, over and out of an obstacle;
crookedness will cost you points.
Dressage
riders really work at honing their skills toward straightness, they even strive
to ride straight on their circles.
Sounds confusing, but it simply means that the nose, neck, spine and hip are evenly arced to the exact curve of their
circle. The smaller the circle the
tighter the horse’s body is arced.
Straightness also improves your horse’s body flexion (if he is not
angling a hip or dropping a shoulder, then he is working harder to be round in
a straight line), this strengthens his joints, promotes collection
and adds longevity to his performance life.
In
the photo below you’ll notice the approach of horse and rider is perfectly
straight to the obstacle where the degree of difficulty is increased with the
downhill pathway.
In
the second photo, the team came to a complete stop, for the point of the
illustration. Typically
you would not want to stop and then go forward over such a large obstacle. Stopping leaves the horse with no momentum to
track his hind feet up under himself for lift.
Remember, ideally, we don’t want to tick obstacles with front or back
feet as a tick is a half point score deduction.
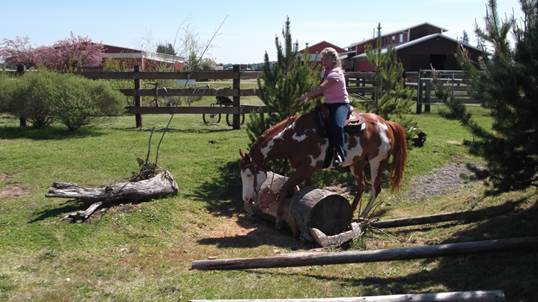
In
the third photo you’ll see the horse from the front at a complete halt. Notice that the rider looks more concerned
than the horse does. The rider does not
want to put her horse in a position to be injured or scared. This horse has been ridden over other logs, but has never encountered one quite this wide.
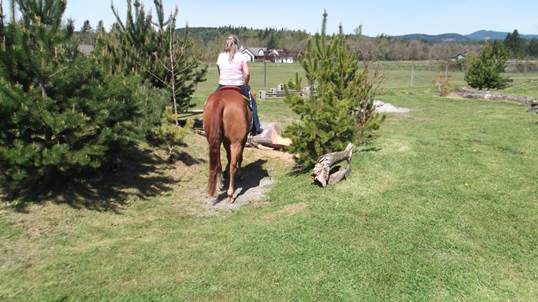
Straight
approach to the log.
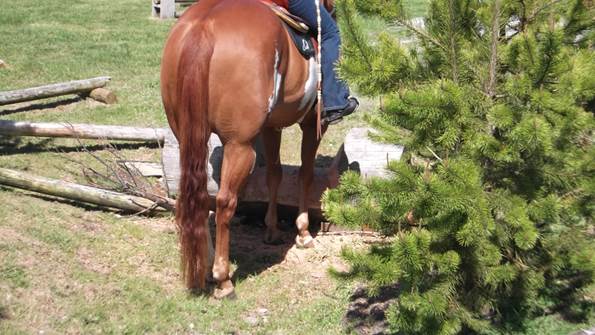
Note
the horse’s front feet are equal in placement and the hind feet are set to
track right behind them. This horse will
move in a straight line as he steps over the log.
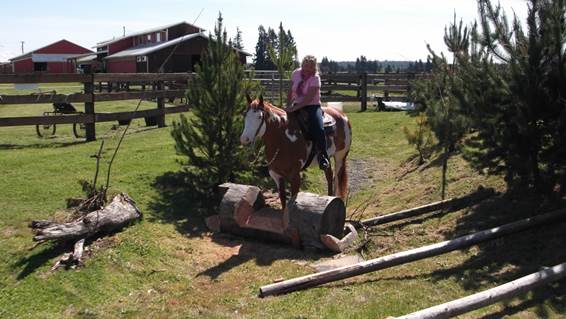
Here is a front view. The horse is in this position only because we
have stopped him; something we would not normally do. We do not want to ask the horse to move
forward over such a large obstacle from a stand still.
The horse can’t get a good view of
this obstacle from this position…it is below and behind his eye. To get over this obstacle now, the rider
backs the horse far enough that he has a good view of the log. Now she asks the horse to move forward and
cross the log. In a competition you
should never change the horse’s direction of travel unless the pattern directs
you to do so. Backing the horse and then
crossing the log was only to help the horse in a training session.
When approaching such a large
obstacle, allow your horse to think about it for just a second. This is an “advanced” obstacle since the log
will take up the entire space under the horse’s rib cage. This doesn’t leave much room for error.
The horse handles this obstacle
perfectly being straight from the tip of his nose to the dock of his tail. Note how far underneath him his hocks and
hind feet are, his spine is up and his neck is round,
all on a loose rein. (This horse spent
a year going over ground poles and smaller logs before ever being asked to go
to an extreme obstacle.)
To allow the horse to do his job to
the best of his ability, the rider remains balanced and straight, her legs are
evenly urging the horse to move forward, her seat is square over his back. Her left arm or rein hand is moved forward to
lengthen the rein; the last thing she wants to do is to interfere with the
horse’s slow, steady, methodical thought process and foot placement.
Remember, you also earn points for
cadence and flow.
In his pattern there is barely enough
room in front of the horse for him to go straight on his exit before he is
asked to turn slightly to the left. In
addition to the turn, there is a slight incline, and you want the horse to
continue the pace he set on his initial approach to the log.
As a competitive trail rider you do not want to be looking down. Always look forward to the pathway you want
the horse to follow.
BACKING
Backing should
be as straight as going forward.
Eventually you will need to back through anything and everything
imaginable.
To
help you and your horse get started with straightness, back along a wall or
fence line. As you do, you’ll practice
the cues that control the horse’s shoulders and hips.
Once
you master this control enough to back straight, your next goal will be to back straight and then turn the horse’s hips, followed by turning
the shoulders, and all without touching the poles or the edges of a trench. Your horse must be straight when backing off
a teeter totter, as you do not want to step off one side or the other.
If
such maneuvers are beyond your current ability, now is a very good time to
start lessons with that instructor that you located while completing lesson
two, or sign up for the online course, Training Performance Horses as www.horsecoursesonline.com
When
you watch the following video; you’ll note the job was
done with some “flow” and the horse did not touch the obstacle poles. However, to have earned a higher score, I
would have needed even more flow between the shoulders and hips while turning
the corner on the center of the back through “L”. A little more flow would have eliminated the
slight stutter of movement between the shoulders and hips while in
reverse.
These maneuvers require
much practice and patience. At the time
of the video this horse was not ready or capable of moving his shoulders one
direction while the hips moved the opposite direction any better than he
did. If I had asked for more speed, the
horse might have lost his confidence and most likely ticked a pole or stepped
on one.
Plan
to make your improvements in very small increments and you’ll enhance the
ability and confidence of your horse.
Only after you have perfected your cueing sequence will you want to add
speed for more flow.
Insert Utube
video: MOV086 it runs for 1.01 minutes.
Practice they say “makes perfect”.
But that is only true if the practice is perfect. If you are not practicing properly, you are
simply practicing poor riding and teaching incorrect movement. Every champion has a coach. No one does it alone. Find a good instructor to help you improve
your riding, cueing and your horse’s ability to correctly perform basic
maneuvers.
SIDEWAYS, HOW IMPORTANT IS IT?
You can
certainly trail ride anywhere you want to go without side-passing, but it
really comes in handy and adds to your safety factor. It is also a maneuver that you will use
frequently in competition trail.
It is
not uncommon to be required to side-pass a log in the middle of a pond,
side-pass a log on a hill, or side-pass with the horse’s front feet on a bridge
while the hind feet are on uneven ground.
You are often required to side-pass to a gate. Once at the gate you may be asked to
side-pass the horse’s front feet into a hole in order to
be close enough to reach the latch.
Siding-passing to or from a mailbox is a common obstacle. There will be
much more technical work on all of these maneuvers in
Course Two of Ride Competitive Trail to Win.
Side-passing
needs to become one of your favorite warm up maneuvers in the arena or going
down the driveway. And…….you guessed it, it ultimately needs to be done with your
horse’s body perfectly straight, except for the slight tip of his nose into the
direction you are side-passing. As with
all exercises, they may be intimidating and unattractive in the beginning, but
when you begin to improve, you’ll know it was worth the repeated effort.
Most horses when
learning to side-pass will want to lead with either a shoulder or a hip; in
doing so they are angled enough that one of the shoulders or one of the hips is
ahead of the rest of the horse. This is
very easy to recognize if you view the horse directly from the back or the
front. Don’t let this incorrect movement
get started; it won’t do you any favors in scoring points. (Keep in mind that only western horses are
taught to side-pass. So, if you’ve been riding
English, you’ve been advised to allow the horse to move forward while moving
sideways, a maneuver called a “half-pass”.
Horses used to doing that will take a little
more practice with the true side-pass.)
However
the “half-pass” is the ultimate correct body position for a true side-pass, all
you have to do is eliminate the forward motion.
Here is a video of the
Paint horse with six months of riding.
Side-passing was the most difficult maneuver for him.
Insert utube videos: MOV076 .35 seconds and MOV072 .27 seconds
Note
that the horse is chewing on the bit because he feels stressed,
and note that his nose is forward of the vertical which is not
ideal. However, he is side-passing
willingly and straight! With continued
proper practice, a year later his side-passing was much more fluid and
collected on a loose rein.
Western pleasure
trainer Mark Shaffer, based in Texas, makes the foundation of his training
program backing, side-passing, and pivoting on the forehand and haunches. Shaffer has a two part
DVD series called “Mechanics N Motion Pro Series # 1. There are some awesome exercises in this
series that improve your competitive trail performance by helping your horse
learn to move with “balance.” Mark
Shaffer also believes in straightness and his program will enhance your jog and
lope, which are becoming more and more requested in competitive trail. You can check out Mark Shaffer’s website at www.markshaffershowhorses.com
In the AQHA sanctioned
Trail Challenges a jog is required in level 2 and the lope is required in level
3 and it isn’t necessarily worked into the pattern on level ground. Frequently you will be required to jog or
lope through water, up or down a hill or muddy bank or over an obstacle.
Practice what you see
in training DVDs and the videos in this course in your “minds-eye”, where you
can always practice perfectly. If you
are working with a professional instructor, you may find it helpful to have him
or her watch training videos with you.
The views and suggestions of other video trainers make great material to
be discussed and digested during your riding lessons.
WHOA………….DOES NOT MEAN; MAYBE OR IN JUST A MINUTE
The word “Whoa” and the
cues that accompany “whoa” do not give a green light to the horse to stop with
the next few strides. The word “Whoa” is
not a yellow light that means maybe we can stop if you want too.
The word “Whoa” and the
appropriate cues are and should be a definite red light.
You never know when you
or your horse’s life might depend on the stop and wait. And even if it is never life threatening,
not stopping and standing still is just rude and makes for a crummy ride or
training session. Stopping and waiting
are the rider’s responsibility to enforce.
Your halt needs to
balanced and square with your horse’s weight shifted to his hindquarters; or
your horse’s body will not be positioned for the next task or transition.
When competing in
mountain trail you may have to halt on a bridge and wait for five seconds or
halt with just one front foot over a log and wait several seconds. You could be asked to stand quietly next to a
noisy waterfall while reaching out to fill a paper cup with water which the
judge will measure when you get to the bottom of the hill.
If your horse isn’t
willing to stop and wait quietly, you’ve lost points and didn’t get much water
in your cup.
Most trainers recommend
that the very first command a horse learns is to stop. Horses should stop on command when being led,
when working on a lunge line and when be ridden at any gait.
An immediate stop is a
requirement.
MOUNTING AND DISMOUNTING AND
WAITING PATIENTLY
Mounting and
dismounting a horse that stands quietly is a tribute to his rider/trainer. A horse should always standstill to be
mounted or during the dismount. Insist
on it every time you mount or dismount.
Many times
a competitive trail pattern will require a mount and dismount. There are accommodations for riders with
physical handicaps. You may not have a
major handicap, but you may have bad knees, sore hips
or lack some fitness, still you must be able to mount and dismount a horse that
stands still. Practice until perfect.
Nearly 80% of riding
injuries happen during the mount or dismount.
Why? Because the horse did not
stand still and wait patiently on his rider.
Spend a lot of time
demanding your horse standing patiently, anywhere you put him.
You’ll also want to
practice mounting and dismounting from the “off” or right side of the horse; it
might be required in pattern.
I expect my horses to wait for me, anytime, anywhere, in any
circumstance. It is a steadfast rule and
if you break your own rule, that horse will forever be optimistic that you’ll
let him break the rule again sometime.
Practice mounting and
just standing. Don’t ask or allow the
horse to move. Just sit and make the
horse wait. When you decide to move away
from the mounting area, don’t do it by moving forward. Instead back in a
straight line and then do pivot on the haunches, stop and wait, then ride
forward. These types of maneuvers are
things you need to be practicing.
Side-pass away from the
mounting block, back up and ride off a few steps stop and wait, pivot on the
forehand, etc. You get the picture;
instill in your horse’s mind that moving away from the mounting block does not
mean that he is going anywhere; it means he is going to listen to you.
Then there is my
favorite, backing around the mounting block, both directions.
Assignment:
In
an arena or on open ground in your pasture, make a large square using four
cones. (Make a smaller square when you
want to increase the exercise difficulty.)
Ride the square on the outside of the cones
and make your straight lines as straight as possible. Next ride the square lines straight, but
circle around each cone before making another straight line, make your circles
as precise and round as you can, so that the cone becomes the center of your
circle.
Ride
both directions. Start practicing at
the walk, and then do the exercise at the jog.
Please send me a video of all of your pattern work that you can perform.
If, this was an easy task for you and your
horse and you are comfortable with it, secure your reins to your saddle horn
and perform the pattern with no hand use of the reins, riding strictly from
your seat and legs. (Send me a video of
you riding without holding the reins.)
Using
a mounting block, steps, tree stump or log, make a separate video showing a
mount and dismount from both sides of the horse. Pretend you are at a competition; let’s see
how you would show what you’ve got to the Judge.
Load
your videos to YouTube or Vimeo and email me a working link. (You can create an account on these types of
sites for free, with your own password). Email to; vzapel@hotmail.com
After
riding the cone pattern and viewing your own video; write an essay explaining
what you discovered about your:
1. Cueing sequence to the horse, what cues
did you apply for the result you wanted and in what order did you apply them?
2. What was your horse’s response?
3. What are two of your cues that need a
better response from your horse?
4. How do you think/plan to improve those
cues and horse response?
5. What is your opinion of your mount and
dismount?
6. If you could change something about it, what
would it be?
Please submit your
assignment to: Vikevon7@gmail.com
Remember to include
your full name and email address on the document.