Training Performance Horses
By
Don Blazer, with Instructor Eleanor Blazer
Lesson Two
GROUND WORK AND LUNGEING
* Reference:
Chapter 5: “Nine Secrets of Perfect Horsemanship”, The Six Elements of Training
Confrontation is a requirement for learning.
From the first contact with man, it has been confrontation, followed by compliance, which establishes the basis of communication between horse and handler.
The first confrontation may come with the minutes-old foal when the handler begins the imprinting process. At some moment, the foal will struggle, will be confronted by the handler’s power and restraint, and will find the greatest comfort results by ceasing to struggle. Instantly, we have two of the six elements of training in action. The second element of horse training is COMMUNICATION (which is essentially all that training is), and the third element is COMPLIANCE THROUGH NON-RESISTANCE.
All of the horse’s learning should be based on the principle of a confrontation which leads to an understanding of the request and is followed by the expected performance. Confrontation does not mean force or war, but is simply an objection expressed as a jerk on a lead line, the tap of a heel by a rider or a bump of the reins when the horse attempts a wrong response.
A horse just learning communication may respond to a request, and the response may be correct or incorrect. If the response is correct, the horse may be praised and enjoy the praise, but will not have learned that any other response is wrong. The horse that responds incorrectly is immediately faced with a disciplinary action which communicates to him he did not do the right thing. The horse must search for the correct response. Each incorrect action leads to another confrontation until the horse discovers the correct performance and is rewarded with praise. Repetition of such requests and responses results in the establishment of a common language and understanding--horse training.
Confrontation should never be severe or abusive. However, a willful disobedience by a schooled horse should invoke a sharp, immediate, attention-getting and memorable punishment. (The idea of horse training is to improve the horse as a useful partner in performance, not demonstrate ego-driven dominance).
Meeting for the first time, trainer and horse may not share a common vocabulary. First attempts at request and response are a discovery period in which both partners learn something about the other.
And it is an excellent idea to establish immediately who will be doing the asking and who will be doing the responding. Horses love to know where they fit into the scheme of things. They don’t mind being first, last or somewhere in-between. They just want to know where they belong.
Deciding what to do and asking that the horse do it is the trainer’s responsibility.
Responding quickly, smoothly and without resistance is the horse’s responsibility. And a great place to get started is with consistent groundwork and a 30-foot lunge line.
But before you take the horse to the arena for lunge work, remember that everything and anything a trainer does while he is on the ground is observed by the horse. Every experience a horse has is a training session, so the trainer must be sure his actions are logical, understandable to the horse and don’t cause fear. Horses do not learn language skills well when they are afraid.
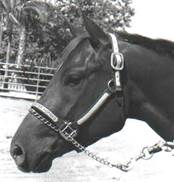
Always place a chain over the horse’s nose. Use of
the chain may never be needed, but it is there when the unexpected occurs.
Halter breaking should start when the horse is very young. Most experienced horsemen believe the foal should be introduced to a halter and leading when still only several days old. The teaching should be very gentle and the foal should be given plenty of time to understand the idea of moving toward a pressure--that applied to the halter lead.
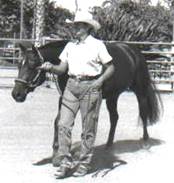
Always make a horse walk up next to you. You
should be positioned between the horse’s head and his shoulder.
The more help you can give the foal, the better, so the use of a rope around the foal’s hindquarters to in effect "push" him forward from behind is recommended. With only a few quiet, easy sessions, the foal will learn to move forward to the pull of the halter lead, and give in whichever direction the handler wishes to go.
When leading a horse, the horse should be kept up next to the handler. The horse’s head should be just in front of the handler’s shoulder. The horse should move along at the speed of the handler, neither jumping forward nor lagging behind. The handler should always hold the lead about 16 to 18 inches from the attachment to the halter, then the handler will be able to keep the horse close at hand. Never lead a horse at the end of a long shank or lead line.
When stopping the horse, give a verbal command, "Ho," then a light jerk on the lead. The horse should stop. If the horse does not stop the command should be given again, followed by another jerk on the lead. This action should be repeated again and again, until the horse obeys. The horse should learn to stop and stand quietly before going on to other lessons.
Other ground lessons include standing tied to be groomed and allowing the handler to pick up all four feet and clean them.
The young horse should practice his ground manners daily, and each day’s lesson should reinforce all previous lessons.
It is while on the lunge line the young horse is first taught to drive with his hindquarters (ALL ACTION INITIATES IN THE HINDQUARTERS--the first of the six elements of training), and is introduced to lateral flexion, which results in the spinal arc so necessary for a good performance.
Confrontation and its result--the horse’s understanding of a request--are the true goals of lunge line work. By using the lunge line, the handler can request a particular movement from the horse, help the horse to respond correctly, or confront the horse’s improper response.
Lungeing a horse requires the handler’s careful attention. Carelessness, or lack of understanding about the purpose and use of the lunge line, can easily result in wasted efforts.
To use the lunge line properly, the handler must first know what lungeing should and should not do.
The lunge line is not a free exercise line. You are not lungeing the horse if you take him to a round pen or corral and chase him for 10 minutes. Not only is it a waste of time, but it has the horse moving too fast without a warm-up, as well as teaching him that undisciplined speed is acceptable.
Conversely, if you let the horse "dog along" on the lunge line, that’s a waste of time too, as the horse is not using his body. He’s also learning no effort on his part is required.
The best uses of the lunge line are: 1) gain control over the action of the horse; 2) request and get a particular type of movement; 3) give the horse beneficial exercise.
Young horses are taught to lunge as the first step in preparation for being ridden. On the lunge line you have control over the action of the horse, so the horse can quickly and properly by schooled to walk, trot, canter and stop. When they have mastered those commands, the young horse can be lunged with bridle and saddle, and the handler still has control over the horse’s action preventing bucking, pitching or attempting to rid himself of the equipment.
Older horses are worked on the lunge line so I can get an idea of how they handle themselves and how disciplined they are. Again, on the lunge line, I have control over their actions.
Young or old, the lunge line is an excellent place to practice requesting and getting the proper response. Training is teaching a language, and whether verbal or from body positioning, the lunge line affords an excellent opportunity to repeat and praise the right response, or repeat and correct the wrong response.
As a means of exercising the horse, the lunge line does the best job when used as a warm-up procedure before a show or before a training session. The horse may have been hauled a long distance and may be a little stiff. On the lunge line he can get the kinks out and loosen his muscles before being asked for more strenuous work.
As a method of regular exercise, the lunge line aids in supplying the horse, giving him better balance and providing him with a small amount of work to strengthen muscles.
I use the lunge line with every horse. I continue to use the lunge line throughout a horse’s training. With some horses, the line is used nearly every day. With others, it may be employed infrequently.
Used properly, the lunge line supples a horse and helps give him the desired and required spinal arc necessary for good balance. It also helps a horse learn verbal commands, helps him to learn to carry weight, and helps him to learn to give to the bit and collect while in motion. The lunge line is also an excellent tool to use when correcting bad habits or re-schooling a spoiled horse.
To begin lunge line training, you will need a length of cotton rope at least 25 feet long with a lead chain and snap on one end. The chain should be at least 24 inches long. You can also use a manufactured lunge line, adding a chain and snap if not already there. You should use a training whip with horses learning about the lunge line, and you should wear gloves.
Lead your horse to your working area, be it a round pen or large arena.
Controlling the young horse is the first requirement of lunge line work. It is nearly impossible to hold the horse which bolts or tries to run off unless you have the advantage of extra leverage. To provide the needed advantage, I simply put a halter on the horse, run the lunge line chain through the left side ring, take the chain over the horse’s nose, through the right side ring and then up to the halter ring which attaches to the halter crown piece. When snapping the chain, keep the snap lever away from the horse’s skin. * As part of the assignment you will be sending a video of lunging your horse – it will be expected that you have the chain over the nose during the demonstration. So use it during the training sessions.
Drive the horse
forward by remaining behind his natural balance point.
In this position you will start the horse moving to the left, secure in the knowledge that a sharp jerk on the line, and the verbal command to "ho" should stop any bolting attempts.
Standing in the center of your lungeing area, you want to start the horse moving in a circle around you. Hold the rolled loose end of the lunge line in your left hand and the lunge whip in your right hand. You should be close enough to the horse to be able to tap him gently on the hind legs with the lunge whip.
* Do not wrap
the line around your hand, fingers, arm, body, or allow it to become tangled
under your feet.
To get the horse to move forward, it is necessary for you to move slightly toward the horse’s hip while giving the verbal command to walk. Touch the horse with the whip low on the left hind leg. Don’t make fast movements with the whip, but if the horse should turn toward you, you can lift the whip and touch the horse on the shoulder or neck to push him away.
Do not back away from the horse. Always move toward him and drive him forward. Keep back far enough so if he kicks out you will not be struck.
As the horse starts to walk, you will have to control the length of the line. Give him more line if he is enlarging the circle; gather the line if he is moving closer to you. Continue telling the horse to walk, and keep facing his hindquarters. You must stay behind the horse’s natural balance point, which is just above and behind his left elbow. If you move forward of the balance point, you will block the horse’s forward path and actually be telling the horse to stop.
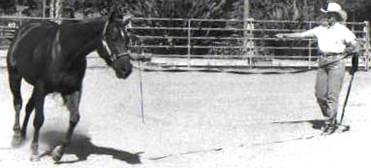
The lunge whip is an extension of your arm. Drive
the horse forward by moving toward his hindquarters.
Using the whip as an extension of your arm, keep pushing the horse away from you by touching him on the shoulder or side, then continue tapping him on the hind legs to drive him forward. If the horse jumps, bolts or tries to pull away, jerk the line and tell him to "ho." When he settles, begin the instruction again. Praise him as he walks forward, and be sure he gets verbal praise and a pat when he stops on the command, "ho."
If you keep moving toward the hindquarters and tapping the horse lightly, low on the hind leg, he’ll eventually get the idea he is supposed to move forward. Sometimes it seems no matter what you do, the horse keeps turning his body so he is facing you rather than you standing at his side. To correct this, you must get the horse to stop and stand still upon the verbal command, "ho." On occasion this lesson may take 10 or 15 minutes. Do not get frustrated and try to force the horse into compliance. Patience and practice will accomplish the task. Take your time.
By the time you get the horse moving forward on command, you will recognize your communication effort has gone through confrontation, has been processed, understood, and acted upon. You have successfully started the process of training a horse.
If the horse is not quiet, jumps away, tries to run off, or is fearful of the whip, you must bring him to a standstill, then quiet him so the correct procedure can be initiated.
When the horse is moving well at the walk, give a tiny tug on the lunge line to bump the horse’s nose toward the center of the circle. After the tug, immediately release the line. If the horse brings his nose in, he’ll begin to arc and move around the circle. If the horse does not respond, he’ll try to move in a straight line and stiffen his body. Use a little more forceful tug until the horse’s nose is turned inward, then release. Never maintain a constant pull on the lunge line.
Keep pushing the horse along with the whip. Do not lose your patience and do not strike the horse with the whip. Only use the whip to tap on the lower part of the rear legs, or on the shoulder or side as an aid to keep the horse from moving in toward you.
Once in a while, if you are working with a spoiled horse or a pet, a good stinging snap from the whip is required. Undisciplined horses need stronger confrontations.
The key to starting a horse on the lunge line is patience, coupled with your persistent movement toward the horse’s hindquarters. Too many people want to back away from the horse to increase the circle or shorten the lunge line. Don’t get out of position. Keep facing the horse’s hindquarters and keep moving toward the horse. Give cues consistently, but don’t expect immediate results. Take your time. Progress will be faster if you allow the lessons to move along slowly.
When you tell the horse to "walk," give him a moment to respond before touching him with the whip. If he moves off properly, be sure to praise him and keep your position behind his balance point.
Sooner, rather than later, the horse will begin looking off in all directions, particularly if he is young. This is where the training really starts.
Keep the horse’s nose turned in slightly toward the center of the circle. Don’t jerk it in and try to hold it. Just tug gently, then immediately release the pressure. If the horse is carrying his head too high or too low, a light tug on the line will remind him to pay attention to the lesson. After a few days of consistent work, the horse will start to keep his head in the proper position most of the time, and he’ll start to work with his nose slightly toward the center. This is the beginning of suppleness (the fifth element).
If the horse tries to run off, you must jerk hard on the line. Jerk on the line several times so hard the horse is forced to face you. This will be his first hard confrontation while you are 25 to 30 feet away, and it will shock the horse a little. He won’t understand how it happened, and it may take a few more similar lessons to get the message across, but he’ll soon have some respect for the line. You must jerk the horse to a standstill the first time he bolts. Otherwise the opportunity will be lost and the next time he tries to leave, it will be much harder to hold him.
A horse on a lunge line has a little different point of view about things. If you were on his back, he could blame you for his troubles. But you aren’t riding him, so he really can’t blame you. All he can do is respect your verbal commands and the little tugs on the line.
Keep that respect. Teach him the lunge line is for work, and that you expect certain responses from him. He’ll soon learn if he doesn’t give the expected response, a confrontation will occur and will continue until he makes an attempt at compliance.
Give your horse plenty of time. Once you get him walking, confine his training to walking and stopping for a few days. Don’t try to wear him out. Too much lunge line work will sour the young horse.
To stop the horse, say "ho" and move your body to a position in front of the horse’s natural balance point. This will block the horse’s forward movement and effectively bring him to a halt. If the horse doesn’t respond correctly, give the verbal command again, followed by a jerk on the line. Repeat the verbal and physical commands as often as it takes until he understands the message and complies. Be sure you have moved to a position in front of the horse’s balance point.
It may take three or four tries to get the horse to stop, but he’ll soon get it. Praise him when he does. Walk to him and pet him on the head and neck, then go back to your original position and restart the colt at the walk. Repeat the stop command, and when he stops, praise him.
Keep in mind that “ho” means: STOP and DO NOT MOVE! Taking several steps after stopping is not acceptable. Do not allow the horse to turn and face you. Students who were exposed to Parelli’s techniques will have trouble with this, and will have to be firm with the horse.
Always work in both directions.
To change directions, you must change the lunge line attachment. Remove the chain, then replace it by putting it through the right side halter ring, over the nose and through the left side halter ring, and finally snap it to the left side ring at the crown piece.
Getting most horses to move to the right is normally more difficult. Use the same procedures as you did moving to the left, only add more patience.
Once the horse is walking, stopping and starting again without hesitation, progress comes quickly. You can go on to the trot or jog, and the lope or canter. At this point, I begin working the young horse with bridle and saddle. I get the colt accustomed to being saddled and bridled by introducing him to the equipment after his lunge work and while he is in his stall. Usually it only takes three or four days for the colt to be completely at ease when tacked.
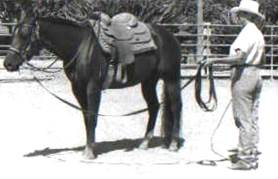
Once the horse
has accepted his equipment he can be lunged while bit-up.
To trot or jog, give the verbal command, then push the horse forward into the new gait by snapping the whip low and behind the hind legs. Do not hit the horse with the whip. Encourage him, but don’t punish him for not yet understanding the new command. Both the trot and jog are naturally faster than the walk, but that does not mean they should be performed with tension or excessive speed.
Once the horse has taken the new gait, keep him moving by using the whip in a circular motion coming up from behind the horse’s heels toward his shoulder.
The first time you get the horse to trot or jog, he will probably go too fast and be very tense. Let the horse slow down on his own. Don’t try to force him to slow by pulling on the lunge line. Keep the tug on the line as a reminder to bring his nose in toward the center of the circle, or as reinforcement of the verbal command, "ho."
The first few times you try to get the horse to lope or canter, he will probably start on the wrong lead, crossfire or break into a lope and immediately drop back to the jog. Keep working with the horse and give him at least five days of practice sessions to get the communication correct.
I try to keep the early training sessions to no more than 15 minutes. Do not get the horse overheated or end the session with a harsh discipline.
A horse will tell you when he has had enough by trying to stop on his own. Watch the colt’s breathing. It should not be too rapid. Do not work a horse into a sweat. Keep the horse relaxed and happy and always end with the horse giving a positive performance. Never think you must work a certain amount of time. The correct amount of work results in the horse showing some degree of understanding. No more work is needed.
I never worry about a horse being on the wrong lead or crossfiring. With a green horse, it is a sign of stiffness in the back. A few days of work will usually correct the problem. If, however, a horse wants to stay on the same lead all the time, check for lameness. Usually the horse will have a problem in the leg he wants as his leading leg.
After several weeks of lunge line work, the horse will be supple enough to bend his spine upward if you are encouraging a strong driving action by the hindquarters. The horse will also start to show some lateral flexion as he learns to follow his nose and work with a slight arc to his body.
Within a month’s time, the horse should be working well on the lunge line and should be showing flexion, suppleness and plenty of impulsion (the fourth element) if you are using the whip correctly. The whip is not used to strike the horse, but should sweep forward from a position below the hocks and should be brought up high on the horse’s shoulder. Use the whip in this manner when the horse needs just a bit more encouragement. If the horse is not inclined to put out much effort, snap the whip behind him. If striking the horse is required to get a response, the whip should hit the horse below the hocks on the back of the hind legs.
To teach the horse more advanced work, change the lunge line chain. Instead of having it over his nose, attach the chain to the ring under the jaw. Double the chain so it doesn’t swing too much. With the chain under the chin, the horse can reverse directions and move out again without a full stop.
Reversing without stopping is the foundation for teaching the rollback on the lunge line. The key is to tug the horse’s nose in toward you, while you step around the horse and move toward the hindquarters to drive the horse off in the opposite direction.
Review this video: http://www.horsecoursesonline.com/videos/reversing_longe_line.html
To teach rollbacks on the lunge line, ask the horse to walk, then to stop. Tug the horse’s nose into the center of the circle so the horse turns inward. As he does, move your position from his hindquarters past his head to his other side, and ask him to move off in the new direction. Work with him at the walk and trot until he changes directions quickly and smoothly. After a few practice sessions, it won’t be necessary to stop the horse before changing directions; you’ll simply give the verbal command, “reverse” and then begin the physical movement.
When he sees you change your body position, the horse will immediately move off in the new direction and he will have a single fluid movement--a rollback.
The whip should always be held in the hand nearest the horse’s hindquarters, so be sure to change the whip before asking for the rollback.
With practice, you can have the horse doing figure 8’s in front of you in less than two weeks. Don’t over work the horse at any exercise. About 20 minutes of lunge line work is plenty for even a well-conditioned horse.
The lunge line is also an excellent place to teach the horse to be careful with his foot placement. Working cavalettis or ground poles teaches the horse to be observant and to concentrate. While working ground poles, the horse can be taught cadence or timing as he negotiates a series of strides and regulated footfall.
By using the ground poles, the horse can be taught to jump small hurdles and to fold his knees properly.
The lunge line provides the opportunity to master the necessary basics in preparation for advanced training.
When lungeing the horse while tacked (run the irons up so they don’t hit his elbows; stirrups on a western saddle can be left in place), be sure the horse does not attempt to buck too much. It is not a good idea to let the horse learn to buck, even on the lunge line. Young horses not yet ridden will often attempt to buck the saddle off. They should be stopped immediately, and then restarted in a relaxed manner.
When carrying a bridle (young horses should always be started in a snaffle), the reins should be very loose. Do not force a young horse’s head into the vertical position by shortening the reins. The horse should be allowed to lower his head and break at the poll by driving his hindquarters forward. As the horse learns to develop more impulsion by driving from behind, his head and neck will naturally move into the correct position.
As the horse learns to carry the bit, the reins may be shortened slightly so the horse carries his head more to the vertical when he gives to the bit pressure. Shortening the reins should be done slowly so the horse learns to put his head more into the vertical without ever experiencing discomfort.
Lungeing the horse while he is saddled and carrying a bit teaches him balance and starts him toward collection (the sixth element) while in motion by helping him to move his balance point rearward. By now the horse should be following his nose, thus being more supple and better able to carry a rider. You want your horse to have an arc from the poll to the croup, and you’ll get it quicker with the aid of the lunge line.
To correct a spoiled horse or re-school one, you may have to jerk on the lunge line a little more severely while the chain is over the nose. This will certainly get his attention and keep his mind on his lessons.
When you need to discipline a horse, do it…and be sure it counts. If discipline is required, then it must be done, and it must be forceful enough to gain the horse’s respect of your ability to take control.
Confrontation is a requirement of learning.
Initially the lunge line helps teach communication and provide the small confrontations necessary to basic schooling. The lunge line also helps the horse become more flexible and helps develop spinal arc.
Advanced lunge line schooling takes the horse into the realm of collection and it provides healthy exercise while the horse learns to carry himself in perfect balance.
Assignment:
1. Please send a picture of your horse prepared to start lunging, with the proper fitted halter and lunge line (chain over the nose).
2. Before advancing to lesson three, a video must be submitted of you lunging your horse in both directions, at all three gaits and stopping on cue. You can send two videos – one in each direction, please keep them short – no need to keep the horse going forever.
Show: (1.) Transition from walk to trot/jog.
(2.) Transition from trot/jog to canter/lope.
(3.) A stop at each gait, with the horse coming to a complete stop - not coming into you and not taking more steps. You should go to the horse when done lunging – do not allow him to come in to you.
Be sure you are in the correct lunging position, and the horse is travelling in a collected manner with the nose tipped slightly in or at least straight (not counter-arced).
Feel free to send videos as you work toward the final video to show progress and request advice. Be sure to let me know when it is the final video for grading. elblazer@horsecoursesonline.com