TEACHING TECHNIQUES
LESSON
In your prerequisite course, Instructor Role
and Responsibility, you were given a quick overview of safety within your
teaching facility. In this lesson, the
focus is on your new client and how he or she should handle horses for safety’s
sake. While you may be very aware of the
information that follows, your client may not be. You can’t get “too basic”, and nothing can
put an end to your teaching business quite as fast or permanently as a
“negligence” law suit.
Going over the material in this lesson
makes a good “opening” lesson for “first time” students.
Impress upon your novice riding students
that horses are not 1,000-pound dogs.
Horses react very quickly to outside
stimulation. They will run from
something that frightens them. Once a horse reaches what is thought to be
safety, he’ll usually stop, turn and look at the perceived monster. If a human happens to be between him and
safety, he won’t hesitate to run over the person. Your students must be alert at all times.
Be sure your students know that all
horses kick. If a horse is startled, a
kick may quickly follow. Horses will
kick in play or aggression.
When a student is grooming a horse, if
a tool is dropped, never allow the student to bend over to pick up the
item. They should use their foot to move
it to the side, into a safe zone before retrieving it.
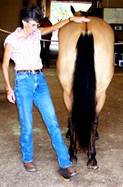
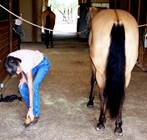
Move the brush from
behind horse.
Now pick it up.
Students must be taught that if a horse
is to be approached from the rear –the student should speak first. A firm “whoa” when approaching a horse from
the rear may avoid a kick. When walking
behind a horse, the student should either stay very close to the hindquarters,
with a hand on the rump, or move into an area beyond the reach of a fully
extended kick.
Walk
close to the hindquarters with a hand on the rump.
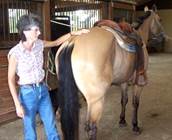
Caution students that when approaching a
horse from the front, they should never run up to the horse. They should walk quietly and speak in a calm
voice so the horse is aware of the person.
Approach him to the left or right of center – toward his shoulder is
best; explain to the student the horse has vision problems, due to set of the
eyes and having both monocular and binocular vision at the same time. Do not extend your hand directly toward his
face or muzzle; place a hand on his shoulder, while saying “whoa”.
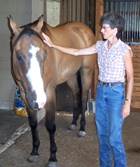
Approach
a horse from the side.
Never allow a student to be with a loose
horse. It is very dangerous to be in a
pasture with a loose horse…it is even more dangerous if there are several horses. The risk of being run over or kicked is very
high when horses are running free.
Carrying a long stick or whip will help the student to keep the horses
back. Never allow a student to carry
grain or hay while in a pasture with a loose horse…this is sure to get the
student hurt.
Caution students to beware; horse do
bite. Horses must complete the biting
act. Once a horse starts to close his
mouth the action must be carried through – he cannot open his mouth in
mid-bite. In addition to this, if a
horse has been disciplined many times, he may bite and jerk away…this can leave
a nasty wound or bruise.
Students should be made aware that horses
will reach out and try to bite. Students
should be alert when walking down the aisle way of a barn where horses are
hanging their heads out of the stalls. Have a short lesson to teach students to
read a horse’s body language.
Horses will usually send signals before
committing an act. It is important students
learn these signals and know how to re-act to them.
The most obvious form of horse
communication involve the ears. A horse with his ears pinned back against his
head is an aggressive horse. It is not
be a good idea to approach this horse with an extended hand – a finger might be
lost.
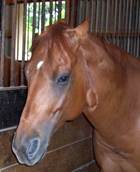
Ears
back; Stay away!
A cocked back leg accompanied with
pinned ears is sure to be followed by a kick.
Browse around the Internet or look at
a book with pictures of people 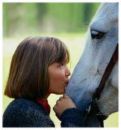 interacting
with horses. Invariably you will see a
photo of a girl kissing a horse on the end of the nose. This is a great way to get a broken nose or a
few loose teeth. The bone within a
horse’s head is extremely hard. If the
horse being kissed flips his head, the kiss will quickly be forgotten. Students can show affection for a horse by
scratching him along the withers.
interacting
with horses. Invariably you will see a
photo of a girl kissing a horse on the end of the nose. This is a great way to get a broken nose or a
few loose teeth. The bone within a
horse’s head is extremely hard. If the
horse being kissed flips his head, the kiss will quickly be forgotten. Students can show affection for a horse by
scratching him along the withers.
Never allow students to tie themselves
to a horse in any way, or to wrap the end of the rope or reins around their
hands. There are times when getting away
from the horse is the best thing for all concerned.
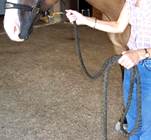
Lead
rope held properly; not wrapped around hand.
Teach students the correct way to lead
a horse. When leading a horse, the
student should walk next to him, with his throatlatch opposite the student’s
shoulder. Do not allow students to walk
directly in front of a horse. If the horse is behind the student and something
spooks him he can jump directly into the person. Hold a short lesson on proper leading.

Proper
leading position – next to the throatlatch.
Protective clothing is a must.
Boots are not a fashion statement;
they serve a purpose. The leather
provides a protective barrier between a hoof and a toe. Granted being stepped on will still hurt, but
less damage will result if the student is wearing boots rather than tennis
shoes or sandals. Footwear designed for
riding can keep the foot from sliding through the stirrup or iron.
 Riding helmets have been discussed
in-depth in all horse riding disciplines.
It all comes down to one fact – they do save lives. It is recommended an
Riding helmets have been discussed
in-depth in all horse riding disciplines.
It all comes down to one fact – they do save lives. It is recommended an
Gloves are not mandatory, but can
protect hands while working around horses.
The feeling of having a lead rope slide through bare hands is very
unpleasant even if the student doesn’t suffer severe rope burns.
PART TWO: THE HORSE’S SAFTEY:
Horses are large animals and have a
flight instinct; when frightened, they run.
These two characteristics make dangerous situations worse. Impress those facts upon your students, and
keep them in the forefront of your thinking.
Your school horses are actually the
source of much of your income…even if you don’t see it in the form of cash or
checks. Protect your investment and your
future income.
Your
horse’s surroundings must be horse-proof.
Stalls, fences, pastures and passageways must be structured and
maintained with your horse’s safety in mind.
You must be observant at all times - repair, remove and avoid unsafe
situations.
Stalls and pastures should not have
protruding boards, nails or other objects that can harm your horse. Construction gaps large enough to allow the
insertion of a foot or head must be repaired.
Feeders and waterers should be horse safe. The stall flooring should be textured so your
horse can stand without slipping (rubber mats or clay is best – avoid
concrete).
Passageways or barn aisles should be
clear and wide enough for you and your horse to pass safely. Tools, such as wheelbarrows and manure forks,
should be put away.
Latches on doors and gates should be
latched back so your horse cannot be injured when passing by. Make sure the door or gate is open all the
way before leading the horse through.
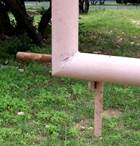
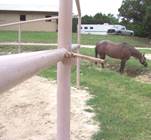
Dangerous gate latch. The same gate; handle not locked down.
Common
sense around horses is an important virtue.
When around horses, everyone must be alert and aware of their movements
at all times. If someone puts you or your
horse in a situation you feel is unsafe, do not be shy, speak up and protect
yourself and your horse. You must learn
to see what students are doing even when they are behind you.
FACILITIES:
It’s advisable
to teach beginner and inexperienced riders in an enclosed area; indoor arena or
outdoor schooling area with suitable, all-weather footing.
It is always a good idea to have
students—especially a group—lead horses to the riding area, and then mount
there under the supervision of the instructor.
After the lesson, the student or students should dismount while you
watch, then lead the horse back to the grooming area. You may wish to have the students bathe and
groom the horses before they are returned to their stalls or pens, or you may
simply want to have your staff perform such “after work” care.
The riding area should be well
maintained and gates should be “closed” during riding lessons.
There should be no unnecessary
equipment within the lesson area. Jumps,
ground poles, cones, etc that will not be used in the current lesson should be
removed.
The facility should be well
maintained. Anything lying on the ground
not being used should be considered “trash” and removed. A clean, neat facility is extremely important
in both impressing prospect clients and in protecting you from “negligent
liability.”
SUITABLE
MOUNT:
Your
prerequisite course discussed “lesson horses,” so this is just a reminder:
Size of horse should be appropriate to
the size of the rider. Avoid putting a
tiny rider on a big horse no matter how good the rider may suggest she is. And, of course, don’t put a very large rider
on a small horse.
The horse should be easy to get to
move forward, turn and stop.
The horse should be as “close to
bomb-proof” as is possible. No horse is
“bomb-proof”, but try to maintain calm, quiet, unflappable lesson horses.
Overcoming the “fear” factor is the
first step in presenting a good riding lesson; selecting the right horse for
the rider is paramount to reducing “fear.”
Once students have had several lessons
and are showing progress, put them on different horses. It is a bad idea to have students wanting to
ride only their “favorite” horse. When a
rider gets too familiar with a horse they tend to get careless with that
horse. The riding student should always
feel there is a bit of a challenge to riding the horse.
CLASS
SIZE
It will be incumbent
upon you to decide how many students you can teach at a time and be both safe
and effective. One of the first
considerations should be the size and configuration of the area to be used.
You
will also have to decide which students can work together during the same
lesson. Always try to keep students of
equal skill working together; don’t put experienced riders in a class with
novice or beginning riders.
As
the instructor, it is up to you to choose the work the horse and rider will
do. Before writing or deciding on a
lesson plan, assess the rider or riders for competence and mental capability.
The
kinds of lessons you teach on a specific day should be influenced by the
weather, which will undoubted affect the horses, the size of the arena, the number
of students and their skills and your own subject range. (Don’t try to teach flying lead changes if
your horses and riders are having difficulty mastering the correct lead.)
Finally
the choice of work must be within the physical abilities of both the horse and
rider.
BEING
IN CONTROL:
Undoubtedly
there will be times when observers—parents, other relatives, friends, or just
interested spectators—will think they can add to or suggest how you should
conduct your lesson.
As the instructor, you are ultimately
responsible for how any lesson is conducted or progresses and you can be held
accountable for any incident that may occur during the lesson. If you surrender that responsibility (do
not allow pressure from observers to cause you to do so) you can be held
accountable for any injuries sustained in an accident.
While it may be difficult to be
assertive, yet polite to observers, you must always maintain authority over
your riders. That doesn’t mean that
you can’t listen to requests or discuss the possibility of specific exercises
for a lesson. But it does mean that
your judgment is always binding and final.
It can be helpful is observers are
requested to abide by a set of rules:
observers may watch from a designated area, observers may not
communicate with students during a lesson, observers may not vocalize their
opinions during a lesson, children watching with adults must be quiet and
behave in an acceptable manner.
Be
as safe as possible, but don’t let your concern for safety become so
overwhelming that it becomes a detriment to your teaching or makes students
worry and lose confidence.
Your
students expect to be challenged and to improve their riding skills…after all,
that is the promise you made to them when you presented yourself as a
professional riding instructor.
Assignment:
1.
Write a lesson plan
outline of how you would start with a new student who has no equine background.
2.
List what safety issues
you would present to the student.
3.
Explain what type of
attire you would require the student to wear.
Please
send your work to: elblazer@horsecoursesonline.com
Be sure to include your complete name
and email address on all your reports.